
honcho
Memory library for building stateful agents
Stars: 347
Honcho is a platform for creating personalized AI agents and LLM powered applications for end users. The repository is a monorepo containing the server/API for managing database interactions and storing application state, along with a Python SDK. It utilizes FastAPI for user context management and Poetry for dependency management. The API can be run using Docker or manually by setting environment variables. The client SDK can be installed using pip or Poetry. The project is open source and welcomes contributions, following a fork and PR workflow. Honcho is licensed under the AGPL-3.0 License.
README:


Honcho is an open source memory library with a managed service for building stateful agents. Use it with any model, framework, or architecture. It enables agents to build and maintain state about any entity--users, agents, groups, ideas, and more. And because it's a continual learning system, it understands entities that change over time. Using Honcho as your memory system will earn your agents higher retention, more trust, and help you build data moats to out-compete incumbents.
Honcho has defined the Pareto Frontier of Agent Memory. Watch the video, check out our evals page, and read the blog post for more detail.
With Honcho you can easily setup your application's workflow, save your interaction history, and leverage the reasoning it does to inform the behavior of your agents
Typescript examples are available in our docs.
- Install the SDK
# Python
pip install honcho-ai
uv add honcho-ai
poetry add honcho-ai- Setup your
Workspace,Peers,Session, and sendMessages
from honcho import Honcho

# 1. Initialize your Honcho client
honcho = Honcho(workspace_id="my-app-testing")

# 2. Initialize peers
alice = honcho.peer("alice")
tutor = honcho.peer("tutor")

# 3. Create a session and add messages

session = honcho.session("session-1")
# Adding messages from a peer will automatically add them to the session
session.add_messages(
    [
        alice.message("Hey there — can you help me with my math homework?"),
        tutor.message("Absolutely. Send me your first problem!"),
    ]
)- Leverage reasoning from Honcho to inform your agent's behavior
### 1. Use the chat endpoint to ask questions about your users in natural language
response = alice.chat("What learning styles does the user respond to best?")

### 2. Use session context to continue a conversation with an LLM
context = session.context(summary=True, tokens=10_000)

# Convert to a format to send to OpenAI and get the next message
openai_messages = context.to_openai(assistant=tutor)

from openai import OpenAI
client = OpenAI()
response = client.chat.completions.create(
  model="gpt-4",
  messages=openai_messages
)

### 3. Search for similar messages
results = alice.search("Math Homework")

### 4. Get a session-scoped representation of a peer
alice_representation = session.representation(alice)
This is a simple example of how you can use Honcho to build a chatbot and leverage insights to personalize the agent's behavior.
Sign up at app.honcho.dev to get started with a managed version of Honcho.
Learn more ways to use Honcho on our developer docs.
Read about the design philosophy and history of the project on our blog.
The Honcho project is split between several repositories with this one hosting the core service logic. This is implemented as a FastAPI server/API to store data about an application's state.
There are also client SDKs implemented in the sdks/ directory with support
for Python and TypeScript.
Examples on how to use the SDK are located within each SDK folder and in the SDK Reference
There are also documented examples of how to use the core SDKs in the API Reference section of the documentation.
Sign up for an account at https://app.honcho.dev and get started with $100 free credits. When you sign up you'll be prompted to join an organization which will have a dedicated instance of Honcho.
Provision API keys and change your base url to point to https://api.honcho.dev
Additionally, Honcho can be self-hosted for testing and evaluation purposes. See the Local Development section below for details on how to set up a local version of Honcho.
Below is a guide on setting up a local environment for running the Honcho Server.
This guide was made using a M3 Macbook Pro. For any compatibility issues on different platforms, please raise an Issue.
Honcho is developed using python and uv.
The minimum python version is 3.9
The minimum uv version is 0.4.9
Once the dependencies are installed on the system run the following steps to get the local project setup.
- Clone the repository
git clone https://github.com/plastic-labs/honcho.git- Enter the repository and install the python dependencies
We recommend using a virtual environment to isolate the dependencies for Honcho
from other projects on the same system. uv will create a virtual environment
when you sync your dependencies in the project.
cd honcho
uv sync
This will create a virtual environment and install the dependencies for Honcho.
The default virtual environment will be located at honcho/.venv. Activate the
virtual environment via:
source honcho/.venv/bin/activate- Set up a database
Honcho utilizes Postgres for its database with pgvector. An easy way to get started with a postgres database is to create a project with Supabase
Alternatively, a docker-compose template is available with a sample database configuration.
To use Docker:
cp docker-compose.yml.example docker-compose.yml
docker compose up -d database- Edit the environment variables
Honcho uses a .env file for managing runtime environment variables. A
.env.template file is included for convenience. Several of the configurations
are not required and are only necessary for additional logging, monitoring, and
security.
Below are the required configurations:
DB_CONNECTION_URI= # Connection uri for a postgres database (with postgresql+psycopg prefix)

# LLM Provider API Keys (at least one required depending on your configuration)
LLM_ANTHROPIC_API_KEY= # API Key for Anthropic (used for dialectic by default)
LLM_OPENAI_API_KEY= # API Key for OpenAI (optional, for embeddings if EMBED_MESSAGES=true)
LLM_GEMINI_API_KEY= # API Key for Google Gemini (used for summary/deriver by default)
LLM_GROQ_API_KEY= # API Key for Groq (used for query generation by default)
Note that the
DB_CONNECTION_URImust have the prefixpostgresql+psycopgto function properly. This is a requirement brought bysqlalchemy
The template has the additional functionality disabled by default. To ensure that they are disabled you can verify the following environment variables are set to false:
AUTH_USE_AUTH=false
SENTRY_ENABLED=false
If you set AUTH_USE_AUTH to true you will need to generate a JWT secret. You can
do this with the following command:
python scripts/generate_jwt_secret.pyThis will generate a JWT secret and print it to the console. You can then set
the AUTH_JWT_SECRET environment variable. This is required for AUTH_USE_AUTH:
AUTH_JWT_SECRET=<generated_secret>- Run database migrations
With the database set up and environment variables configured, run the migrations to create the necessary tables:
uv run alembic upgrade headThis will create all tables for Honcho including workspaces, peers, sessions, messages, and the queue system.
- Launch Honcho
With everything set up, you can now launch a local instance of Honcho. In addition to the database, two components need to be running:
Start the API server:
uv run fastapi dev src/main.pyThis is a development server that will reload whenever code is changed.
Start a background worker (deriver):
In a separate terminal, run:
uv run python -m src.deriverThe deriver generates representation, summaries, peer cards, and manages dreaming tasks. You can increase the number of deriver's to improve runtime efficiency.
Honcho uses pre-commit hooks to ensure code quality and consistency across the project. These hooks automatically run checks on your code before each commit, including linting, formatting, type checking, and security scans.
To set up pre-commit hooks in your development environment:
- Install pre-commit using uv
uv add --dev pre-commit- Install the pre-commit hooks
uv run pre-commit install \
    --hook-type pre-commit \
    --hook-type commit-msg \
    --hook-type pre-push
This will install hooks for pre-commit, commit-msg, and pre-push stages.
The pre-commit configuration includes:
- Code Quality: Python linting and formatting (ruff), TypeScript linting (biome)
- Type Checking: Static type analysis with basedpyright
- Security: Vulnerability scanning with bandit
- Documentation: Markdown linting and license header checks
- Testing: Automated test runs for Python and TypeScript code
- File Hygiene: Trailing whitespace, line endings, file size checks
- Commit Standards: Conventional commit message validation
You can run the hooks manually on all files without making a commit:
uv run pre-commit run --all-filesOr run specific hooks:
uv run pre-commit run ruff --all-files
uv run pre-commit run basedpyright --all-filesAs mentioned earlier a docker-compose template is included for running Honcho.
As an alternative to running Honcho locally it can also be run with the compose
template.
The docker-compose template is set to use an environment file called .env.
You can also copy the .env.template and fill with the appropriate values.
Copy the template and update the appropriate environment variables before launching the service:
cd honcho
cp .env.template .env
# update the file with openai key and other wanted environment variables
cp docker-compose.yml.example docker-compose.yml
docker compose upThe API can also be deployed on fly.io. Follow the Fly.io
Docs to setup your environment and the
flyctl.
A sample fly.toml is included for convenience.
Note: The fly.toml does not include launching a Postgres database. This must be configured separately
Once flyctl is set up use the following commands to launch the application:
cd honcho
flyctl launch --no-deploy # Follow the prompts and edit as you see fit
cat .env | flyctl secrets import # Load in your secrets
flyctl deploy # Deploy with appropriate environment variablesHoncho uses a flexible configuration system that supports both TOML files and environment variables. Configuration values are loaded in the following priority order (highest to lowest):
- Environment variables
-
.envfile (for local development) -
config.tomlfile - Default values
Copy the example configuration file to get started:
cp config.toml.example config.tomlThen modify the values as needed. The TOML file is organized into sections:
-
[app]- Application-level settings (log level, session limits, embedding settings, namespace) -
[db]- Database connection and pool settings -
[auth]- Authentication configuration -
[cache]- Redis cache configuration -
[llm]- LLM provider API keys and general settings -
[deriver]- Background worker settings and representation configuration -
[peer_card]- Peer card generation settings -
[dialectic]- Dialectic API configuration with per-level reasoning settings -
[summary]- Session summarization settings -
[dream]- Dream processing configuration (including specialist models and surprisal settings) -
[webhook]- Webhook configuration -
[metrics]- Prometheus pull-based metrics -
[telemetry]- CloudEvents telemetry for analytics -
[vector_store]- Vector store configuration (pgvector, turbopuffer, or lancedb) -
[sentry]- Error tracking and monitoring settings
All configuration values can be overridden using environment variables. The environment variable names follow this pattern:
-
{SECTION}_{KEY}for nested settings - Just
{KEY}for app-level settings
Examples:
-
DB_CONNECTION_URI- Database connection string -
AUTH_JWT_SECRET- JWT secret key -
DIALECTIC_LEVELS__low__MODEL- Model for low reasoning level -
DERIVER_PROVIDER- Provider for background deriver -
SUMMARY_PROVIDER- Summary generation provider -
LOG_LEVEL- Application log level -
METRICS_ENABLED- Enable Prometheus metrics -
TELEMETRY_ENABLED- Enable CloudEvents telemetry
When a configuration value is set in multiple places, Honcho uses this priority:
- Environment variables - Always take precedence
- .env file - Loaded for local development
- config.toml - Base configuration
- Default values - Built-in defaults
This allows you to:
- Use
config.tomlfor base configuration - Override specific values with environment variables in production
- Use
.envfiles for local development without modifying config.toml
If you have this in config.toml:
[db]
CONNECTION_URI = "postgresql://localhost/honcho_dev"
POOL_SIZE = 10
You can override just the connection URI in production:
export DB_CONNECTION_URI="postgresql://prod-server/honcho_prod"The application will use the production connection URI while keeping the pool size from config.toml.
The functionality of Honcho can be split into two different services: Storage and Insights.
Honcho uses an entity-centric model where both users and agents are represented as "peers". This unified approach enables:
- Multi-participant sessions with mixed human and AI agents
- Configurable observation settings (which peers observe which others)
- Flexible identity management for all participants
- Support for complex multi-agent interactions
- Rich Reasoning System: Multiple implementation methods that extract conclusions from interactions and build comprehensive representations of peers
- Chat API: Provides reasoning-informed responses that integrate conclusions with current context
- Background Processing: Asynchronous processing pipeline for expensive operations like representation updates and session summarization
- Multi-Provider Support: Configurable LLM providers for different use cases
Honcho contains several different primitives used for storing application and peer data. This data is used for managing conversations, modeling peer identity, building RAG applications, and more.
The philosophy behind Honcho is to provide a platform that is peer-centric and easily scalable from a single user to a million.
Below is a mapping of the different primitives and their relationships.
Workspaces
├── Peers ←──────────────────┐
│   ├── Sessions             │
│   └── Collections          │
│       └── Documents        │
│                            │
│                            │
└── Sessions ←───────────────┤ (many-to-many)
    ├── Peers ───────────────┘
    └── Messages (session-level)
Relationship Details:
- A Workspace contains multiple Peers
- Peers and Sessions have a many-to-many relationship (peers can participate in multiple sessions, sessions can have multiple peers)
-
Messages can exist at two levels:
- Session-level: Communication between peers within a session
- Collections belong to specific Peers
- Documents are stored within Collections
Users familiar with APIs such as the OpenAI Assistants API will be familiar with much of the mapping here.
This is the top level construct of Honcho. Developers can register different
Workspaces for different assistants, agents, AI enabled features, etc. It is a way to
isolate data between use cases and provide multi-tenant capabilities.
Within a Workspace everything revolves around a Peer. The Peer object
represents any participant in the system - whether human users or AI agents.
This unified model enables complex multi-participant interactions.
The Session object represents a set of interactions between Peers within a
Workspace. Other applications may refer to this as a thread or conversation.
Sessions can involve multiple peers with configurable observation settings.
The Message represents an atomic data unit that can exist at two levels:
- Session-level Messages: Communication between peers within a session context
All messages are labeled by their source peer and can be processed asynchronously to update their representations. This flexible design allows for both conversational interactions and broader data ingestion for personality modeling.
At a high level a Collection is a named group of Documents. Developers
familiar with RAG based applications will be familiar with these. Collections
store vector embedded data that developers and agents can retrieve against using
functions like cosine similarity.
Collections are also used internally by Honcho while creating representations of peers.
As stated before a Document is vector embedded data stored in a Collection.
The reasoning functionality of Honcho is built on top of the Storage service. As
Messages and Sessions are created for Peers, Honcho will asynchronously
reason about peer psychology to derive facts about them and store them
in reserved Collections.
A high level summary of the pipeline is as follows:
- Messages are created via the API
- Derivation Tasks are enqueued for background processing including:
-
representation: To update representations ofPeers -
summary: To create summaries ofSessions
-
- Session-based queue processing ensures proper ordering
- Results are stored internally
Honcho exposes several different ways to retrieve data from the system to best serve the needs of any given application.
In long-running conversations with an LLM, the context window can fill up
quickly. To address this, Honcho provides a context
endpoint that returns a combination of messages, conclusions, summaries from a
session up to a provided token limit.
Use this to keep sessions going indefinitely. If you'd like to see this in action, try out Honcho Chat.
There are several search endpoints that let developers query messages at the
Workspace, Session, or Peer level using a hybrid search strategy.
Requests can include advanced filters to further refine the results.
The flagship interface for using these insights is through
the Chat Endpoint.
This is a regular API endpoint (/peers/{peer_id}/chat) that takes natural language requests to get data
about the Peer. This robust design lets us use this single endpoint for all
cases where extra personalization or information about the Peer is necessary.
A developer's application can treat Honcho as an oracle to the Peer and
consult it when necessary. Some examples of how to leverage the Dialectic
API include:
- Asking Honcho for a generic or specific insight about the
Peer - Asking Honcho to hydrate a prompt with data about the
Peers behavior - Asking Honcho for a 2nd opinion or approach about how to respond to the Peer
- Getting personalized responses that incorporate long-term facts and context
For low-latency use cases,
Honcho provides access to a representation endpoint that
returns a static document with insights about a Peer in the context of a
particular session.
Use this to quickly add context to a prompt without having to wait for an LLM response.
We welcome contributions to Honcho! Please read our Contributing Guide for details on our development process, coding conventions, and how to submit pull requests.
Honcho is licensed under the AGPL-3.0 License. Learn more at the License file
For Tasks:
Click tags to check more tools for each tasksFor Jobs:
Alternative AI tools for honcho
Similar Open Source Tools
honcho
Honcho is a platform for creating personalized AI agents and LLM powered applications for end users. The repository is a monorepo containing the server/API for managing database interactions and storing application state, along with a Python SDK. It utilizes FastAPI for user context management and Poetry for dependency management. The API can be run using Docker or manually by setting environment variables. The client SDK can be installed using pip or Poetry. The project is open source and welcomes contributions, following a fork and PR workflow. Honcho is licensed under the AGPL-3.0 License.
testzeus-hercules
Hercules is the world’s first open-source testing agent designed to handle the toughest testing tasks for modern web applications. It turns simple Gherkin steps into fully automated end-to-end tests, making testing simple, reliable, and efficient. Hercules adapts to various platforms like Salesforce and is suitable for CI/CD pipelines. It aims to democratize and disrupt test automation, making top-tier testing accessible to everyone. The tool is transparent, reliable, and community-driven, empowering teams to deliver better software. Hercules offers multiple ways to get started, including using PyPI package, Docker, or building and running from source code. It supports various AI models, provides detailed installation and usage instructions, and integrates with Nuclei for security testing and WCAG for accessibility testing. The tool is production-ready, open core, and open source, with plans for enhanced LLM support, advanced tooling, improved DOM distillation, community contributions, extensive documentation, and a bounty program.

cognita
Cognita is an open-source framework to organize your RAG codebase along with a frontend to play around with different RAG customizations. It provides a simple way to organize your codebase so that it becomes easy to test it locally while also being able to deploy it in a production ready environment. The key issues that arise while productionizing RAG system from a Jupyter Notebook are: 1. **Chunking and Embedding Job** : The chunking and embedding code usually needs to be abstracted out and deployed as a job. Sometimes the job will need to run on a schedule or be trigerred via an event to keep the data updated. 2. **Query Service** : The code that generates the answer from the query needs to be wrapped up in a api server like FastAPI and should be deployed as a service. This service should be able to handle multiple queries at the same time and also autoscale with higher traffic. 3. **LLM / Embedding Model Deployment** : Often times, if we are using open-source models, we load the model in the Jupyter notebook. This will need to be hosted as a separate service in production and model will need to be called as an API. 4. **Vector DB deployment** : Most testing happens on vector DBs in memory or on disk. However, in production, the DBs need to be deployed in a more scalable and reliable way. Cognita makes it really easy to customize and experiment everything about a RAG system and still be able to deploy it in a good way. It also ships with a UI that makes it easier to try out different RAG configurations and see the results in real time. You can use it locally or with/without using any Truefoundry components. However, using Truefoundry components makes it easier to test different models and deploy the system in a scalable way. Cognita allows you to host multiple RAG systems using one app. ### Advantages of using Cognita are: 1. A central reusable repository of parsers, loaders, embedders and retrievers. 2. Ability for non-technical users to play with UI - Upload documents and perform QnA using modules built by the development team. 3. Fully API driven - which allows integration with other systems. > If you use Cognita with Truefoundry AI Gateway, you can get logging, metrics and feedback mechanism for your user queries. ### Features: 1. Support for multiple document retrievers that use `Similarity Search`, `Query Decompostion`, `Document Reranking`, etc 2. Support for SOTA OpenSource embeddings and reranking from `mixedbread-ai` 3. Support for using LLMs using `Ollama` 4. Support for incremental indexing that ingests entire documents in batches (reduces compute burden), keeps track of already indexed documents and prevents re-indexing of those docs.
warc-gpt
WARC-GPT is an experimental retrieval augmented generation pipeline for web archive collections. It allows users to interact with WARC files, extract text, generate text embeddings, visualize embeddings, and interact with a web UI and API. The tool is highly customizable, supporting various LLMs, providers, and embedding models. Users can configure the application using environment variables, ingest WARC files, start the server, and interact with the web UI and API to search for content and generate text completions. WARC-GPT is designed for exploration and experimentation in exploring web archives using AI.
bedrock-claude-chatbot
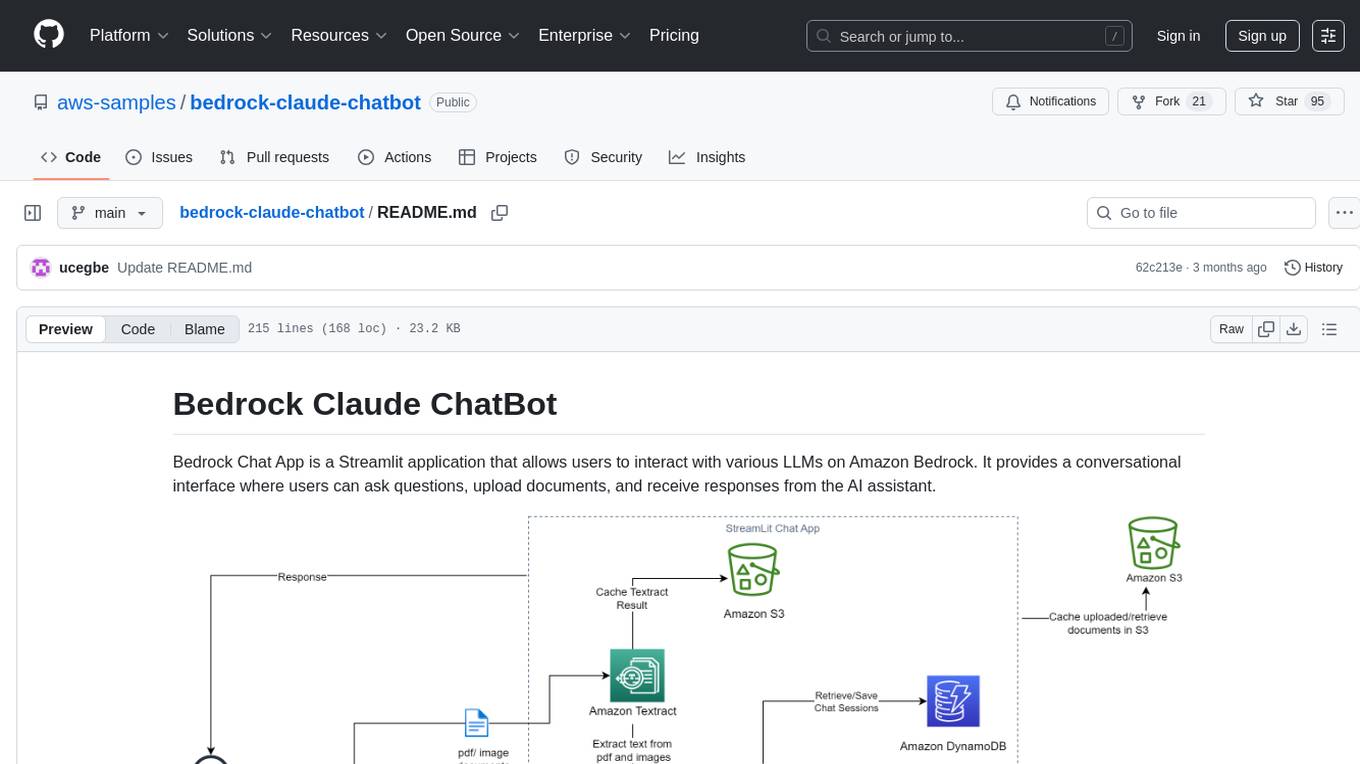
Bedrock Claude ChatBot is a Streamlit application that provides a conversational interface for users to interact with various Large Language Models (LLMs) on Amazon Bedrock. Users can ask questions, upload documents, and receive responses from the AI assistant. The app features conversational UI, document upload, caching, chat history storage, session management, model selection, cost tracking, logging, and advanced data analytics tool integration. It can be customized using a config file and is extensible for implementing specialized tools using Docker containers and AWS Lambda. The app requires access to Amazon Bedrock Anthropic Claude Model, S3 bucket, Amazon DynamoDB, Amazon Textract, and optionally Amazon Elastic Container Registry and Amazon Athena for advanced analytics features.
CoolCline
CoolCline is a proactive programming assistant that combines the best features of Cline, Roo Code, and Bao Cline. It seamlessly collaborates with your command line interface and editor, providing the most powerful AI development experience. It optimizes queries, allows quick switching of LLM Providers, and offers auto-approve options for actions. Users can configure LLM Providers, select different chat modes, perform file and editor operations, integrate with the command line, automate browser tasks, and extend capabilities through the Model Context Protocol (MCP). Context mentions help provide explicit context, and installation is easy through the editor's extension panel or by dragging and dropping the `.vsix` file. Local setup and development instructions are available for contributors.
SWELancer-Benchmark
SWE-Lancer is a benchmark repository containing datasets and code for the paper 'SWE-Lancer: Can Frontier LLMs Earn $1 Million from Real-World Freelance Software Engineering?'. It provides instructions for package management, building Docker images, configuring environment variables, and running evaluations. Users can use this tool to assess the performance of language models in real-world freelance software engineering tasks.
VoiceStreamAI
VoiceStreamAI is a Python 3-based server and JavaScript client solution for near-realtime audio streaming and transcription using WebSocket. It employs Huggingface's Voice Activity Detection (VAD) and OpenAI's Whisper model for accurate speech recognition. The system features real-time audio streaming, modular design for easy integration of VAD and ASR technologies, customizable audio chunk processing strategies, support for multilingual transcription, and secure sockets support. It uses a factory and strategy pattern implementation for flexible component management and provides a unit testing framework for robust development.
log10
Log10 is a one-line Python integration to manage your LLM data. It helps you log both closed and open-source LLM calls, compare and identify the best models and prompts, store feedback for fine-tuning, collect performance metrics such as latency and usage, and perform analytics and monitor compliance for LLM powered applications. Log10 offers various integration methods, including a python LLM library wrapper, the Log10 LLM abstraction, and callbacks, to facilitate its use in both existing production environments and new projects. Pick the one that works best for you. Log10 also provides a copilot that can help you with suggestions on how to optimize your prompt, and a feedback feature that allows you to add feedback to your completions. Additionally, Log10 provides prompt provenance, session tracking and call stack functionality to help debug prompt chains. With Log10, you can use your data and feedback from users to fine-tune custom models with RLHF, and build and deploy more reliable, accurate and efficient self-hosted models. Log10 also supports collaboration, allowing you to create flexible groups to share and collaborate over all of the above features.
llm-memorization
The 'llm-memorization' project is a tool designed to index, archive, and search conversations with a local LLM using a SQLite database enriched with automatically extracted keywords. It aims to provide personalized context at the start of a conversation by adding memory information to the initial prompt. The tool automates queries from local LLM conversational management libraries, offers a hybrid search function, enhances prompts based on posed questions, and provides an all-in-one graphical user interface for data visualization. It supports both French and English conversations and prompts for bilingual use.
starter-monorepo
Starter Monorepo is a template repository for setting up a monorepo structure in your project. It provides a basic setup with configurations for managing multiple packages within a single repository. This template includes tools for package management, versioning, testing, and deployment. By using this template, you can streamline your development process, improve code sharing, and simplify dependency management across your project. Whether you are working on a small project or a large-scale application, Starter Monorepo can help you organize your codebase efficiently and enhance collaboration among team members.

lmql
LMQL is a programming language designed for large language models (LLMs) that offers a unique way of integrating traditional programming with LLM interaction. It allows users to write programs that combine algorithmic logic with LLM calls, enabling model reasoning capabilities within the context of the program. LMQL provides features such as Python syntax integration, rich control-flow options, advanced decoding techniques, powerful constraints via logit masking, runtime optimization, sync and async API support, multi-model compatibility, and extensive applications like JSON decoding and interactive chat interfaces. The tool also offers library integration, flexible tooling, and output streaming options for easy model output handling.
agentok
Agentok Studio is a tool built upon AG2, a powerful agent framework from Microsoft, offering intuitive visual tools to streamline the creation and management of complex agent-based workflows. It simplifies the process for creators and developers by generating native Python code with minimal dependencies, enabling users to create self-contained code that can be executed anywhere. The tool is currently under development and not recommended for production use, but contributions are welcome from the community to enhance its capabilities and functionalities.
CoML
CoML (formerly MLCopilot) is an interactive coding assistant for data scientists and machine learning developers, empowered on large language models. It offers an out-of-the-box interactive natural language programming interface for data mining and machine learning tasks, integration with Jupyter lab and Jupyter notebook, and a built-in large knowledge base of machine learning to enhance the ability to solve complex tasks. The tool is designed to assist users in coding tasks related to data analysis and machine learning using natural language commands within Jupyter environments.

open-deep-research
Open Deep Research is an open-source project that serves as a clone of Open AI's Deep Research experiment. It utilizes Firecrawl's extract and search method along with a reasoning model to conduct in-depth research on the web. The project features Firecrawl Search + Extract, real-time data feeding to AI via search, structured data extraction from multiple websites, Next.js App Router for advanced routing, React Server Components and Server Actions for server-side rendering, AI SDK for generating text and structured objects, support for various model providers, styling with Tailwind CSS, data persistence with Vercel Postgres and Blob, and simple and secure authentication with NextAuth.js.
llm-subtrans
LLM-Subtrans is an open source subtitle translator that utilizes LLMs as a translation service. It supports translating subtitles between any language pairs supported by the language model. The application offers multiple subtitle formats support through a pluggable system, including .srt, .ssa/.ass, and .vtt files. Users can choose to use the packaged release for easy usage or install from source for more control over the setup. The tool requires an active internet connection as subtitles are sent to translation service providers' servers for translation.
For similar tasks
hass-ollama-conversation
The Ollama Conversation integration adds a conversation agent powered by Ollama in Home Assistant. This agent can be used in automations to query information provided by Home Assistant about your house, including areas, devices, and their states. Users can install the integration via HACS and configure settings such as API timeout, model selection, context size, maximum tokens, and other parameters to fine-tune the responses generated by the AI language model. Contributions to the project are welcome, and discussions can be held on the Home Assistant Community platform.

rclip
rclip is a command-line photo search tool powered by the OpenAI's CLIP neural network. It allows users to search for images using text queries, similar image search, and combining multiple queries. The tool extracts features from photos to enable searching and indexing, with options for previewing results in supported terminals or custom viewers. Users can install rclip on Linux, macOS, and Windows using different installation methods. The repository follows the Conventional Commits standard and welcomes contributions from the community.
honcho
Honcho is a platform for creating personalized AI agents and LLM powered applications for end users. The repository is a monorepo containing the server/API for managing database interactions and storing application state, along with a Python SDK. It utilizes FastAPI for user context management and Poetry for dependency management. The API can be run using Docker or manually by setting environment variables. The client SDK can be installed using pip or Poetry. The project is open source and welcomes contributions, following a fork and PR workflow. Honcho is licensed under the AGPL-3.0 License.
core
OpenSumi is a framework designed to help users quickly build AI Native IDE products. It provides a set of tools and templates for creating Cloud IDEs, Desktop IDEs based on Electron, CodeBlitz web IDE Framework, Lite Web IDE on the Browser, and Mini-App liked IDE. The framework also offers documentation for users to refer to and a detailed guide on contributing to the project. OpenSumi encourages contributions from the community and provides a platform for users to report bugs, contribute code, or improve documentation. The project is licensed under the MIT license and contains third-party code under other open source licenses.
yolo-ios-app
The Ultralytics YOLO iOS App GitHub repository offers an advanced object detection tool leveraging YOLOv8 models for iOS devices. Users can transform their devices into intelligent detection tools to explore the world in a new and exciting way. The app provides real-time detection capabilities with multiple AI models to choose from, ranging from 'nano' to 'x-large'. Contributors are welcome to participate in this open-source project, and licensing options include AGPL-3.0 for open-source use and an Enterprise License for commercial integration. Users can easily set up the app by following the provided steps, including cloning the repository, adding YOLOv8 models, and running the app on their iOS devices.
PyAirbyte
PyAirbyte brings the power of Airbyte to every Python developer by providing a set of utilities to use Airbyte connectors in Python. It enables users to easily manage secrets, work with various connectors like GitHub, Shopify, and Postgres, and contribute to the project. PyAirbyte is not a replacement for Airbyte but complements it, supporting data orchestration frameworks like Airflow and Snowpark. Users can develop ETL pipelines and import connectors from local directories. The tool simplifies data integration tasks for Python developers.
md-agent
MD-Agent is a LLM-agent based toolset for Molecular Dynamics. It uses Langchain and a collection of tools to set up and execute molecular dynamics simulations, particularly in OpenMM. The tool assists in environment setup, installation, and usage by providing detailed steps. It also requires API keys for certain functionalities, such as OpenAI and paper-qa for literature searches. Contributions to the project are welcome, with a detailed Contributor's Guide available for interested individuals.
flowgen
FlowGen is a tool built for AutoGen, a great agent framework from Microsoft and a lot of contributors. It provides intuitive visual tools that streamline the construction and oversight of complex agent-based workflows, simplifying the process for creators and developers. Users can create Autoflows, chat with agents, and share flow templates. The tool is fully dockerized and supports deployment on Railway.app. Contributions to the project are welcome, and the platform uses semantic-release for versioning and releases.
For similar jobs
promptflow
**Prompt flow** is a suite of development tools designed to streamline the end-to-end development cycle of LLM-based AI applications, from ideation, prototyping, testing, evaluation to production deployment and monitoring. It makes prompt engineering much easier and enables you to build LLM apps with production quality.
deepeval
DeepEval is a simple-to-use, open-source LLM evaluation framework specialized for unit testing LLM outputs. It incorporates various metrics such as G-Eval, hallucination, answer relevancy, RAGAS, etc., and runs locally on your machine for evaluation. It provides a wide range of ready-to-use evaluation metrics, allows for creating custom metrics, integrates with any CI/CD environment, and enables benchmarking LLMs on popular benchmarks. DeepEval is designed for evaluating RAG and fine-tuning applications, helping users optimize hyperparameters, prevent prompt drifting, and transition from OpenAI to hosting their own Llama2 with confidence.
MegaDetector
MegaDetector is an AI model that identifies animals, people, and vehicles in camera trap images (which also makes it useful for eliminating blank images). This model is trained on several million images from a variety of ecosystems. MegaDetector is just one of many tools that aims to make conservation biologists more efficient with AI. If you want to learn about other ways to use AI to accelerate camera trap workflows, check out our of the field, affectionately titled "Everything I know about machine learning and camera traps".
leapfrogai
LeapfrogAI is a self-hosted AI platform designed to be deployed in air-gapped resource-constrained environments. It brings sophisticated AI solutions to these environments by hosting all the necessary components of an AI stack, including vector databases, model backends, API, and UI. LeapfrogAI's API closely matches that of OpenAI, allowing tools built for OpenAI/ChatGPT to function seamlessly with a LeapfrogAI backend. It provides several backends for various use cases, including llama-cpp-python, whisper, text-embeddings, and vllm. LeapfrogAI leverages Chainguard's apko to harden base python images, ensuring the latest supported Python versions are used by the other components of the stack. The LeapfrogAI SDK provides a standard set of protobuffs and python utilities for implementing backends and gRPC. LeapfrogAI offers UI options for common use-cases like chat, summarization, and transcription. It can be deployed and run locally via UDS and Kubernetes, built out using Zarf packages. LeapfrogAI is supported by a community of users and contributors, including Defense Unicorns, Beast Code, Chainguard, Exovera, Hypergiant, Pulze, SOSi, United States Navy, United States Air Force, and United States Space Force.
llava-docker
This Docker image for LLaVA (Large Language and Vision Assistant) provides a convenient way to run LLaVA locally or on RunPod. LLaVA is a powerful AI tool that combines natural language processing and computer vision capabilities. With this Docker image, you can easily access LLaVA's functionalities for various tasks, including image captioning, visual question answering, text summarization, and more. The image comes pre-installed with LLaVA v1.2.0, Torch 2.1.2, xformers 0.0.23.post1, and other necessary dependencies. You can customize the model used by setting the MODEL environment variable. The image also includes a Jupyter Lab environment for interactive development and exploration. Overall, this Docker image offers a comprehensive and user-friendly platform for leveraging LLaVA's capabilities.

carrot
The 'carrot' repository on GitHub provides a list of free and user-friendly ChatGPT mirror sites for easy access. The repository includes sponsored sites offering various GPT models and services. Users can find and share sites, report errors, and access stable and recommended sites for ChatGPT usage. The repository also includes a detailed list of ChatGPT sites, their features, and accessibility options, making it a valuable resource for ChatGPT users seeking free and unlimited GPT services.
TrustLLM
TrustLLM is a comprehensive study of trustworthiness in LLMs, including principles for different dimensions of trustworthiness, established benchmark, evaluation, and analysis of trustworthiness for mainstream LLMs, and discussion of open challenges and future directions. Specifically, we first propose a set of principles for trustworthy LLMs that span eight different dimensions. Based on these principles, we further establish a benchmark across six dimensions including truthfulness, safety, fairness, robustness, privacy, and machine ethics. We then present a study evaluating 16 mainstream LLMs in TrustLLM, consisting of over 30 datasets. The document explains how to use the trustllm python package to help you assess the performance of your LLM in trustworthiness more quickly. For more details about TrustLLM, please refer to project website.
AI-YinMei
AI-YinMei is an AI virtual anchor Vtuber development tool (N card version). It supports fastgpt knowledge base chat dialogue, a complete set of solutions for LLM large language models: [fastgpt] + [one-api] + [Xinference], supports docking bilibili live broadcast barrage reply and entering live broadcast welcome speech, supports Microsoft edge-tts speech synthesis, supports Bert-VITS2 speech synthesis, supports GPT-SoVITS speech synthesis, supports expression control Vtuber Studio, supports painting stable-diffusion-webui output OBS live broadcast room, supports painting picture pornography public-NSFW-y-distinguish, supports search and image search service duckduckgo (requires magic Internet access), supports image search service Baidu image search (no magic Internet access), supports AI reply chat box [html plug-in], supports AI singing Auto-Convert-Music, supports playlist [html plug-in], supports dancing function, supports expression video playback, supports head touching action, supports gift smashing action, supports singing automatic start dancing function, chat and singing automatic cycle swing action, supports multi scene switching, background music switching, day and night automatic switching scene, supports open singing and painting, let AI automatically judge the content.