
gpt-home
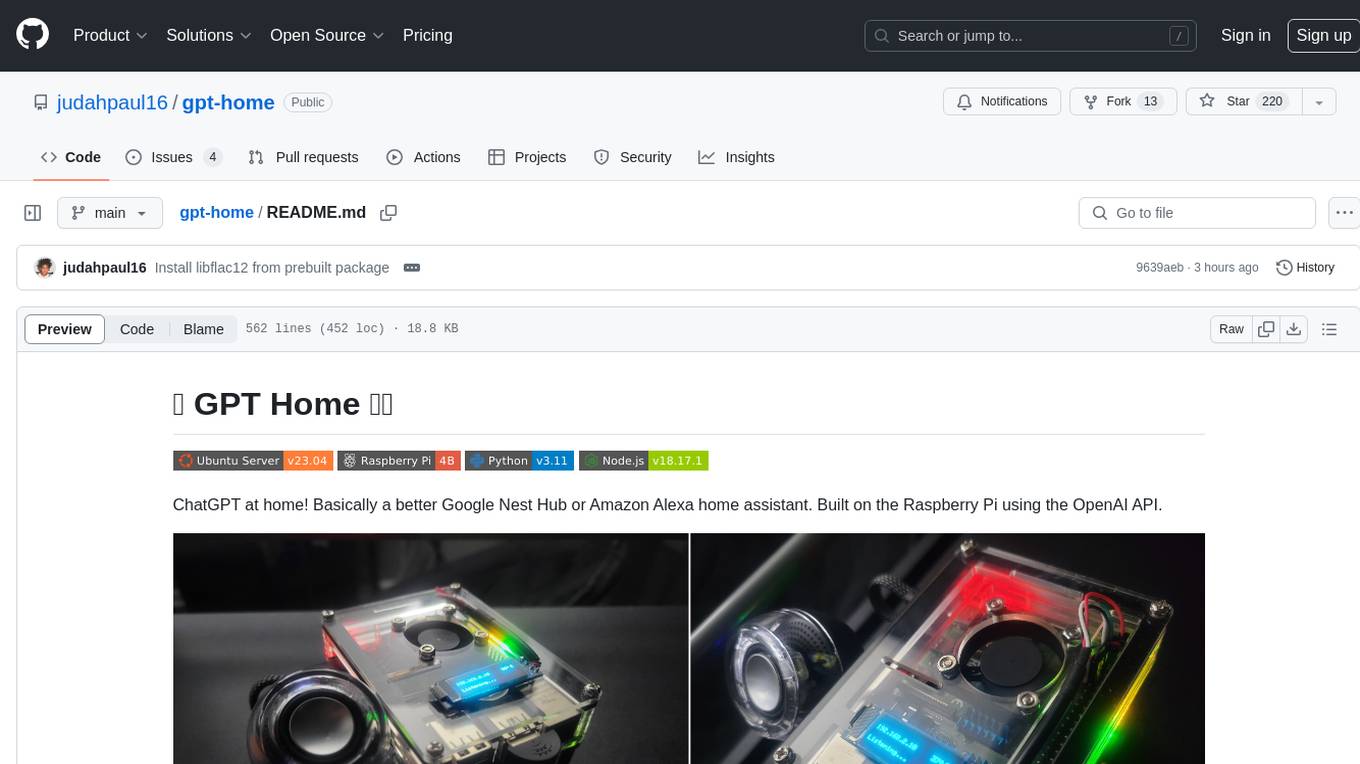
ChatGPT at home! Basically a better Google Nest Hub or Amazon Alexa home assistant. Built on the Raspberry Pi using the OpenAI API.
Stars: 513
GPT Home is a project that allows users to build their own home assistant using Raspberry Pi and OpenAI API. It serves as a guide for setting up a smart home assistant similar to Google Nest Hub or Amazon Alexa. The project integrates various components like OpenAI, Spotify, Philips Hue, and OpenWeatherMap to provide a personalized home assistant experience. Users can follow the detailed instructions provided to build their own version of the home assistant on Raspberry Pi, with optional components for customization. The project also includes system configurations, dependencies installation, and setup scripts for easy deployment. Overall, GPT Home offers a DIY solution for creating a smart home assistant using Raspberry Pi and OpenAI technology.
README:


ChatGPT at home! Basically a better Google Nest Hub or Amazon Alexa home assistant. Built on the Raspberry Pi using the OpenAI API.

This guide will explain how to build your own. It's pretty straight forward. You can also use this as a reference for building other projects on the Raspberry Pi.
- Theoretically, the app should run on any linux system thanks to docker, but I can only vouch for the versions listed in the compatibility table. You should be able use any plug-and-play USB/3.5mm speaker or microphone as long as it's supported by ALSA or PortAudio.
|
|
||||||||
- Run the setup script with the
--no-buildflag to pull the latest image from DockerHub:
curl -s https://raw.githubusercontent.com/judahpaul16/gpt-home/main/contrib/setup.sh | \
bash -s -- --no-build-
Required for Semantic Routing: Update the
openai_api_keyfield insettings.jsonwith your API key for the OpenAI and make sure you have at least a few dollars in your billing tab. You can also update this later in the web interface atgpt-home.local/settingsor[local_ip_address]/settings.
docker exec -it gpt-home bash -c "sed -i 's/\"openai_api_key\": \"[^\"]*\"/\"openai_api_key\": \"YOUR_API_KEY_HERE\"/' src/settings.json"-
Optional: If you want to use a model not provided by OpenAI, make sure to update the
litellm_api_keyfield insettings.json. See the LiteLLM docs for a list of all supported providers. You can also update this later in the web interface atgpt-home.local/settingsor[local_ip_address]/settings.
docker exec -it gpt-home bash -c "sed -i 's/\"litellm_api_key\": \"[^\"]*\"/\"litellm_api_key\": \"YOUR_API_KEY_HERE\"/' src/settings.json"IMPORTANT: The image on the left is for illustration purposes. Do not connect the battery directly to the Raspberry Pi. Use a UPS or power supply with a battery like this one. Connecting the battery directly to the Raspberry Pi can cause damage to the board from voltage fluctuations.
Before connecting the battery, ensure that the polarity is correct to avoid damage to your Raspberry Pi or other components. Disconnect power sources before making changes.
 |
 |
This is the list of parts I used to build my first GPT Home. You can use this as a reference for building your own. I've also included optional parts that you can add to enhance your setup. To be clear you can use any system that runs Linux.
👈 View My Parts List
Core Components
- Raspberry Pi 4B: Link - $50-$70
- Mini Speaker: Link - $18
- 128 GB MicroSD card: Link - $13
- USB 2.0 Mini Microphone: Link - $8
Optional Components
- 128x32 OLED Display: Link - $13-$14
- Standoff Spacer Column M3x40mm: Link - $14
- M1.4 M1.7 M2 M2.5 M3 Screw Kit: Link - $15
- Raspberry Pi UPS Power Supply with Battery: Link - $30
- Cool Case for Raspberry Pi 4B: Link - $16
- Core Components: $102-$123
- Optional Components: $75
- Total (Without Optional): $102-$123
- Total (With Optional): $177-$198
To configure Wi-Fi on your Raspberry Pi, you'll need to edit the wpa_supplicant.conf file and ensure the wireless interface is enabled at boot. This method supports configuring multiple Wi-Fi networks and is suitable for headless setups.
You could also use the raspi-config or the nmcli utility to configure Wi-Fi; or simply use an Ethernet connection if you prefer.
👈 View Instructions
Step 1: Create the Bash Script
sudo nano /usr/local/bin/start_wifi.shAdd the following content to the script:
#!/bin/bash

# Set the interface and SSID details
INTERFACE="wlan0"
SSID="your_wifi_ssid"
PASSWORD="your_wifi_password"

# Make sure no previous configuration interferes
sudo killall wpa_supplicant
sudo dhcpcd -x $INTERFACE

# Ensure the wireless interface is up
sudo ip link set $INTERFACE up

# Create a wpa_supplicant configuration file
WPA_CONF="/etc/wpa_supplicant/wpa_supplicant.conf"
wpa_passphrase "$SSID" "$PASSWORD" | sudo tee $WPA_CONF > /dev/null

# Start wpa_supplicant
sudo wpa_supplicant -B -i $INTERFACE -c $WPA_CONF

# Obtain an IP address
sudo dhcpcd $INTERFACE
Make sure to replace your_wifi_ssid and your_wifi_password with your actual WiFi network's SSID and password.
Step 2: Make the Script Executable
sudo chmod +x /usr/local/bin/start_wifi.shStep 3: Create a Systemd Service File
sudo nano /etc/systemd/system/start_wifi.serviceAdd the following content to the service file:
[Unit]
Description=Start WiFi at boot
After=network.target

[Service]
ExecStart=/usr/local/bin/start_wifi.sh
RemainAfterExit=true

[Install]
WantedBy=multi-user.target
Step 4: Reload Systemd and Enable the Service
sudo systemctl daemon-reload
sudo systemctl enable start_wifi.service
sudo systemctl start start_wifi.service
Your Raspberry Pi should now connect to the Wi-Fi network automatically on boot.
If you want to connect to hidden networks or multiple networks, edit the wpa_supplicant.conf file located at /etc/wpa_supplicant/wpa_supplicant.conf and add the following configuration:
network={
    priority=1 # Higher priority networks are attempted first
    ssid="Your_Wi-Fi_Name"
    psk="Your_Wi-Fi_Password"
    key_mgmt=WPA-PSK
    scan_ssid=1 # Hidden network

    priority=2
    ssid="Enterprise_Wi-Fi_Name"
    key_mgmt=WPA-EAP
    eap=PEAP # or TTLS, TLS, FAST, LEAP
    identity="Your_Username"
    password="Your_Password"
    phase1="peaplabel=0" # or "peapver=0" for PEAPv0
    phase2="auth=MSCHAPV2" # or "auth=MSCHAP" for MSCHAPv1
}
Restart the wpa_supplicant service to apply the changes:
sudo systemctl restart wpa_supplicantSee the wpa_supplicant example file for more information on the configuration options.
Before running this project on your system, ensure your system clock is synchronized, your package lists are updated, and NGINX and Docker are installed. The setup script will take care of this for you but you can also do this manually.
👈 View Instructions
Synchronize your system clock:
Install chrony for time synchronization:
sudo apt install -y chrony       # For Debian/Ubuntu
sudo yum install -y chrony       # For RHEL/CentOS/Alma
sudo dnf install -y chrony       # # For RHEL/CentOS/Alma 9^
sudo zypper install -y chrony    # For openSUSE
sudo pacman -S chrony            # For Arch Linux
Activate and synchronize time immediately with chrony:
sudo chronyc makestepUpdate your package list:
Regular updates to your package list ensure access to the latest software and security patches.
sudo apt update                   # For Debian/Ubuntu
sudo yum makecache                # For RHEL/CentOS/Alma
sudo dnf makecache                # For RHEL/CentOS/Alma 9^
sudo zypper refresh               # For openSUSE
sudo pacman -Sy                   # For Arch Linux
Enable additional repositories:
For systems that utilize EPEL and other special repositories, you may need to enable them to access a wider range of available packages.
For Debian/Ubuntu:
sudo add-apt-repository universe
sudo apt update
For RHEL/CentOS/Alma and Fedora:
sudo yum install -y epel-release   # For RHEL/CentOS/Alma
sudo dnf install -y epel-release   # For RHEL/CentOS/Alma 9^
sudo yum makecache --timer            # For RHEL/CentOS/Alma
sudo dnf makecache --timer            # For RHEL/CentOS/Alma 9^
Install Development Tools:
Development tools are essential for building packages and compiling software. Ensure you have the necessary tools installed.
For Debian/Ubuntu:
sudo apt install -y build-essentialFor RHEL/CentOS/Alma and Fedora:
sudo yum groupinstall -y "Development Tools"   # For RHEL/CentOS/Alma
sudo dnf groupinstall -y "Development Tools"   # For RHEL/CentOS/Alma 9^
Install System Dependencies
-
Docker: Required for containerization.
sudo apt-get install -y docker.io  # For Debian/Ubuntu
sudo yum install -y docker         # For RHEL/CentOS/Alma
sudo dnf install -y docker         # For RHEL/CentOS/Alma 9^
sudo zypper install -y docker      # For openSUSE
sudo pacman -S docker              # For Arch Linux
then
sudo systemctl enable --now docker -
NGINX: Required for reverse proxy for the web interface.
sudo apt-get install -y nginx   # For Debian/Ubuntu
sudo yum install -y nginx       # For RHEL/CentOS/Alma
sudo dnf install -y nginx       # For RHEL/CentOS/Alma 9^
sudo zypper install -y nginx    # For openSUSE
sudo pacman -S nginx            # For Arch Linux
Note: Update the openai_api_key field in settings.json with your API key for the OpenAI and make sure you have at least a few dollars in your billing tab. You can also update this later in the web interface at gpt-home.local/settings or [local_ip_address]/settings.
-
Optionally, if you want to use a model not provided by OpenAI, make sure to update the
litellm_api_keyfield insettings.json. See the LiteLLM docs for a list of all supported providers.
Optional: Add these aliases to your .bashrc file for easier management of the container.
alias gpt-start="docker exec -it gpt-home supervisorctl start app"
alias gpt-restart="docker exec -it gpt-home supervisorctl restart app"
alias gpt-stop="docker exec -it gpt-home supervisorctl stop app"
alias gpt-status="docker exec -it gpt-home supervisorctl status app"
alias gpt-log="docker exec -it gpt-home tail -n 100 -f /app/src/events.log"

alias wi-start="docker exec -it gpt-home supervisorctl start web-interface"
alias wi-restart="docker exec -it gpt-home supervisorctl restart web-interface && sudo systemctl restart nginx"
alias wi-stop="docker exec -it gpt-home supervisorctl stop web-interface"
alias wi-status="docker exec -it gpt-home supervisorctl status web-interface"
alias wi-build="docker exec -it gpt-home bash -c 'cd /app/src/frontend && npm i && npm run build'"
alias wi-log="tail -n 100 -f /var/log/nginx/access.log"
alias wi-error="tail -n 100 -f /var/log/nginx/error.log"

alias spotifyd-start="docker exec -it gpt-home supervisorctl start spotifyd"
alias spotifyd-restart="docker exec -it gpt-home supervisorctl restart spotifyd"
alias spotifyd-stop="docker exec -it gpt-home supervisorctl stop spotifyd"
alias spotifyd-status="docker exec -it gpt-home supervisorctl status spotifyd"
alias spotifyd-log="docker exec -it gpt-home tail -n 100 -f /var/log/spotifyd.log"
Run source ~/.bashrc to apply the changes to your current terminal session.
The setup script will take quite a while to run (900.0s+ to build and setup dependencies on my quad-core Raspberry Pi 4B w/ 1G RAM). It will install all the dependencies and build the Docker container. However, you can skip the build process by passing the --no-build flag to the script; it will install the dependencies, set up the firewall and NGINX, and pull the container from Docker Hub and run it.
curl -s https://raw.githubusercontent.com/judahpaul16/gpt-home/main/contrib/setup.sh | \
    bash -s -- --no-build
Alternatively, for development purposes, running setup.sh without the --no-build flag mounts the project directory to the container by adding -v ~/gpt-home:/app to the docker run command. This allows you to make changes to the project files on your Raspberry Pi and see the changes reflected in the container without rebuilding the image. This is useful for testing changes to the codebase. Run directly with:
curl -s https://raw.githubusercontent.com/judahpaul16/gpt-home/main/contrib/setup.sh | \
    bash -s
You can also run the container interactively if you need to debug or test changes to the codebase with the -it (interactive terminal), --entrypoint /bin/bash, and --rm (remove on process exit) flags. This will drop you into a shell session inside the container. Alternatively, if the conatiner is already running:
docker exec -it gpt-home bashThis will start the container and drop you into a shell session inside the container.
Explanation of Docker Run Flags
--tmpfs /run:
    Mounts a tmpfs at /run for transient runtime data.
--tmpfs /run/lock:
    Mounts a tmpfs at /run/lock for lock files.
--privileged:
    Grants extended privileges to the container
    Necessary for accessing host audio devices.
--net=host:
    Uses the host network stack directly.
    May be necessary for avahi-daemon services.
-v /dev/snd:/dev/snd:
    Provides access to the host's sound devices.
-v /dev/shm:/dev/shm:
    Provides access to shared memory.
-v /usr/share/alsa:/usr/share/alsa:ro:
    Maps the ALSA shared data as read-only.
-v /var/run/dbus:/var/run/dbus:
    Provides access to the D-Bus system for inter-process communication.
--mount type=bind,source=/etc/asound.conf,target=/etc/asound.conf:
Binds the host's ALSA configuration to the container.If you prefer to run the setup script manually, you can do so. Create a script in your home folder with vim ~/setup.sh or nano ~/setup.sh and paste in the following:
👈 View Script
#!/bin/bash

latest_release=$(curl -s https://api.github.com/repos/judahpaul16/gpt-home/releases/latest | grep 'tag_name' | cut -d\" -f4)

# Colors
RED='\033[0;31m'
GREEN='\033[0;32m'
YELLOW='\033[0;33m'
BLUE='\033[0;34m'
MAGENTA='\033[0;35m'
CYAN='\033[0;36m'
WHITE='\033[0;37m'
NC='\033[0m' # No Color

echo ""
echo -e "${MAGENTA}"
echo "GPT Home $latest_release"
echo "Created by Judah Paul"
echo "More info @ https://github.com/judahpaul16/gpt-home/"
echo -e "${NC}"

echo -e "${GREEN}"
echo "  ____ ____ _____   _   _                      "
echo " / ___|  _ \\_   _| | | | | ___  _ __ ___   ___ "
echo "| |  _| |_) || |   | |_| |/ _ \\| '_ \` _ \\ / _ \\"
echo "| |_| |  __/ | |   |  _  | (_) | | | | | |  __/"
echo " \\____|_|    |_|   |_| |_|\\___/|_| |_| |_|\\___|"
echo -e "${NC}"

echo -e "${CYAN}"
echo "         ______________"
echo "        | how may I    |"
echo "        | assist you   |"
echo "        | today?       |"
echo "        |______________|"
echo "                 \\                       |"
echo "                  \\                      |"
echo "                   \\                     |"
echo "   _______                   ________    |"
echo "  |ooooooo|      ____       | __  __ |   |"
echo "  |[]+++[]|     [____]      |/  \\/  \\|   |"
echo "  |+ ___ +|     ]()()[      |\\__/\\__/|   |"
echo "  |:|   |:|   ___\\__/___    |[][][][]|   |"
echo "  |:|___|:|  |__|    |__|   |++++++++|   |"
echo "  |[]===[]|   |_|/  \\|_|    | ______ |   |"
echo "_ ||||||||| _ | | __ | | __ ||______|| __|"
echo "  |_______|   |_|[::]|_|    |________|   \\"
echo "              \\_|_||_|_/                  \\"
echo "                |_||_|                     \\"
echo "               _|_||_|_                     \\"
echo "      ____    |___||___|                     \\"
echo -e "${NC}"

# Mask systemd-networkd-wait-online.service to prevent boot delays
sudo systemctl mask systemd-networkd-wait-online.service

# Set Permissions
sudo chown -R $(whoami):$(whoami) .
sudo chmod -R 755 .

# Function to install system dependencies
function install() {
    local package=$1
    echo "Ensuring package '$package' is installed..."

    # Detect the package management system
    if command -v apt-get >/dev/null; then
        if ! dpkg -s "$package" >/dev/null 2>&1; then
            sudo yes | add-apt-repository universe >/dev/null 2>&1 || true
            sudo apt update || true
            if [ "$package" == "docker" ]; then
                sudo apt-get install -y docker.io
            else
                sudo apt-get install -y "$package"
            fi
        fi
    elif command -v yum >/dev/null; then
        if ! rpm -q "$package" >/dev/null 2>&1; then
            sudo yum install -y epel-release >/dev/null 2>&1 || true
            sudo yum makecache --timer || true
            sudo yum install -y "$package"
        fi
    elif command -v dnf >/dev/null; then
        if ! dnf list installed "$package" >/dev/null 2>&1; then
            sudo dnf install -y epel-release >/dev/null 2>&1 || true
            sudo dnf makecache --timer || true
            sudo dnf install -y "$package"
        fi
    elif command -v zypper >/dev/null; then
        if ! zypper se -i "$package" >/dev/null 2>&1; then
            sudo zypper refresh || true
            sudo zypper install -y "$package"
        fi
    elif command -v pacman >/dev/null; then
        if ! pacman -Q "$package" >/dev/null 2>&1; then
            sudo pacman -Sy
            sudo pacman -S --noconfirm "$package"
        fi
    else
        echo "Package manager not supported."
        return 1
    fi

    if [ "$package" == "docker" ]; then
        if ! docker ps >/dev/null 2>&1; then
            echo "Docker installed. Adding $(whoami) to the 'docker' group..."
            sudo usermod -aG docker $(whoami)
            echo -e "${RED}User added to \`docker\` group but the session must be reloaded to access the Docker daemon. Please log out, log back in, and rerun the script. Exiting...${NC}"
            exit 0
        fi
    fi
}

install chrony
install nginx
install containerd
install docker
install docker-buildx-plugin
install alsa-utils
sudo systemctl enable docker
sudo systemctl start docker

# Create ALSA config (asound.conf, adjust as needed)
sudo tee /etc/asound.conf > /dev/null <<EOF
pcm.!default { type hw card Headphones device 0 }
ctl.!default { type hw card Headphones }
EOF

# Install Docker Buildx plugin
mkdir -p $HOME/.docker/cli-plugins
curl -Lo $HOME/.docker/cli-plugins/docker-buildx https://github.com/docker/buildx/releases/download/v0.14.0/buildx-v0.14.0.linux-arm64
sudo chmod +x $HOME/.docker/cli-plugins/docker-buildx
docker buildx version

# Setup UFW Firewall
echo "Setting up UFW Firewall..."
if which firewalld >/dev/null; then
    sudo systemctl stop firewalld
    sudo systemctl disable firewalld
    sudo yum remove firewalld -y 2>/dev/null || sudo apt-get remove firewalld -y 2>/dev/null || sudo zypper remove firewalld -y 2>/dev/null
fi
if ! which ufw >/dev/null; then
    sudo yum install ufw -y 2>/dev/null || sudo apt-get install ufw -y 2>/dev/null || sudo zypper install ufw -y 2>/dev/null
fi
sudo ufw allow ssh
sudo ufw allow 80,443/tcp
sudo ufw allow 5353/udp
echo "y" | sudo ufw enable

# Setup NGINX for reverse proxy
echo "Setting up NGINX..."
sudo mkdir -p /etc/nginx/sites-available /etc/nginx/sites-enabled
sudo tee /etc/nginx/sites-available/gpt-home <<EOF
server {
    listen 80;
    location / {
        proxy_pass http://127.0.0.1:8000/;
        proxy_set_header Host \$host;
        proxy_set_header X-Real-IP \$remote_addr;
        proxy_set_header X-Forwarded-For \$proxy_add_x_forwarded_for;
    }
}
EOF

# Remove gpt-home site symlink if it exists
[ -L "/etc/nginx/sites-enabled/gpt-home" ] && sudo unlink /etc/nginx/sites-enabled/gpt-home

# Remove the default site if it exists
[ -L "/etc/nginx/sites-enabled/default" ] && sudo unlink /etc/nginx/sites-enabled/default

# Create a symlink to the gpt-home site and reload NGINX
sudo ln -s /etc/nginx/sites-available/gpt-home /etc/nginx/sites-enabled
sudo systemctl enable nginx
sudo nginx -t && sudo systemctl restart nginx

sudo systemctl status --no-pager nginx

if [[ "$1" != "--no-build" ]]; then
    [ -d ~/gpt-home ] && rm -rf ~/gpt-home
    git clone https://github.com/judahpaul16/gpt-home ~/gpt-home
    cd ~/gpt-home
    echo "Checking if the container 'gpt-home' is already running..."
    if [ $(docker ps -q -f name=gpt-home) ]; then
        echo "Stopping running container 'gpt-home'..."
        docker stop gpt-home
    fi

    echo "Checking for existing container 'gpt-home'..."
    if [ $(docker ps -aq -f status=exited -f name=gpt-home) ]; then
        echo "Removing existing container 'gpt-home'..."
        docker rm -f gpt-home
    fi

    echo "Pruning Docker system..."
    docker system prune -f

    # Check if the buildx builder exists, if not create and use it
    if ! docker buildx ls | grep -q mybuilder; then
        docker buildx create --name mybuilder --use
        docker buildx inspect --bootstrap
    fi

    # Building Docker image 'gpt-home' for ARMhf architecture
    echo "Building Docker image 'gpt-home' for ARMhf..."
    timeout 3600 docker buildx build --platform linux/arm64 -t gpt-home --load .

    if [ $? -ne 0 ]; then
        echo "Docker build failed. Exiting..."
        exit 1
    fi

    echo "Container 'gpt-home' is now ready to run."

    echo "Running container 'gpt-home' from image 'gpt-home'..."
    docker run --restart unless-stopped -d --name gpt-home \
        --mount type=bind,source=/etc/asound.conf,target=/etc/asound.conf \
        --privileged \
        --net=host \
        --tmpfs /run \
        --tmpfs /run/lock \
        -v ~/gpt-home:/app \
        -v /dev/snd:/dev/snd \
        -v /dev/shm:/dev/shm \
        -v /usr/share/alsa:/usr/share/alsa \
        -v /var/run/dbus:/var/run/dbus \
        gpt-home

    echo "Container 'gpt-home' is now running."

    # Show status of the container
    docker ps -a | grep gpt-home

    sleep 10

    # Show status of all programs managed by Supervisor
    docker exec -i gpt-home supervisorctl status
fi

if [[ "$1" == "--no-build" ]]; then
    docker ps -aq -f name=gpt-home | xargs -r docker rm -f
    docker pull judahpaul/gpt-home
    docker run --restart unless-stopped -d --name gpt-home \
        --mount type=bind,source=/etc/asound.conf,target=/etc/asound.conf \
        --privileged \
        --net=host \
        --tmpfs /run \
        --tmpfs /run/lock \
        -v /dev/snd:/dev/snd \
        -v /dev/shm:/dev/shm \
        -v /usr/share/alsa:/usr/share/alsa \
        -v /var/run/dbus:/var/run/dbus \
        judahpaul/gpt-home
    docker ps -a | grep gpt-home
    sleep 10
    docker exec -i gpt-home supervisorctl status
fi
Be sure to make the script executable to run it
chmod +x setup.sh
./setup.sh
|
|
|
|
||||||||||||||||||||||||||||||||||||||||||||||||||||||||||||||
Contributions are certainly welcome! Please read the contributing guidelines for more information on how to contribute.
This project is licensed under the GNU GPL v3.0 License - see the LICENSE file for details.
For Tasks:
Click tags to check more tools for each tasksFor Jobs:
Alternative AI tools for gpt-home
Similar Open Source Tools
gpt-home
GPT Home is a project that allows users to build their own home assistant using Raspberry Pi and OpenAI API. It serves as a guide for setting up a smart home assistant similar to Google Nest Hub or Amazon Alexa. The project integrates various components like OpenAI, Spotify, Philips Hue, and OpenWeatherMap to provide a personalized home assistant experience. Users can follow the detailed instructions provided to build their own version of the home assistant on Raspberry Pi, with optional components for customization. The project also includes system configurations, dependencies installation, and setup scripts for easy deployment. Overall, GPT Home offers a DIY solution for creating a smart home assistant using Raspberry Pi and OpenAI technology.
peon-ping
peon-ping is a tool designed to provide voice lines from popular game characters when your AI coding agent needs attention or to let the agent choose its own sound via MCP. It aims to solve the issue of losing focus when coding agents don't notify you. It works with various AI coding agents like Claude Code, Codex, Cursor, OpenCode, Kilo CLI, Kiro, Windsurf, Google Antigravity, and more. The tool implements the Coding Event Sound Pack Specification (CESP) and offers features like quick controls, configuration settings, Peon Trainer for exercise reminders, MCP server for AI agents to play sounds, multi-IDE support with adapters, remote development support, mobile notifications, and various sound packs for customization.
ocode
OCode is a sophisticated terminal-native AI coding assistant that provides deep codebase intelligence and autonomous task execution. It seamlessly works with local Ollama models, bringing enterprise-grade AI assistance directly to your development workflow. OCode offers core capabilities such as terminal-native workflow, deep codebase intelligence, autonomous task execution, direct Ollama integration, and an extensible plugin layer. It can perform tasks like code generation & modification, project understanding, development automation, data processing, system operations, and interactive operations. The tool includes specialized tools for file operations, text processing, data processing, system operations, development tools, and integration. OCode enhances conversation parsing, offers smart tool selection, and provides performance improvements for coding tasks.
Ling
Ling is a MoE LLM provided and open-sourced by InclusionAI. It includes two different sizes, Ling-Lite with 16.8 billion parameters and Ling-Plus with 290 billion parameters. These models show impressive performance and scalability for various tasks, from natural language processing to complex problem-solving. The open-source nature of Ling encourages collaboration and innovation within the AI community, leading to rapid advancements and improvements. Users can download the models from Hugging Face and ModelScope for different use cases. Ling also supports offline batched inference and online API services for deployment. Additionally, users can fine-tune Ling models using Llama-Factory for tasks like SFT and DPO.
LocalAGI
LocalAGI is a powerful, self-hostable AI Agent platform that allows you to design AI automations without writing code. It provides a complete drop-in replacement for OpenAI's Responses APIs with advanced agentic capabilities. With LocalAGI, you can create customizable AI assistants, automations, chat bots, and agents that run 100% locally, without the need for cloud services or API keys. The platform offers features like no-code agents, web-based interface, advanced agent teaming, connectors for various platforms, comprehensive REST API, short & long-term memory capabilities, planning & reasoning, periodic tasks scheduling, memory management, multimodal support, extensible custom actions, fully customizable models, observability, and more.
AI-Agent-Starter-Kit
AI Agent Starter Kit is a modern full-stack AI-enabled template using Next.js for frontend and Express.js for backend, with Telegram and OpenAI integrations. It offers AI-assisted development, smart environment variable setup assistance, intelligent error resolution, context-aware code completion, and built-in debugging helpers. The kit provides a structured environment for developers to interact with AI tools seamlessly, enhancing the development process and productivity.
client-ts
Mistral Typescript Client is an SDK for Mistral AI API, providing Chat Completion and Embeddings APIs. It allows users to create chat completions, upload files, create agent completions, create embedding requests, and more. The SDK supports various JavaScript runtimes and provides detailed documentation on installation, requirements, API key setup, example usage, error handling, server selection, custom HTTP client, authentication, providers support, standalone functions, debugging, and contributions.
supergateway
Supergateway is a tool that allows running MCP stdio-based servers over SSE (Server-Sent Events) with one command. It is useful for remote access, debugging, or connecting to SSE-based clients when your MCP server only speaks stdio. The tool supports running in SSE to Stdio mode as well, where it connects to a remote SSE server and exposes a local stdio interface for downstream clients. Supergateway can be used with ngrok to share local MCP servers with remote clients and can also be run in a Docker containerized deployment. It is designed with modularity in mind, ensuring compatibility and ease of use for AI tools exchanging data.
lingo.dev
Replexica AI automates software localization end-to-end, producing authentic translations instantly across 60+ languages. Teams can do localization 100x faster with state-of-the-art quality, reaching more paying customers worldwide. The tool offers a GitHub Action for CI/CD automation and supports various formats like JSON, YAML, CSV, and Markdown. With lightning-fast AI localization, auto-updates, native quality translations, developer-friendly CLI, and scalability for startups and enterprise teams, Replexica is a top choice for efficient and effective software localization.
bark.cpp
Bark.cpp is a C/C++ implementation of the Bark model, a real-time, multilingual text-to-speech generation model. It supports AVX, AVX2, and AVX512 for x86 architectures, and is compatible with both CPU and GPU backends. Bark.cpp also supports mixed F16/F32 precision and 4-bit, 5-bit, and 8-bit integer quantization. It can be used to generate realistic-sounding audio from text prompts.
llm.nvim
llm.nvim is a plugin for Neovim that enables code completion using LLM models. It supports 'ghost-text' code completion similar to Copilot and allows users to choose their model for code generation via HTTP requests. The plugin interfaces with multiple backends like Hugging Face, Ollama, Open AI, and TGI, providing flexibility in model selection and configuration. Users can customize the behavior of suggestions, tokenization, and model parameters to enhance their coding experience. llm.nvim also includes commands for toggling auto-suggestions and manually requesting suggestions, making it a versatile tool for developers using Neovim.
CodeGPT
CodeGPT is a CLI tool written in Go that helps you write git commit messages or do a code review brief using ChatGPT AI (gpt-3.5-turbo, gpt-4 model) and automatically installs a git prepare-commit-msg hook. It supports Azure OpenAI Service or OpenAI API, conventional commits specification, Git prepare-commit-msg Hook, customizing the number of lines of context in diffs, excluding files from the git diff command, translating commit messages into different languages, using socks or custom network HTTP proxies, specifying model lists, and doing brief code reviews.
daytona
Daytona is a secure and elastic infrastructure tool designed for running AI-generated code. It offers lightning-fast infrastructure with sub-90ms sandbox creation, separated and isolated runtime for executing AI code with zero risk, massive parallelization for concurrent AI workflows, programmatic control through various APIs, unlimited sandbox persistence, and OCI/Docker compatibility. Users can create sandboxes using Python or TypeScript SDKs, run code securely inside the sandbox, and clean up the sandbox after execution. Daytona is open source under the GNU Affero General Public License and welcomes contributions from developers.
clawlet
Clawlet is an ultra-lightweight and efficient personal AI assistant that comes as a single binary with no CGO, runtime, or dependencies. It features hybrid semantic memory search and is inspired by OpenClaw and nanobot. Users can easily download Clawlet from GitHub Releases and drop it on any machine to enable memory search functionality. The tool supports various LLM providers like OpenAI, OpenRouter, Anthropic, Gemini, and local endpoints. Users can configure Clawlet for memory search setup and chat app integrations for platforms like Telegram, WhatsApp, Discord, and Slack. Clawlet CLI provides commands for initializing workspace, running the agent, managing channels, scheduling jobs, and more.
ai-commit
ai-commit is a tool that automagically generates conventional git commit messages using AI. It supports various generators like Bito Cli, ERNIE-Bot-turbo, ERNIE-Bot, Moonshot, and OpenAI Chat. The tool requires PHP version 7.3 or higher for installation. Users can configure generators, set API keys, and easily generate and commit messages with customizable options. Additionally, ai-commit provides commands for managing configurations, self-updating, and shell completion scripts.
llama-api-server
This project aims to create a RESTful API server compatible with the OpenAI API using open-source backends like llama/llama2. With this project, various GPT tools/frameworks can be compatible with your own model. Key features include: - **Compatibility with OpenAI API**: The API server follows the OpenAI API structure, allowing seamless integration with existing tools and frameworks. - **Support for Multiple Backends**: The server supports both llama.cpp and pyllama backends, providing flexibility in model selection. - **Customization Options**: Users can configure model parameters such as temperature, top_p, and top_k to fine-tune the model's behavior. - **Batch Processing**: The API supports batch processing for embeddings, enabling efficient handling of multiple inputs. - **Token Authentication**: The server utilizes token authentication to secure access to the API. This tool is particularly useful for developers and researchers who want to integrate large language models into their applications or explore custom models without relying on proprietary APIs.
For similar tasks
gpt-home
GPT Home is a project that allows users to build their own home assistant using Raspberry Pi and OpenAI API. It serves as a guide for setting up a smart home assistant similar to Google Nest Hub or Amazon Alexa. The project integrates various components like OpenAI, Spotify, Philips Hue, and OpenWeatherMap to provide a personalized home assistant experience. Users can follow the detailed instructions provided to build their own version of the home assistant on Raspberry Pi, with optional components for customization. The project also includes system configurations, dependencies installation, and setup scripts for easy deployment. Overall, GPT Home offers a DIY solution for creating a smart home assistant using Raspberry Pi and OpenAI technology.
AIO
AIO is a comprehensive guide for setting up a home All-in-One server, enabling users to create an enterprise-level virtualized environment at home. It allows running multiple operating systems simultaneously, achieving public network access, optimizing hardware performance, and reducing IT costs. The guide includes detailed documentation for setting up from scratch and requires a computer with virtualization support, VMware ESXi installation media, and basic network configuration knowledge.
comfy-cli
comfy-cli is a command line tool designed to simplify the installation and management of ComfyUI, an open-source machine learning framework. It allows users to easily set up ComfyUI, install packages, manage custom nodes, download checkpoints, and ensure cross-platform compatibility. The tool provides comprehensive documentation and examples to aid users in utilizing ComfyUI efficiently.
crewAI-tools
The crewAI Tools repository provides a guide for setting up tools for crewAI agents, enabling the creation of custom tools to enhance AI solutions. Tools play a crucial role in improving agent functionality. The guide explains how to equip agents with a range of tools and how to create new tools. Tools are designed to return strings for generating responses. There are two main methods for creating tools: subclassing BaseTool and using the tool decorator. Contributions to the toolset are encouraged, and the development setup includes steps for installing dependencies, activating the virtual environment, setting up pre-commit hooks, running tests, static type checking, packaging, and local installation. Enhance AI agent capabilities with advanced tooling.
aipan-netdisk-search
Aipan-Netdisk-Search is a free and open-source web project for searching netdisk resources. It utilizes third-party APIs with IP access restrictions, suggesting self-deployment. The project can be easily deployed on Vercel and provides instructions for manual deployment. Users can clone the project, install dependencies, run it in the browser, and access it at localhost:3001. The project also includes documentation for deploying on personal servers using NUXT.JS. Additionally, there are options for donations and communication via WeChat.
Agently-Daily-News-Collector
Agently Daily News Collector is an open-source project showcasing a workflow powered by the Agent ly AI application development framework. It allows users to generate news collections on various topics by inputting the field topic. The AI agents automatically perform the necessary tasks to generate a high-quality news collection saved in a markdown file. Users can edit settings in the YAML file, install Python and required packages, input their topic idea, and wait for the news collection to be generated. The process involves tasks like outlining, searching, summarizing, and preparing column data. The project dependencies include Agently AI Development Framework, duckduckgo-search, BeautifulSoup4, and PyYAM.
comfy-cli
Comfy-cli is a command line tool designed to facilitate the installation and management of ComfyUI, an open-source machine learning framework. Users can easily set up ComfyUI, install packages, and manage custom nodes directly from the terminal. The tool offers features such as easy installation, seamless package management, custom node management, checkpoint downloads, cross-platform compatibility, and comprehensive documentation. Comfy-cli simplifies the process of working with ComfyUI, making it convenient for users to handle various tasks related to the framework.
BentoDiffusion
BentoDiffusion is a BentoML example project that demonstrates how to serve and deploy diffusion models in the Stable Diffusion (SD) family. These models are specialized in generating and manipulating images based on text prompts. The project provides a guide on using SDXL Turbo as an example, along with instructions on prerequisites, installing dependencies, running the BentoML service, and deploying to BentoCloud. Users can interact with the deployed service using Swagger UI or other methods. Additionally, the project offers the option to choose from various diffusion models available in the repository for deployment.
For similar jobs
sweep
Sweep is an AI junior developer that turns bugs and feature requests into code changes. It automatically handles developer experience improvements like adding type hints and improving test coverage.
teams-ai
The Teams AI Library is a software development kit (SDK) that helps developers create bots that can interact with Teams and Microsoft 365 applications. It is built on top of the Bot Framework SDK and simplifies the process of developing bots that interact with Teams' artificial intelligence capabilities. The SDK is available for JavaScript/TypeScript, .NET, and Python.
ai-guide
This guide is dedicated to Large Language Models (LLMs) that you can run on your home computer. It assumes your PC is a lower-end, non-gaming setup.

classifai
Supercharge WordPress Content Workflows and Engagement with Artificial Intelligence. Tap into leading cloud-based services like OpenAI, Microsoft Azure AI, Google Gemini and IBM Watson to augment your WordPress-powered websites. Publish content faster while improving SEO performance and increasing audience engagement. ClassifAI integrates Artificial Intelligence and Machine Learning technologies to lighten your workload and eliminate tedious tasks, giving you more time to create original content that matters.
chatbot-ui
Chatbot UI is an open-source AI chat app that allows users to create and deploy their own AI chatbots. It is easy to use and can be customized to fit any need. Chatbot UI is perfect for businesses, developers, and anyone who wants to create a chatbot.
BricksLLM
BricksLLM is a cloud native AI gateway written in Go. Currently, it provides native support for OpenAI, Anthropic, Azure OpenAI and vLLM. BricksLLM aims to provide enterprise level infrastructure that can power any LLM production use cases. Here are some use cases for BricksLLM: * Set LLM usage limits for users on different pricing tiers * Track LLM usage on a per user and per organization basis * Block or redact requests containing PIIs * Improve LLM reliability with failovers, retries and caching * Distribute API keys with rate limits and cost limits for internal development/production use cases * Distribute API keys with rate limits and cost limits for students
uAgents
uAgents is a Python library developed by Fetch.ai that allows for the creation of autonomous AI agents. These agents can perform various tasks on a schedule or take action on various events. uAgents are easy to create and manage, and they are connected to a fast-growing network of other uAgents. They are also secure, with cryptographically secured messages and wallets.
griptape
Griptape is a modular Python framework for building AI-powered applications that securely connect to your enterprise data and APIs. It offers developers the ability to maintain control and flexibility at every step. Griptape's core components include Structures (Agents, Pipelines, and Workflows), Tasks, Tools, Memory (Conversation Memory, Task Memory, and Meta Memory), Drivers (Prompt and Embedding Drivers, Vector Store Drivers, Image Generation Drivers, Image Query Drivers, SQL Drivers, Web Scraper Drivers, and Conversation Memory Drivers), Engines (Query Engines, Extraction Engines, Summary Engines, Image Generation Engines, and Image Query Engines), and additional components (Rulesets, Loaders, Artifacts, Chunkers, and Tokenizers). Griptape enables developers to create AI-powered applications with ease and efficiency.