
model-compose
Declarative AI Model and Workflow Orchestrator
Stars: 73
model-compose is an open-source, declarative workflow orchestrator inspired by docker-compose. It lets you define and run AI model pipelines using simple YAML files. Effortlessly connect external AI services or run local AI models within powerful, composable workflows. Features include declarative design, multi-workflow support, modular components, flexible I/O routing, streaming mode support, and more. It supports running workflows locally or serving them remotely, Docker deployment, environment variable support, and provides a CLI interface for managing AI workflows.
README:
model-compose is an open-source, declarative workflow orchestrator inspired by docker-compose. It lets you define and run AI model pipelines using simple YAML files — no custom code required. Effortlessly connect external AI services or run local AI models, all within powerful, composable workflows.
- Declarative by Design: Define complete AI workflows using simple YAML files—no complex scripting required.
- Compose Anything: Combine multiple AI models, APIs, and tools into a single, unified pipeline.
- Built for Orchestration: Orchestrate multi-step model interactions with ease. Transform individual API calls into maintainable, end-to-end systems.
- Multi-Workflow Support: Define multiple named workflows in one project. Run them by name or set a default for quick execution.
- Modular Components: Break down logic into reusable components and jobs. Easily plug, swap, and extend them across workflows.
- Flexible I/O Routing: Connect inputs and outputs between jobs using clean, scoped variables—no glue code needed.
- Streaming Mode Support: Stream real-time outputs from models and APIs, enabling interactive applications and faster feedback loops.
- Run Locally, Serve Remotely: Execute workflows from the CLI or expose them as HTTP or MCP endpoints with an optional Web UI.
- Docker Deployment: Build and deploy your workflow controller as a Docker container for consistent and portable execution environments.
-
Environment Variable Support: Easily inject secrets and configuration via
.envfiles or environment variables to keep your YAML clean and secure.
pip install model-compose
Or install from source:
git clone https://github.com/hanyeol/model-compose.git
cd model-compose
pip install -e .
Requires: Python 3.9 or higher
model-compose provides a CLI interface to launch and manage your AI workflows — inspired by docker-compose.
Use the up command to launch the workflow controller, which hosts your workflows as HTTP or MCP endpoints and optionally provides a Web UI.
model-compose up
By default, this command will:
- Look for a file named
model-compose.ymlin the current working directory - Automatically load environment variables from a
.envfile in the same directory, if it exists - Start the workflow controller (default:
http://localhost:8080) - Optionally launch the Web UI (default:
http://localhost:8081, if configured)
To run in the background (detached mode):
model-compose up -d
You can specify one or more configuration files using -f:
model-compose -f base.yml -f override.yml up
If needed, you can override or extend environment variables with:
model-compose up --env-file .env
or
model-compose up --env OPENAI_API_KEY=... --env ELEVENLABS_API_KEY=...
💡 Once the controller is running, you can trigger workflows via the REST API or, if using MCP, via JSON-RPC. You can also access them through the Web UI.
To gracefully stop and remove the workflow controller and all associated services:
model-compose down
Run a workflow directly from the CLI without starting the controller:
model-compose run <workflow-name> --input '{"key": "value"}'
This is useful for testing, automation, or scripting.
| Command | Description |
|---|---|
model-compose up |
Launch the workflow controller and load defined workflows |
model-compose down |
Gracefully stop and remove the controller and all related services |
model-compose start |
Start the controller if it has been previously configured |
model-compose stop |
Temporarily pause the currently running controller |
The model-compose.yml file is the central configuration file that defines how your workflows are composed and executed.
It includes:
- Controller: configures the HTTP/MCP server, API endpoints, and optional Web UI
- Components: reusable definitions for calling APIs, running local AI models, or executing commands
- Workflows: named sets of jobs that define the flow of data
- Jobs: steps that execute specific components, with support for inputs, outputs, and dependencies
- Listeners: optional callback listeners that handle asynchronous responses from external services
- Gateways: optional tunneling services that expose your local controller to the public internet
By default, model-compose automatically looks for a file named model-compose.yml in the current working directory when running commands like up or run.
controller:
  type: http-server
  port: 8080
  base_path: /api
  webui:
    port: 8081

components:
  - id: chatgpt
    type: http-client
    base_url: https://api.openai.com/v1
    path: /chat/completions
    method: POST
    headers:
      Authorization: Bearer ${env.OPENAI_API_KEY}
      Content-Type: application/json
    body:
      model: gpt-4o
      messages:
        - role: user
          content: "Write an inspiring quote."
    output:
      quote: ${response.choices[0].message.content}

workflows:
  - id: generate-quote
    default: true
    jobs:
      - id: get-quote
        component: chatgpt
This minimal example defines a simple workflow that calls the OpenAI ChatGPT API to generate an inspiring quote.
- The
controllersection starts an HTTP server on port8080and enables a Web UI on port8081. - The
componentssection defines a reusable HTTP client namedchatgptthat makes aPOSTrequest to the OpenAI Chat Completions API. It uses an environment variableOPENAI_API_KEYfor authentication and extracts the quote from the API response. - The
workflowssection defines a single workflow calledgenerate-quote. It contains one job,get-quote, which uses thechatgptcomponent to fetch a quote from the API. - Since
default: trueis set, the workflow is selected by default if no workflow name is specified during execution.
You can easily expand this example by adding more components (e.g., text-to-speech, image generation) and connecting them through additional jobs.
listener:
  type: http-callback
  port: 8090
  base_path: /callbacks
  callbacks:
    - path: /chat-ai
      method: POST
      item: ${body.data}
      identify_by: ${item.task_id}
      result: ${item.choices[0].message.content}
This listener sets up an HTTP callback endpoint at http://localhost:8090/callbacks/chat-ai to handle asynchronous responses from an external service that behaves like ChatGPT but supports delayed or push-based results. This is useful when integrating with services that notify results via webhook-style callbacks.
gateway:
  type: http-tunnel
  driver: ngrok
  port: 8090
This gateway configuration exposes the local listener defined above to the public internet using an HTTP tunnel powered by ngrok. It forwards incoming traffic from a secure, public URL (e.g., https://abc123.ngrok.io) directly to your local callback endpoint at http://localhost:8090. This is essential when integrating with third-party services that need to push data back to your workflow via webhooks or asynchronous callbacks.
📁 For more example model-compose.yml configurations, check the examples directory in the source code.
model-compose optionally provides a lightweight Web UI to help you visually trigger workflows, inspect inputs and outputs, and monitor execution logs.

To enable the Web UI, simply add the webui section under your controller in the model-compose.yml file:
controller:
  type: http-server
  port: 8080
  webui:
    port: 8081
Once enabled, the Web UI will be available at:
http://localhost:8081
You can fully customize the Web UI experience by specifying a different driver or serving your own frontend.
By default, model-compose uses Gradio as the interactive UI. However, if you prefer to use your own static frontend (e.g., a custom React/Vite app), you can switch to the static driver.
Here’s how you can do it:
controller:
  type: http-server
  port: 8080
  webui:
    driver: static
    static_dir: webui
    port: 8081
Your frontend should be a prebuilt static site (e.g., using vite build, next export, or react-scripts build) and placed in the specified static_dir.
Make sure index.html exists in that directory.
project/
├── model-compose.yml
├── webui/
│   ├── index.html
│   ├── assets/
│   └── ...
- Ensure the
static_dirpath is relative to the project root or an absolute path. - You can use environment variables inside
model-compose.ymlto make this path configurable.
Support for additional drivers (e.g., dynamic) may be added in future versions.
Once configured, the Web UI will be available at:
http://localhost:8081
You can also expose your workflows via the Model Context Protocol (MCP) server to enable remote execution, automation, or system integration using a lightweight JSON-RPC interface.
controller:
  type: mcp-server
  port: 8080
  base_path: /mcp

components:
  - id: chatgpt
    type: http-client
    base_url: https://api.openai.com/v1
    path: /chat/completions
    method: POST
    headers:
      Authorization: Bearer ${env.OPENAI_API_KEY}
      Content-Type: application/json
    body:
      model: gpt-4o
      messages:
        - role: user
          content: "Write an inspiring quote."
    output:
      quote: ${response.choices[0].message.content}

workflows:
  - id: generate-quote
    default: true
    jobs:
      - id: get-quote
        component: chatgpt
This configuration launches the controller as an MCP server, which listens on port 8080 and exposes your workflows over a JSON-RPC API.
Once running, you can invoke workflows remotely using a standard MCP request:
{
  "jsonrpc": "2.0",
  "id": 1,
  "method": "callTool",
  "params": {
    "name": "generate-quote",
    "arguments": {}
  }
}
You can send this request via any HTTP client to:
POST http://localhost:8080/mcp
You can run the workflow controller inside a Docker container by specifying the runtime option in your model-compose.yml file.
controller:
  type: http-server
  port: 8080
  runtime: docker
This configuration will launch the controller inside a lightweight Docker container automatically managed by model-compose. It uses default settings such as container name, image, and volume mappings.
You can fully configure the Docker runtime by using an object under the runtime key:
controller:
  type: http-server
  port: 8080
  runtime:
    type: docker
    image: 192.168.0.23/custom-image:latest
    container_name: my-controller
    volumes:
      - ./models:/models
      - ./cache:/cache
    ports:
      - "5000:8080"
      - "5001:8081"
    env:
      MODEL_STORAGE_PATH: /models
    command: [ "python", "-m", "mindor.cli.compose", "up" ]
    ...
This gives you full control over:
- container_name: Custom name for the container
- image: Docker image to use
- volumes: Bind mounts for sharing files between host and container
- ports: Port mappings for host ↔ container communication
- env: Environment variables to inject
- command: Override the default entrypoint
- and many more
All of these are optional, allowing you to start simple and customize only what you need.
- Run your controller in a clean, isolated environment
- Avoid dependency conflicts with your host Python setup
- Easily deploy your project to remote servers or CI pipelines
- Share reproducible workflows with others

We welcome all contributions! Whether it's fixing bugs, improving docs, or adding examples — every bit helps.
# Setup for development
git clone https://github.com/hanyeol/model-compose.git
cd model-compose
pip install -e .[dev]
MIT License © 2025 Hanyeol Cho.
Have questions, ideas, or feedback? Open an issue or start a discussion on GitHub Discussions.
For Tasks:
Click tags to check more tools for each tasksFor Jobs:
Alternative AI tools for model-compose
Similar Open Source Tools
model-compose
model-compose is an open-source, declarative workflow orchestrator inspired by docker-compose. It lets you define and run AI model pipelines using simple YAML files. Effortlessly connect external AI services or run local AI models within powerful, composable workflows. Features include declarative design, multi-workflow support, modular components, flexible I/O routing, streaming mode support, and more. It supports running workflows locally or serving them remotely, Docker deployment, environment variable support, and provides a CLI interface for managing AI workflows.
action_mcp
Action MCP is a powerful tool for managing and automating your cloud infrastructure. It provides a user-friendly interface to easily create, update, and delete resources on popular cloud platforms. With Action MCP, you can streamline your deployment process, reduce manual errors, and improve overall efficiency. The tool supports various cloud providers and offers a wide range of features to meet your infrastructure management needs. Whether you are a developer, system administrator, or DevOps engineer, Action MCP can help you simplify and optimize your cloud operations.
pentagi
PentAGI is an innovative tool for automated security testing that leverages cutting-edge artificial intelligence technologies. It is designed for information security professionals, researchers, and enthusiasts who need a powerful and flexible solution for conducting penetration tests. The tool provides secure and isolated operations in a sandboxed Docker environment, fully autonomous AI-powered agent for penetration testing steps, a suite of 20+ professional security tools, smart memory system for storing research results, web intelligence for gathering information, integration with external search systems, team delegation system, comprehensive monitoring and reporting, modern interface, API integration, persistent storage, scalable architecture, self-hosted solution, flexible authentication, and quick deployment through Docker Compose.
company-research-agent
Agentic Company Researcher is a multi-agent tool that generates comprehensive company research reports by utilizing a pipeline of AI agents to gather, curate, and synthesize information from various sources. It features multi-source research, AI-powered content filtering, real-time progress streaming, dual model architecture, modern React frontend, and modular architecture. The tool follows an agentic framework with specialized research and processing nodes, leverages separate models for content generation, uses a content curation system for relevance scoring and document processing, and implements a real-time communication system via WebSocket connections. Users can set up the tool quickly using the provided setup script or manually, and it can also be deployed using Docker and Docker Compose. The application can be used for local development and deployed to various cloud platforms like AWS Elastic Beanstalk, Docker, Heroku, and Google Cloud Run.
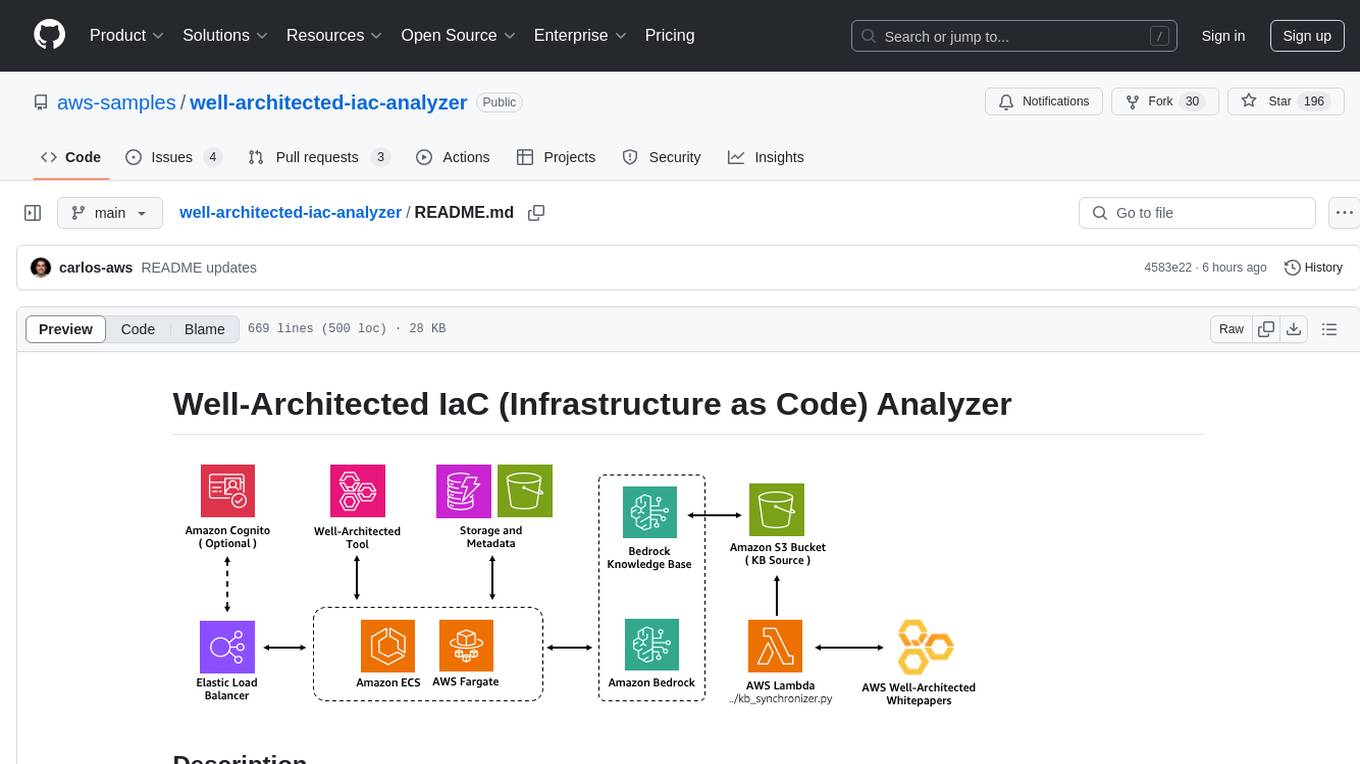
well-architected-iac-analyzer
Well-Architected Infrastructure as Code (IaC) Analyzer is a project demonstrating how generative AI can evaluate infrastructure code for alignment with best practices. It features a modern web application allowing users to upload IaC documents, complete IaC projects, or architecture diagrams for assessment. The tool provides insights into infrastructure code alignment with AWS best practices, offers suggestions for improving cloud architecture designs, and can generate IaC templates from architecture diagrams. Users can analyze CloudFormation, Terraform, or AWS CDK templates, architecture diagrams in PNG or JPEG format, and complete IaC projects with supporting documents. Real-time analysis against Well-Architected best practices, integration with AWS Well-Architected Tool, and export of analysis results and recommendations are included.

fast-mcp
Fast MCP is a Ruby gem that simplifies the integration of AI models with your Ruby applications. It provides a clean implementation of the Model Context Protocol, eliminating complex communication protocols, integration challenges, and compatibility issues. With Fast MCP, you can easily connect AI models to your servers, share data resources, choose from multiple transports, integrate with frameworks like Rails and Sinatra, and secure your AI-powered endpoints. The gem also offers real-time updates and authentication support, making AI integration a seamless experience for developers.
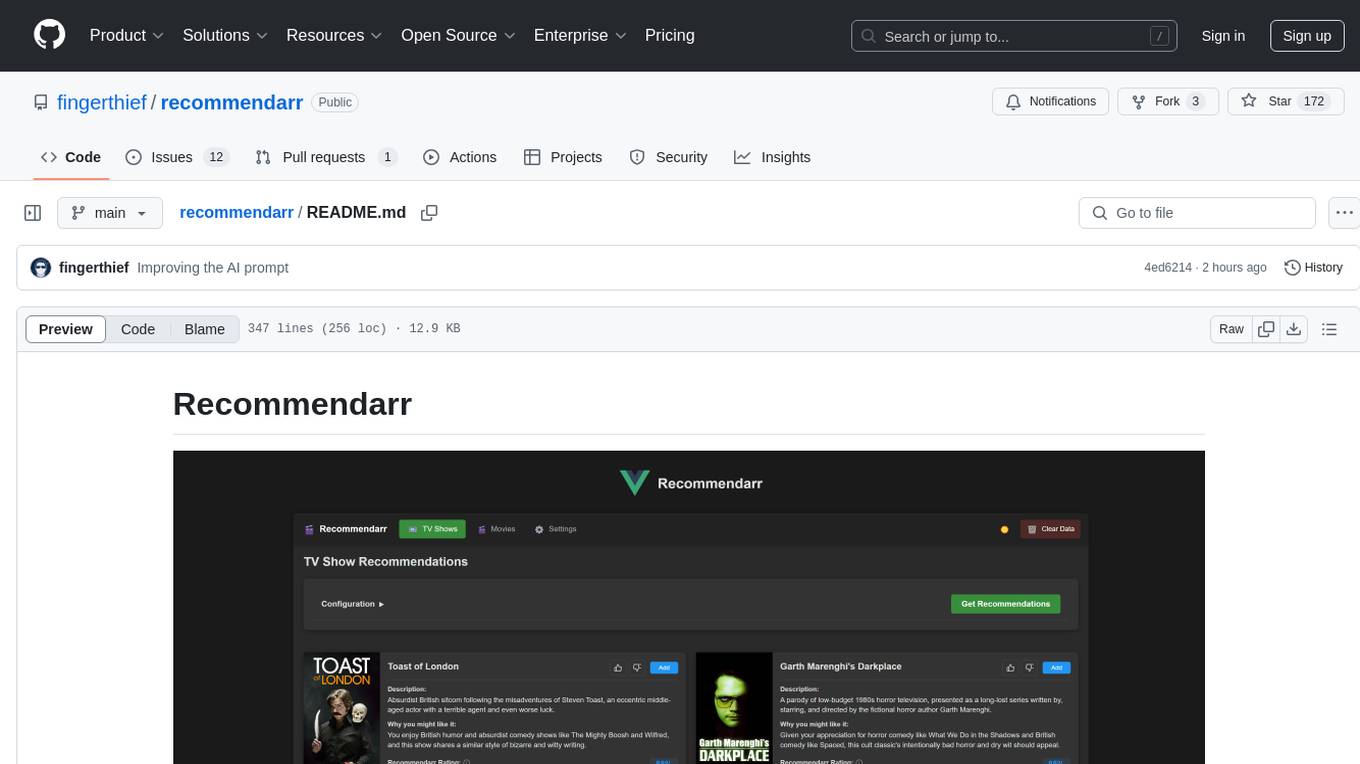
recommendarr
Recommendarr is a tool that generates personalized TV show and movie recommendations based on your Sonarr, Radarr, Plex, and Jellyfin libraries using AI. It offers AI-powered recommendations, media server integration, flexible AI support, watch history analysis, customization options, and dark/light mode toggle. Users can connect their media libraries and watch history services, configure AI service settings, and get personalized recommendations based on genre, language, and mood/vibe preferences. The tool works with any OpenAI-compatible API and offers various recommended models for different cost options and performance levels. It provides personalized suggestions, detailed information, filter options, watch history analysis, and one-click adding of recommended content to Sonarr/Radarr.
UCAgent
UCAgent is an AI-powered automated UT verification agent for chip design. It automates chip verification workflow, supports functional and code coverage analysis, ensures consistency among documentation, code, and reports, and collaborates with mainstream Code Agents via MCP protocol. It offers three intelligent interaction modes and requires Python 3.11+, Linux/macOS OS, 4GB+ memory, and access to an AI model API. Users can clone the repository, install dependencies, configure qwen, and start verification. UCAgent supports various verification quality improvement options and basic operations through TUI shortcuts and stage color indicators. It also provides documentation build and preview using MkDocs, PDF manual build using Pandoc + XeLaTeX, and resources for further help and contribution.
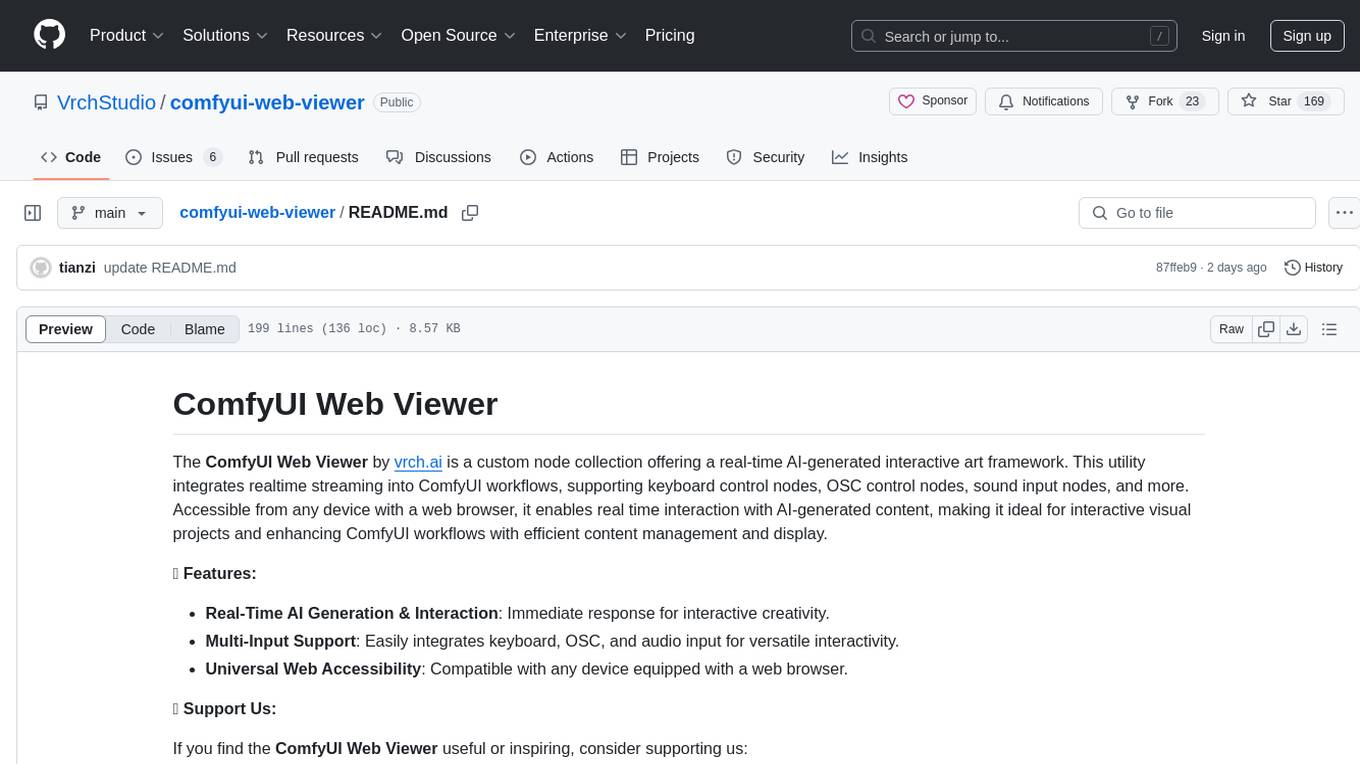
comfyui-web-viewer
The ComfyUI Web Viewer by vrch.ai is a real-time AI-generated interactive art framework that integrates realtime streaming into ComfyUI workflows. It supports keyboard control nodes, OSC control nodes, sound input nodes, and more, accessible from any device with a web browser. It enables real-time interaction with AI-generated content, ideal for interactive visual projects and enhancing ComfyUI workflows with efficient content management and display.
forge
Forge is a powerful open-source tool for building modern web applications. It provides a simple and intuitive interface for developers to quickly scaffold and deploy projects. With Forge, you can easily create custom components, manage dependencies, and streamline your development workflow. Whether you are a beginner or an experienced developer, Forge offers a flexible and efficient solution for your web development needs.
code2prompt
Code2Prompt is a powerful command-line tool that generates comprehensive prompts from codebases, designed to streamline interactions between developers and Large Language Models (LLMs) for code analysis, documentation, and improvement tasks. It bridges the gap between codebases and LLMs by converting projects into AI-friendly prompts, enabling users to leverage AI for various software development tasks. The tool offers features like holistic codebase representation, intelligent source tree generation, customizable prompt templates, smart token management, Gitignore integration, flexible file handling, clipboard-ready output, multiple output options, and enhanced code readability.
py-llm-core
PyLLMCore is a light-weighted interface with Large Language Models with native support for llama.cpp, OpenAI API, and Azure deployments. It offers a Pythonic API that is simple to use, with structures provided by the standard library dataclasses module. The high-level API includes the assistants module for easy swapping between models. PyLLMCore supports various models including those compatible with llama.cpp, OpenAI, and Azure APIs. It covers use cases such as parsing, summarizing, question answering, hallucinations reduction, context size management, and tokenizing. The tool allows users to interact with language models for tasks like parsing text, summarizing content, answering questions, reducing hallucinations, managing context size, and tokenizing text.
roast
Roast is a convention-oriented framework for creating structured AI workflows maintained by the Augmented Engineering team at Shopify. It provides a structured, declarative approach to building AI workflows with convention over configuration, built-in tools for file operations, search, and AI interactions, Ruby integration for custom steps, shared context between steps, step customization with AI models and parameters, session replay, parallel execution, function caching, and extensive instrumentation for monitoring workflow execution, AI calls, and tool usage.
cursor-tools
cursor-tools is a CLI tool designed to enhance AI agents with advanced skills, such as web search, repository context, documentation generation, GitHub integration, Xcode tools, and browser automation. It provides features like Perplexity for web search, Gemini 2.0 for codebase context, and Stagehand for browser operations. The tool requires API keys for Perplexity AI and Google Gemini, and supports global installation for system-wide access. It offers various commands for different tasks and integrates with Cursor Composer for AI agent usage.

aider-desk
AiderDesk is a desktop application that enhances coding workflow by leveraging AI capabilities. It offers an intuitive GUI, project management, IDE integration, MCP support, settings management, cost tracking, structured messages, visual file management, model switching, code diff viewer, one-click reverts, and easy sharing. Users can install it by downloading the latest release and running the executable. AiderDesk also supports Python version detection and auto update disabling. It includes features like multiple project management, context file management, model switching, chat mode selection, question answering, cost tracking, MCP server integration, and MCP support for external tools and context. Development setup involves cloning the repository, installing dependencies, running in development mode, and building executables for different platforms. Contributions from the community are welcome following specific guidelines.
DesktopCommanderMCP
Desktop Commander MCP is a server that allows the Claude desktop app to execute long-running terminal commands on your computer and manage processes through Model Context Protocol (MCP). It is built on top of MCP Filesystem Server to provide additional search and replace file editing capabilities. The tool enables users to execute terminal commands with output streaming, manage processes, perform full filesystem operations, and edit code with surgical text replacements or full file rewrites. It also supports vscode-ripgrep based recursive code or text search in folders.
For similar tasks
model-compose
model-compose is an open-source, declarative workflow orchestrator inspired by docker-compose. It lets you define and run AI model pipelines using simple YAML files. Effortlessly connect external AI services or run local AI models within powerful, composable workflows. Features include declarative design, multi-workflow support, modular components, flexible I/O routing, streaming mode support, and more. It supports running workflows locally or serving them remotely, Docker deployment, environment variable support, and provides a CLI interface for managing AI workflows.
llama_deploy
llama_deploy is an async-first framework for deploying, scaling, and productionizing agentic multi-service systems based on workflows from llama_index. It allows building workflows in llama_index and deploying them seamlessly with minimal changes to code. The system includes services endlessly processing tasks, a control plane managing state and services, an orchestrator deciding task handling, and fault tolerance mechanisms. It is designed for high-concurrency scenarios, enabling real-time and high-throughput applications.
fastagency
FastAgency is an open-source framework designed to accelerate the transition from prototype to production for multi-agent AI workflows. It provides a unified programming interface for deploying agentic workflows written in AG2 agentic framework in both development and productional settings. With features like seamless external API integration, a Tester Class for continuous integration, and a Command-Line Interface (CLI) for orchestration, FastAgency streamlines the deployment process, saving time and effort while maintaining flexibility and performance. Whether orchestrating complex AI agents or integrating external APIs, FastAgency helps users quickly transition from concept to production, reducing development cycles and optimizing multi-agent systems.

cua
Cua is a tool for creating and running high-performance macOS and Linux virtual machines on Apple Silicon, with built-in support for AI agents. It provides libraries like Lume for running VMs with near-native performance, Computer for interacting with sandboxes, and Agent for running agentic workflows. Users can refer to the documentation for onboarding, explore demos showcasing AI-Gradio and GitHub issue fixing, and utilize accessory libraries like Core, PyLume, Computer Server, and SOM. Contributions are welcome, and the tool is open-sourced under the MIT License.
For similar jobs
ludwig
Ludwig is a declarative deep learning framework designed for scale and efficiency. It is a low-code framework that allows users to build custom AI models like LLMs and other deep neural networks with ease. Ludwig offers features such as optimized scale and efficiency, expert level control, modularity, and extensibility. It is engineered for production with prebuilt Docker containers, support for running with Ray on Kubernetes, and the ability to export models to Torchscript and Triton. Ludwig is hosted by the Linux Foundation AI & Data.
wenda
Wenda is a platform for large-scale language model invocation designed to efficiently generate content for specific environments, considering the limitations of personal and small business computing resources, as well as knowledge security and privacy issues. The platform integrates capabilities such as knowledge base integration, multiple large language models for offline deployment, auto scripts for additional functionality, and other practical capabilities like conversation history management and multi-user simultaneous usage.
LLMonFHIR
LLMonFHIR is an iOS application that utilizes large language models (LLMs) to interpret and provide context around patient data in the Fast Healthcare Interoperability Resources (FHIR) format. It connects to the OpenAI GPT API to analyze FHIR resources, supports multiple languages, and allows users to interact with their health data stored in the Apple Health app. The app aims to simplify complex health records, provide insights, and facilitate deeper understanding through a conversational interface. However, it is an experimental app for informational purposes only and should not be used as a substitute for professional medical advice. Users are advised to verify information provided by AI models and consult healthcare professionals for personalized advice.
Chinese-Mixtral-8x7B
Chinese-Mixtral-8x7B is an open-source project based on Mistral's Mixtral-8x7B model for incremental pre-training of Chinese vocabulary, aiming to advance research on MoE models in the Chinese natural language processing community. The expanded vocabulary significantly improves the model's encoding and decoding efficiency for Chinese, and the model is pre-trained incrementally on a large-scale open-source corpus, enabling it with powerful Chinese generation and comprehension capabilities. The project includes a large model with expanded Chinese vocabulary and incremental pre-training code.
AI-Horde-Worker
AI-Horde-Worker is a repository containing the original reference implementation for a worker that turns your graphics card(s) into a worker for the AI Horde. It allows users to generate or alchemize images for others. The repository provides instructions for setting up the worker on Windows and Linux, updating the worker code, running with multiple GPUs, and stopping the worker. Users can configure the worker using a WebUI to connect to the horde with their username and API key. The repository also includes information on model usage and running the Docker container with specified environment variables.
openshield
OpenShield is a firewall designed for AI models to protect against various attacks such as prompt injection, insecure output handling, training data poisoning, model denial of service, supply chain vulnerabilities, sensitive information disclosure, insecure plugin design, excessive agency granting, overreliance, and model theft. It provides rate limiting, content filtering, and keyword filtering for AI models. The tool acts as a transparent proxy between AI models and clients, allowing users to set custom rate limits for OpenAI endpoints and perform tokenizer calculations for OpenAI models. OpenShield also supports Python and LLM based rules, with upcoming features including rate limiting per user and model, prompts manager, content filtering, keyword filtering based on LLM/Vector models, OpenMeter integration, and VectorDB integration. The tool requires an OpenAI API key, Postgres, and Redis for operation.
VoAPI
VoAPI is a new high-value/high-performance AI model interface management and distribution system. It is a closed-source tool for personal learning use only, not for commercial purposes. Users must comply with upstream AI model service providers and legal regulations. The system offers a visually appealing interface, independent development documentation page support, service monitoring page configuration support, and third-party login support. It also optimizes interface elements, user registration time support, data operation button positioning, and more.

VoAPI
VoAPI is a new high-value/high-performance AI model interface management and distribution system. It is a closed-source tool for personal learning use only, not for commercial purposes. Users must comply with upstream AI model service providers and legal regulations. The system offers a visually appealing interface with features such as independent development documentation page support, service monitoring page configuration support, and third-party login support. Users can manage user registration time, optimize interface elements, and support features like online recharge, model pricing display, and sensitive word filtering. VoAPI also provides support for various AI models and platforms, with the ability to configure homepage templates, model information, and manufacturer information.