
well-architected-iac-analyzer
Generative AI tool for evaluating Infrastructure as Code and architecture diagrams against AWS Well-Architected best practices.
Stars: 196
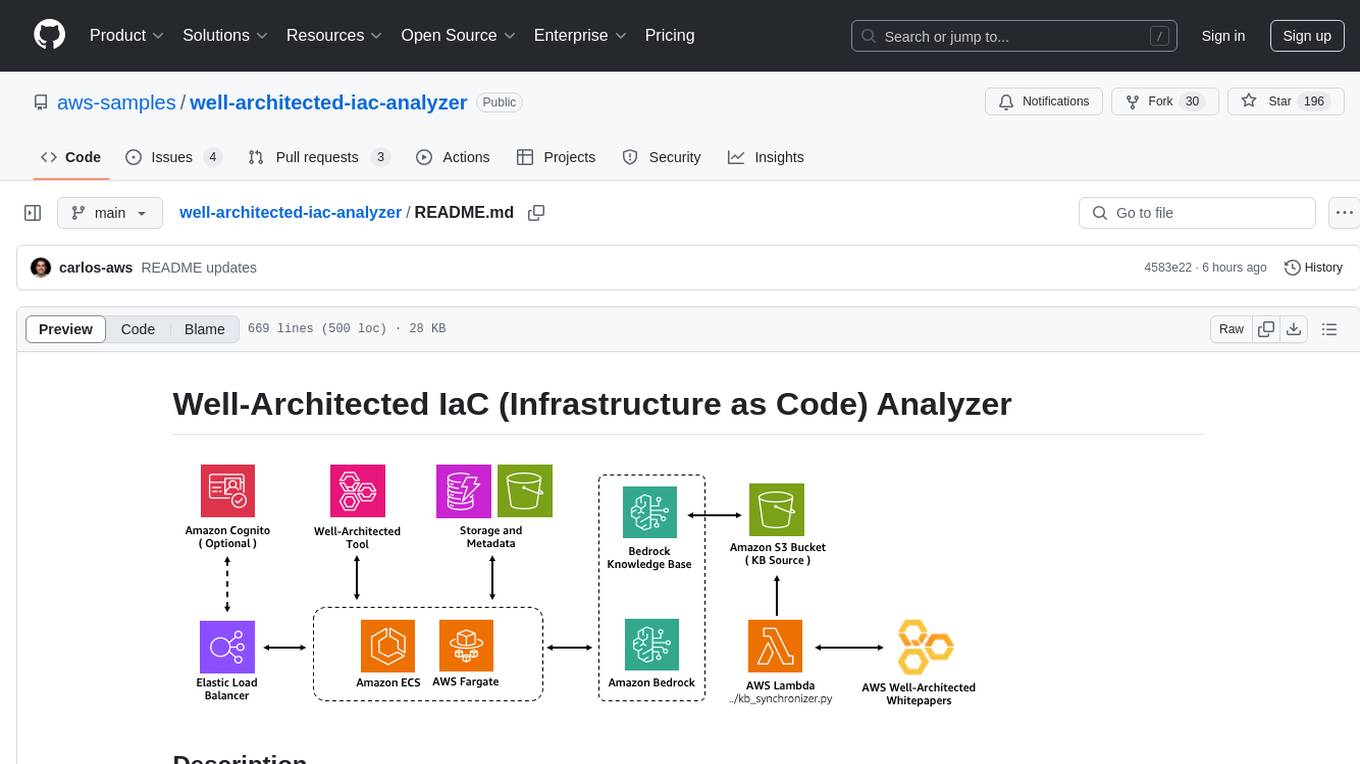
Well-Architected Infrastructure as Code (IaC) Analyzer is a project demonstrating how generative AI can evaluate infrastructure code for alignment with best practices. It features a modern web application allowing users to upload IaC documents, complete IaC projects, or architecture diagrams for assessment. The tool provides insights into infrastructure code alignment with AWS best practices, offers suggestions for improving cloud architecture designs, and can generate IaC templates from architecture diagrams. Users can analyze CloudFormation, Terraform, or AWS CDK templates, architecture diagrams in PNG or JPEG format, and complete IaC projects with supporting documents. Real-time analysis against Well-Architected best practices, integration with AWS Well-Architected Tool, and export of analysis results and recommendations are included.
README:

Well-Architected Infrastructure as Code (IaC) Analyzer is a project that demonstrates how generative AI can be used to evaluate infrastructure code for alignment with best practices.
It features a modern web application built with React and AWS Cloudscape Design System, allowing users to upload IaC documents (e.g., AWS CloudFormation, Terraform, or AWS CDK templates), complete IaC projects (multiple files or zip archives), or architecture diagrams for assessment. The application leverages Amazon Bedrock to analyze the infrastructure against AWS Well-Architected best practices. These best practices are sourced from AWS Well-Architected whitepapers and synchronized with the Amazon Bedrock knowledge base.
This tool provides users with insights into how well their infrastructure code aligns with or deviates from established AWS best practices, offering suggestions for improving cloud architecture designs. Users can also upload supporting documents to provide additional context for more accurate analysis results. For architecture diagrams, it can even generate corresponding IaC templates following AWS best practices.
- Upload and analyze Infrastructure as Code templates:
- CloudFormation (YAML/JSON)
- Terraform (.tf)
- AWS CDK (in any supported language)
- Upload and analyze architecture diagrams:
- PNG format
- JPEG/JPG format
- Analyze complete IaC projects:
- Multiple files at once
- ZIP archives containing infrastructure code
- Add supporting documents (PDF, TXT, PNG, JPEG) to provide additional context for analysis
- Generate IaC templates from architecture diagrams
- Real-time analysis against Well-Architected best practices
- Integration with AWS Well-Architected Tool
- Export analysis results and recommendations


You have three options for deploying this solution:
- Option 1: Using a CloudFormation Deployment Stack (Recommended)
- Option 2: Using a Deployment Script
- Option 3: Manual Deployment
This option uses AWS CloudFormation to create a temporary deployment environment to deploy the Well-Architected IaC Analyzer solution. This approach doesn't require any tools to be installed on your local machine.
You must enable AWS Bedrock Model Access to the following LLM models in your AWS region:
- Titan Text Embeddings V2
- Claude 3.5 Sonnet v2
- To enable these models, follow the instructions here.
-
Download the CloudFormation template: iac-analyzer-deployment-stack.yaml
-
Open the AWS CloudFormation console:
- Make sure you are in the same AWS region where you enabled access to the LLM models
-
On the "Create stack" page:
- Select "Upload a template file" and upload the
iac-analyzer-deployment-stack.yamltemplate - Choose "Next"
- Select "Upload a template file" and upload the
-
On the "Specify stack details" page. Enter or change the stack name, then:
- Change the stack parameters as needed. Check the CloudFormation Configuration Parameters section below for details
Note: By default, the stack deploys with a Public Application Load Balancer (internet-facing) without authentication enabled. It's strongly recommended to enable authentication to properly secure your internet-facing application.
- Choose "Next" until reaching the "Review" page and choose "Submit".
The deployment process typically takes 15-20 minutes.
Once complete, you'll find a new CloudFormation stack named WA-IaC-Analyzer-{region}-GenAIStack containing all the deployed resources for this solution. Find the application URL in the stack outputs:
- In the CloudFormation console, navigate to the Outputs tab of the stack named WA-IaC-Analyzer-{region}-GenAIStack
- Look for the FrontendURL value
-
If you enabled authentication with a custom domain:
- Create a DNS record (CNAME or Alias) pointing to the ALB domain name
-
If you created a new Cognito user pool:
- Navigate to the Amazon Cognito console
- Find the user pool created by the stack (named "WAAnalyzerUserPool")
- Add users who should have access to the application
-
Access your deployed application using the URL from the CloudFormation outputs (or your CNAME or Alias pointing to the ALB)
Expand this section for instructions using the deployment script:
You must enable AWS Bedrock Model Access to the following LLM models in your AWS region:
- Titan Text Embeddings V2
- Claude 3.5 Sonnet v2
- To enable these models, follow the instructions here.
Apart from enabling access to the model listed above, the following tools must be installed on your local machine:
- Node.js (v18 or later) and npm
- Python (v3.11 or later) and pip
- AWS CDK CLI
- Either one of these container tools:
- AWS CLI configured with appropriate credentials
Note: If you would like to change the default Load Balancer scheme, AI model or authentication options, check the Configuration Options For Manual Deployments section first before deploying.
- Clone the Repository
git clone https://github.com/aws-samples/well-architected-iac-analyzer.git
cd well-architected-iac-analyzer- Make the deployment script executable:
chmod +x deploy-wa-analyzer.sh- Deploy with required parameters:
# Deploy using Docker
./deploy-wa-analyzer.sh -r us-west-2 -c docker

# Or deploy using Finch
./deploy-wa-analyzer.sh -r us-west-2 -c finch
The script will automatically:
- Check for prerequisites
- Set up the Python virtual environment
- Install all dependencies
- Deploy the CDK stack
- Provide post-deployment information
After successful deployment, you can find the Application Load Balancer (ALB) DNS name in:
- The outputs of the
deploy-wa-analyzer.shscript - The outputs section of the CloudFormation stack named
WA-IaC-Analyzer-{region}-GenAIStackin the AWS Console
If you prefer to manually deploy step by step, expand this section for more instructions:
You must enable AWS Bedrock Model Access to the following LLM models in your AWS region:
- Titan Text Embeddings V2
- Claude 3.5 Sonnet v2
- To enable these models, follow the instructions here.
Apart from enabling access to the model listed above, the following tools must be installed on your local machine:
- Node.js (v18 or later) and npm
- Python (v3.11 or later) and pip
- AWS CDK CLI
- Either one of these container tools:
- AWS CLI configured with appropriate credentials
Note: If you would like to change the default Load Balancer scheme, AI model or authentication options, check the Configuration Options For Manual Deployments section first before deploying.
- Clone the Repository
git clone https://github.com/aws-samples/well-architected-iac-analyzer.git
cd well-architected-iac-analyzer- Set Up Python Virtual Environment
# Create virtual environment
python -m venv .venv

# Activate virtual environment
# On Linux/macOS:
source .venv/bin/activate
# On Windows:
.venv\Scripts\activate

# Verify you're in the virtual environment
# You should see (.venv) at the beginning of your prompt- Install Dependencies
Install Python dependencies:
pip3 install -r requirements.txtInstall CDK dependencies:
npm installInstall Frontend dependencies:
cd ecs_fargate_app/frontend
npm install
cd ../..
Install Backend dependencies:
cd ecs_fargate_app/backend
npm install
cd ../..- Deploy the Stack
Set the AWS region and ignore ECR credentials storage during CDK deployment:
export CDK_DEPLOY_REGION=us-west-2
export AWS_ECR_IGNORE_CREDS_STORAGE=true
Set the container runtime:
export CDK_DOCKER=finch  # For Finch

# OR

export CDK_DOCKER=docker # For Docker
Bootstrap CDK (if not already done):
cdk bootstrapDeploy the stack:
cdk deployAfter successful deployment, you can find the Application Load Balancer (ALB) DNS name in:
- The outputs of the
cdk deploycommand - The outputs section of the CloudFormation stack named
WA-IaC-Analyzer-{region}-GenAIStackin the AWS Console
The deployment stack template provides a comprehensive set of configuration options organized into parameter groups. Expand this to see more details:
-
Deploy with internet-facing Application Load Balancer? (
PublicLoadBalancer)-
True(Default): Deploys an internet-facing load balancer accessible from the internet -
False: Deploys an internal load balancer accessible only within your VPC network -
Access considerations for internal load balancers: To access an internal load balancer, you'll need network connectivity to the deployed VPC via:
- VPC peering
- VPN connection
- AWS Direct Connect
- Other network connectivity solutions
⚠️ Security Warning: If you selectTruewith authentication disabled, your application will be publicly accessible without authentication. For public-facing deployments, we strongly recommend enabling authentication.
-
-
Amazon Bedrock Model ID (
ModelId)- Default:
anthropic.claude-3-5-sonnet-20241022-v2:0(Claude 3.5 Sonnet v2) - You can specify an alternative Bedrock model ID if needed
- Note: This application has been primarily tested with Claude 3.5 Sonnet v2. While other Bedrock models may work, using different models might lead to unexpected results.
- Default:
-
Enable Authentication (
Authentication)-
False(Default): No authentication required to access the application -
True: Enables authentication via the selected method
-
-
Authentication Method (
AuthType)-
none(Default): No authentication -
new-cognito: Creates a new Amazon Cognito user pool -
existing-cognito: Uses an existing Amazon Cognito user pool -
oidc: Uses an OpenID Connect provider (Auth0, Okta, etc.)
-
-
SSL Certificate ARN (
CertificateArn)- Required when
Authenticationis set toTrue - Format:
arn:aws:acm:region:account:certificate/certificate-id - Important: Before enabling authentication, you must have a valid AWS Certificate Manager (ACM) certificate covering the DNS domain name that you plan to use for accessing the application
- Required when
These parameters are required when AuthType is set to new-cognito:
-
Cognito Domain Prefix (
CognitoDomainPrefix)- A unique prefix for your Cognito domain (e.g.,
wa-analyzer) - The resulting domain will be:
your-prefix.auth.region.amazoncognito.com
- A unique prefix for your Cognito domain (e.g.,
-
Allowed Callback URLs (
CallbackUrls)- Comma-separated list of URLs where users will be redirected after signing in
- Must include the URL you'll use to access the application, followed by
/oauth2/idpresponse - Example:
https://wa-analyzer.example.com/oauth2/idpresponse
-
Logout Redirect URL (
LogoutUrl)- URL where users will be redirected after signing out
- Example:
https://wa-analyzer.example.com
These parameters are required when AuthType is set to existing-cognito:
-
Existing Cognito User Pool ARN (
ExistingUserPoolArn)- ARN of your existing Cognito user pool
- Format:
arn:aws:cognito-idp:region:account:userpool/pool-id
-
Existing Cognito Client ID (
ExistingUserPoolClientId)- The client ID from your existing Cognito user pool
-
Existing Cognito Domain (
ExistingUserPoolDomain)- The domain of your existing Cognito user pool
- Can be a Cognito prefix domain:
your-prefix.auth.region.amazoncognito.com - Or a custom domain:
auth.your-domain.com
-
Existing Cognito Logout URL (
ExistingCognitoLogoutUrl)- The URL users are redirected to after signing out
- Example:
https://wa-analyzer.example.com
These parameters are required when AuthType is set to oidc:
-
OIDC Issuer URL (
OidcIssuer)- The issuer URL for your OIDC provider
- Example for Auth0:
https://your-tenant.us.auth0.com/authorize
-
OIDC Client ID (
OidcClientId)- The client ID from your OIDC provider
-
OIDC Authorization Endpoint URL (
OidcAuthorizationEndpoint)- The authorization endpoint of your OIDC provider
- Example for Auth0:
https://your-tenant.us.auth0.com/authorize
-
OIDC Token Endpoint URL (
OidcTokenEndpoint)- The token endpoint of your OIDC provider
- Example for Auth0:
https://your-tenant.us.auth0.com/oauth/token
-
OIDC User Info Endpoint URL (
OidcUserInfoEndpoint)- The user info endpoint of your OIDC provider
- Example for Auth0:
https://your-tenant.us.auth0.com/userinfo
-
OIDC Logout URL (
OidcLogoutUrl)- The URL for logging out users
- Example for Auth0:
https://your-tenant.us.auth0.com/v2/logout?client_id=your-client-id&returnTo=https://wa-analyzer.example.com
Important OIDC Note: Before deploying with OIDC authentication, you must create a secret in AWS Secrets Manager named
WAIaCAnalyzerOIDCSecretcontaining your OIDC client secret in the same region where you'll deploy the stack:# Using AWS CLI aws secretsmanager create-secret \ --name WAIaCAnalyzerOIDCSecret \ --secret-string "your-oidc-client-secret" \ --region <aws-region>
If you are following either the Option 2 or 3 for deploying the solution, configuration parameters are managed from the `config.ini` file. Expand this section to learn more:
If you want to use a different model than "Claude 3.5 Sonnet v2", update the config.ini with the correct model ID:
[settings]
model_id = anthropic.claude-3-5-sonnet-20241022-v2:0
Note: This application has been primarily tested with "Claude 3.5 Sonnet v2". While other Bedrock models may work, using different models might lead to unexpected results. The default model ID is set to
anthropic.claude-3-5-sonnet-20241022-v2:0.
By default, this project will deploy the Load Balancer scheme as internet-facing (Public load balancer), making it accessible from the internet.
If you need to change the load balancer scheme to internal, you can modify the public_load_balancer parameter in the config.ini file:
[settings]
public_load_balancer = False
To access an internal load balancer, you will need to be in the private network connected to the deployed VPC, either via:
- VPC peering
- VPN
- AWS Direct Connect
- Other network connectivity solutions
Note: Before enabling authentication, make sure you have a valid AWS Certificate Manager (ACM) certificate covering the DNS domain name (CNAME or Alias) that you plan to use to point to this application's ALB.
For Example:
- If you own the domain
*.example.com- And you plan to access the application via
wa-analyzer.example.com(with a CNAME or Alias pointing to the ALB deployed by this stack)- You must first create or import a certificate in ACM that covers either:
*.example.com, orwa-analyzer.example.com- Then, you can add the certificate's ARN in the
certificate_arnparameter below when deploying the stack
The application can be deployed with different authentication configurations managed via the config.ini file.
A. Default Deployment (No Authentication)
- HTTP listener only
- Can be deployed as public or private ALB
- Example settings in config.ini:
authentication = False
auth_type = none
B. New Cognito User Pool
- HTTPS listener with AWS Cognito authentication
- Creates a new Cognito user pool
- Self-signup disabled by default
- Example settings in config.ini:
# In below example, "wa-analyzer.example.com" is the DNS alias that you would create pointing to the ALB deployed by this CDK stack
authentication = True
auth_type = new-cognito
certificate_arn = arn:aws:acm:region:account:certificate/certificate-id
cognito_domain_prefix = your-domain-prefix
allback_urls = https://wa-analyzer.example.com/oauth2/idpresponse
logout_url = https://wa-analyzer.example.com
C. Existing Cognito User Pool
- HTTPS listener with existing AWS Cognito authentication
- Uses an existing Cognito user pool
- Example settings in config.ini:
# In below example, "wa-analyzer.example.com" is the DNS alias that you would create pointing to the ALB deployed by this CDK stack
authentication = True
auth_type = existing-cognito
certificate_arn = arn:aws:acm:region:account:certificate/certificate-id
existing_user_pool_arn = arn:aws:cognito-idp:<aws-region>:<aws-account-id>:userpool/<user-pool-id>
existing_user_pool_client_id = <user-pool-client-id>
existing_user_pool_domain = <your-existing-cognito-domain-prefix>.auth.<aws-region>.amazoncognito.com # Example using Cognito prefix domain: https://docs.aws.amazon.com/cognito/latest/developerguide/cognito-user-pools-assign-domain-prefix.html
# Or; existing_user_pool_domain = wa-analyzer-auth.example.com # Example of custom domain (e.g. wa-analyzer-auth.example.com): https://docs.aws.amazon.com/cognito/latest/developerguide/cognito-user-pools-add-custom-domain.html)
existing_cognito_logout_url = https://wa-analyzer.example.com
D. OpenID Connect (OIDC)
- HTTPS listener with OIDC authentication
- Compatible with any OIDC-compliant identity provider
If you plan to use OIDC authentication (auth_type = oidc), follow these steps:
-
Before deployment, create a secret in AWS Secrets Manager named
WAIaCAnalyzerOIDCSecretcontaining your OIDC client secret before deploying the stack. The secret must be created in the same AWS region where you plan to deploy the stack:# Using AWS CLI aws secretsmanager create-secret \ --name WAIaCAnalyzerOIDCSecret \ --secret-string "your-oidc-client-secret" \ --region <aws-region> # Or you can create it via the AWS Console: # 1. Go to AWS Secrets Manager console # 2. Choose "Store a new secret" # 3. Choose "Other type of secret" # 4. Enter your OIDC client secret as a plaintext value # 5. Set the secret name exactly as: WAIaCAnalyzerOIDCSecret # 6. Do not add any automatic rotation # 7. Complete the secret creation
-
Configure OIDC settings in config.ini:
# Below is an example when using Okta as your OIDC IdP, refer to the config.ini file for more examples.
# In below example, "wa-analyzer.example.com" is the DNS alias that you would create pointing to the ALB deployed by this CDK stack
authentication = True
auth_type = oidc
certificate_arn = arn:aws:acm:region:account:certificate/certificate-id
oidc_issuer = https://<okta-tenant-id>.us.auth0.com/authorize
oidc_client_id = <okta-client-id>
oidc_authorization_endpoint = https://<okta-tenant-id>.us.auth0.com/authorize
oidc_token_endpoint = https://<okta-tenant-id>.us.auth0.com/oauth/token
oidc_user_info_endpoint = https://<okta-tenant-id>.us.auth0.com/userinfo
oidc_logout_url = https://<okta-tenant-id>.us.auth0.com/v2/logout?client_id=<oidc-client-id>&returnTo=https://wa-analyzer.example.com (# Refer to https://auth0.com/docs/authenticate/login/logout)
You have two options to remove all resources created by this solution:
- Open the CloudFormation console
- Find and delete the stack named
WA-IaC-Analyzer-{region}-GenAIStack
Only use this clean up option if you followed either Option 2 or 3 when deploying the solution. Expand for more details:
:- Make the destroy script executable:
chmod +x destroy-wa-analyzer.sh- Run the script with required parameters. Make sure to use the same region where you deployed the stack:
# Clean up using Docker
./destroy-wa-analyzer.sh -r us-west-2 -c docker

# Or clean up using Finch
./destroy-wa-analyzer.sh -r us-west-2 -c finch
The script will automatically:
- Verify prerequisites
- Set up the necessary environment
- Destroy all resources in the stack
For development purposes, you can run the application locally using either Finch or Docker containers. This allows you to make changes to the code and see them reflected immediately without having to deploy code changes into your AWS stack.
In addition to the main prerequisites, ensure you have:
- Either Finch or Docker installed and running
- AWS credentials configured with access to required services
- Access to Amazon Bedrock service and the required models (as described in the main Prerequisites section)
Note for Existing Stack Users: If you have already deployed this CDK stack in your AWS account, you can skip the manual resource creation steps below. Instead:
- Go to the CloudFormation console and find your stack (it starts with "WA-IaC-Analyzer-")
- In the "Outputs" tab of the CDK CloudFormation stack, find:
KnowledgeBaseID: Use this value for KNOWLEDGE_BASE_ID in your .env file (for "Setting up Local Development Environment" section below)WellArchitectedDocsS3Bucket: Use this value for WA_DOCS_S3_BUCKET in your .env file (for "Setting up Local Development Environment" section below)If you haven't deployed the stack yet, follow the steps below to create the required resources manually:
-
Create an S3 bucket:
aws s3 mb s3://your-knowledgebase-source-bucket-name --region your-aws-region
-
Upload Well-Architected documents:
aws s3 cp ecs_fargate_app/well_architected_docs/ s3://your-knowledgebase-source-bucket-name/ --recursive
-
Create a Bedrock Knowledge Base:
- Go to the Amazon Bedrock console
- Navigate to Knowledge bases
- Choose "Create knowledge base with vector store"
- Enter a name for your knowledge base
- Select "Amazon S3" as the data source
- Choose "Next"
- Add your S3 bucket as a data source:
- Choose the bucket you created
- Leave all other settings as default
- Choose "Next"
- Select "Titan Text Embeddings v2" as the embedding model and use the default Vector database settings
- Choose "Next" and Complete the knowledge base creation
- Note the Knowledge Base ID from the details page
- Create a
.envfile in the root directory with the following variables:
# AWS Authentication
AWS_REGION=your-aws-region-key
AWS_ACCESS_KEY_ID=your-access-key
AWS_SECRET_ACCESS_KEY=your-secret-key
AWS_SESSION_TOKEN=your-session-token

# Well-Architected Framework Resources
WA_DOCS_S3_BUCKET=your-knowledgebase-source-bucket-name
KNOWLEDGE_BASE_ID=your-kb-id
MODEL_ID=anthropic.claude-3-5-sonnet-20241022-v2:0

# Storage Configuration
STORAGE_ENABLED=true
ANALYSIS_STORAGE_BUCKET=your-analysis-storage-bucket-name
ANALYSIS_METADATA_TABLE=your-analysis-metadata-table-name
Security Note: It is encouraged the use of temporary credentials (including AWS_SESSION_TOKEN) when running the application locally. More details in Temporary security credentials in IAM. Temporary credentials have a limited lifetime and automatically expire, providing an additional layer of security.
Storage Configuration Notes:
- If you have already deployed this CDK stack in your AWS account:
- Go to the CloudFormation console and find your stack (it starts with "WA-IaC-Analyzer-")
- In the "Outputs" tab, find:
AnalysisStorageBucketName: Use this value for ANALYSIS_STORAGE_BUCKETAnalysisMetadataTableName: Use this value for ANALYSIS_METADATA_TABLE
- Make the development script executable:
chmod +x dev.sh- Start the development environment using either Docker or Finch:
# Using Docker
./dev.sh -c docker -up

# Or using Finch
./dev.sh -c finch -up
This will:
- Build and start the frontend container (available at http://localhost:8080)
- Build and start the backend container (available at http://localhost:3000)
- Enable hot reloading for both frontend and backend changes
- Mount source code directories as volumes for immediate updates
- To stop the development environment:
# Using Docker
./dev.sh -c docker -down

# Or using Finch
./dev.sh -c finch -down# Start development environment
./dev.sh -c <container_tool> -up
# Stop development environment
./dev.sh -c <container_tool> -down
# Show help and usage information
./dev.sh -hWhere <container_tool> is either docker or finch.
- Local development uses
finch-compose.dev.yamlfor container configuration - Production deployment continues to use CDK as described in the Installation and Deployment section
See CONTRIBUTING for more information.
This library is licensed under the MIT-0 License. See the LICENSE file.
For Tasks:
Click tags to check more tools for each tasksFor Jobs:
Alternative AI tools for well-architected-iac-analyzer
Similar Open Source Tools
well-architected-iac-analyzer
Well-Architected Infrastructure as Code (IaC) Analyzer is a project demonstrating how generative AI can evaluate infrastructure code for alignment with best practices. It features a modern web application allowing users to upload IaC documents, complete IaC projects, or architecture diagrams for assessment. The tool provides insights into infrastructure code alignment with AWS best practices, offers suggestions for improving cloud architecture designs, and can generate IaC templates from architecture diagrams. Users can analyze CloudFormation, Terraform, or AWS CDK templates, architecture diagrams in PNG or JPEG format, and complete IaC projects with supporting documents. Real-time analysis against Well-Architected best practices, integration with AWS Well-Architected Tool, and export of analysis results and recommendations are included.
bedrock-claude-chat
This repository is a sample chatbot using the Anthropic company's LLM Claude, one of the foundational models provided by Amazon Bedrock for generative AI. It allows users to have basic conversations with the chatbot, personalize it with their own instructions and external knowledge, and analyze usage for each user/bot on the administrator dashboard. The chatbot supports various languages, including English, Japanese, Korean, Chinese, French, German, and Spanish. Deployment is straightforward and can be done via the command line or by using AWS CDK. The architecture is built on AWS managed services, eliminating the need for infrastructure management and ensuring scalability, reliability, and security.
hash
HASH is a self-building, open-source database which grows, structures and checks itself. With it, we're creating a platform for decision-making, which helps you integrate, understand and use data in a variety of different ways.
cursor-tools
cursor-tools is a CLI tool designed to enhance AI agents with advanced skills, such as web search, repository context, documentation generation, GitHub integration, Xcode tools, and browser automation. It provides features like Perplexity for web search, Gemini 2.0 for codebase context, and Stagehand for browser operations. The tool requires API keys for Perplexity AI and Google Gemini, and supports global installation for system-wide access. It offers various commands for different tasks and integrates with Cursor Composer for AI agent usage.
forge
Forge is a powerful open-source tool for building modern web applications. It provides a simple and intuitive interface for developers to quickly scaffold and deploy projects. With Forge, you can easily create custom components, manage dependencies, and streamline your development workflow. Whether you are a beginner or an experienced developer, Forge offers a flexible and efficient solution for your web development needs.
RA.Aid
RA.Aid is an AI software development agent powered by `aider` and advanced reasoning models like `o1`. It combines `aider`'s code editing capabilities with LangChain's agent-based task execution framework to provide an intelligent assistant for research, planning, and implementation of multi-step development tasks. It handles complex programming tasks by breaking them down into manageable steps, running shell commands automatically, and leveraging expert reasoning models like OpenAI's o1. RA.Aid is designed for everyday software development, offering features such as multi-step task planning, automated command execution, and the ability to handle complex programming tasks beyond single-shot code edits.
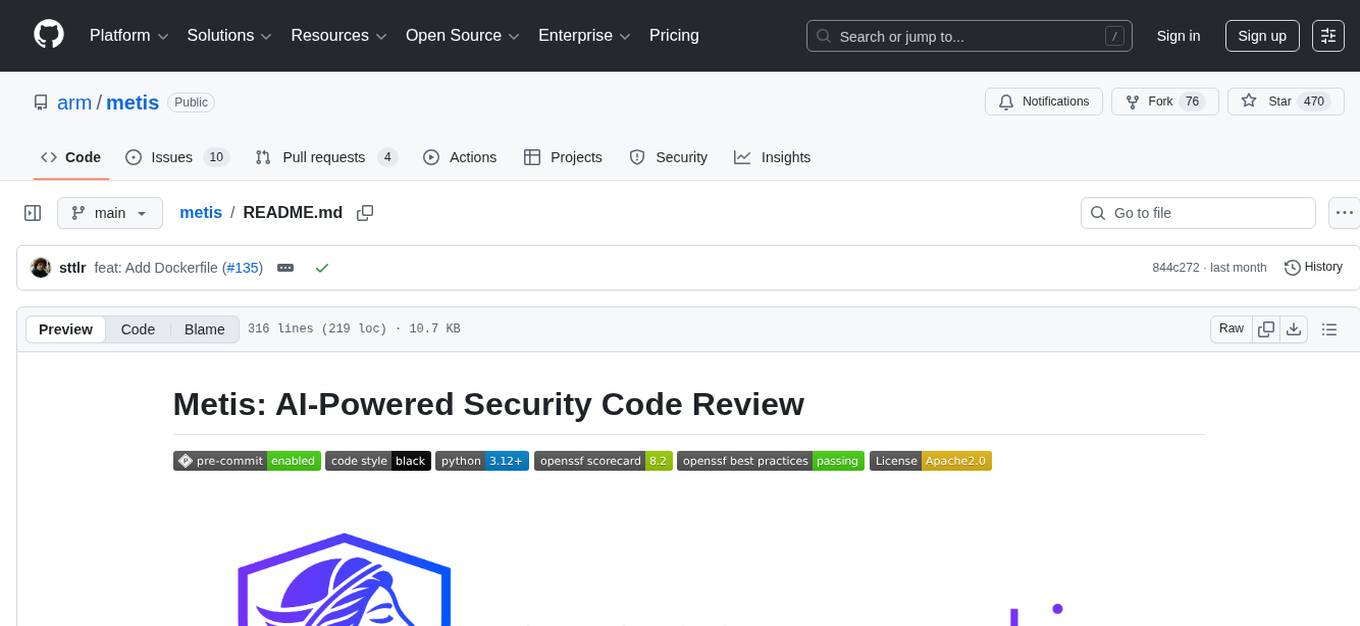
metis
Metis is an open-source, AI-driven tool for deep security code review, created by Arm's Product Security Team. It helps engineers detect subtle vulnerabilities, improve secure coding practices, and reduce review fatigue. Metis uses LLMs for semantic understanding and reasoning, RAG for context-aware reviews, and supports multiple languages and vector store backends. It provides a plugin-friendly and extensible architecture, named after the Greek goddess of wisdom, Metis. The tool is designed for large, complex, or legacy codebases where traditional tooling falls short.
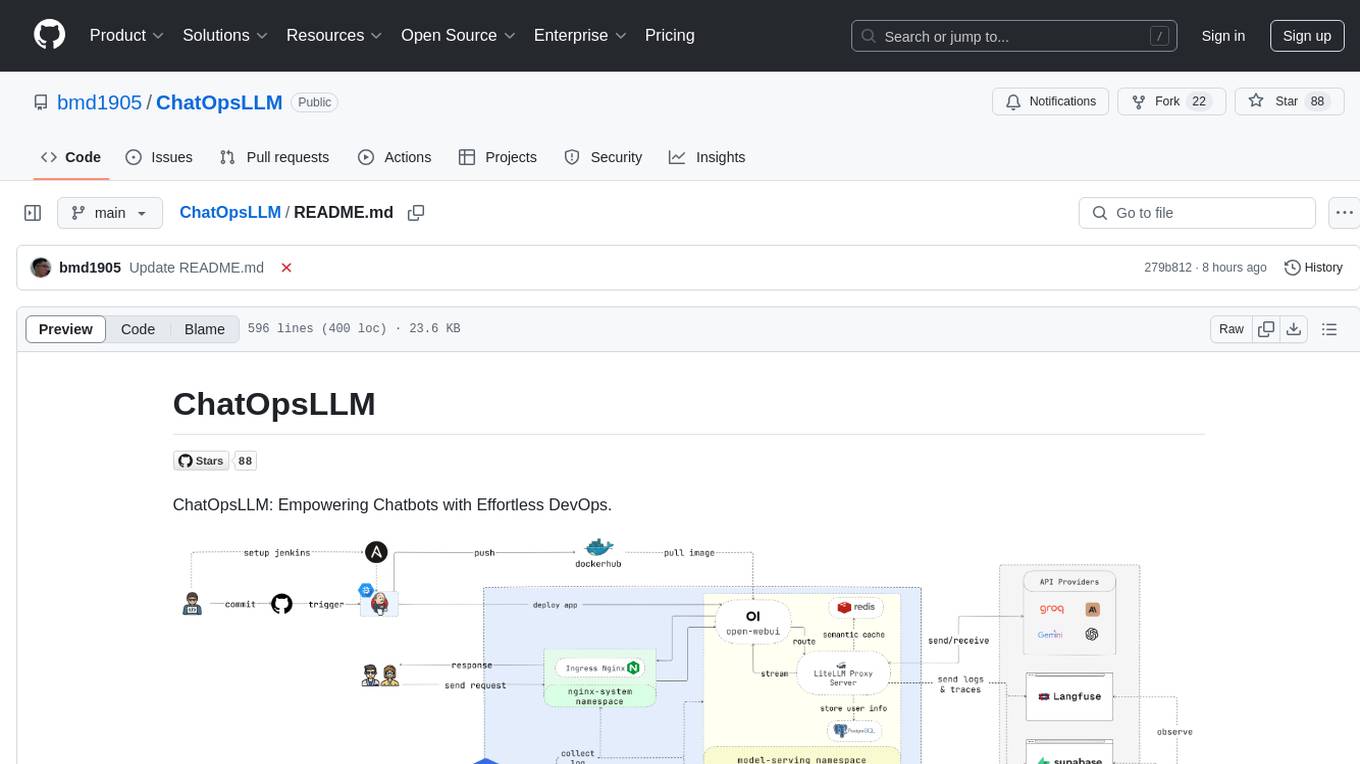
ChatOpsLLM
ChatOpsLLM is a project designed to empower chatbots with effortless DevOps capabilities. It provides an intuitive interface and streamlined workflows for managing and scaling language models. The project incorporates robust MLOps practices, including CI/CD pipelines with Jenkins and Ansible, monitoring with Prometheus and Grafana, and centralized logging with the ELK stack. Developers can find detailed documentation and instructions on the project's website.
uLoopMCP
uLoopMCP is a Unity integration tool designed to let AI drive your Unity project forward with minimal human intervention. It provides a 'self-hosted development loop' where an AI can compile, run tests, inspect logs, and fix issues using tools like compile, run-tests, get-logs, and clear-console. It also allows AI to operate the Unity Editor itself—creating objects, calling menu items, inspecting scenes, and refining UI layouts from screenshots via tools like execute-dynamic-code, execute-menu-item, and capture-window. The tool enables AI-driven development loops to run autonomously inside existing Unity projects.
manifold
Manifold is a powerful platform for workflow automation using AI models. It supports text generation, image generation, and retrieval-augmented generation, integrating seamlessly with popular AI endpoints. Additionally, Manifold provides robust semantic search capabilities using PGVector combined with the SEFII engine. It is under active development and not production-ready.
chatgpt-cli
ChatGPT CLI provides a powerful command-line interface for seamless interaction with ChatGPT models via OpenAI and Azure. It features streaming capabilities, extensive configuration options, and supports various modes like streaming, query, and interactive mode. Users can manage thread-based context, sliding window history, and provide custom context from any source. The CLI also offers model and thread listing, advanced configuration options, and supports GPT-4, GPT-3.5-turbo, and Perplexity's models. Installation is available via Homebrew or direct download, and users can configure settings through default values, a config.yaml file, or environment variables.
lexido
Lexido is an innovative assistant for the Linux command line, designed to boost your productivity and efficiency. Powered by Gemini Pro 1.0 and utilizing the free API, Lexido offers smart suggestions for commands based on your prompts and importantly your current environment. Whether you're installing software, managing files, or configuring system settings, Lexido streamlines the process, making it faster and more intuitive.
shortest
Shortest is an AI-powered natural language end-to-end testing framework built on Playwright. It provides a seamless testing experience by allowing users to write tests in natural language and execute them using Anthropic Claude API. The framework also offers GitHub integration with 2FA support, making it suitable for testing web applications with complex authentication flows. Shortest simplifies the testing process by enabling users to run tests locally or in CI/CD pipelines, ensuring the reliability and efficiency of web applications.

magic-cli
Magic CLI is a command line utility that leverages Large Language Models (LLMs) to enhance command line efficiency. It is inspired by projects like Amazon Q and GitHub Copilot for CLI. The tool allows users to suggest commands, search across command history, and generate commands for specific tasks using local or remote LLM providers. Magic CLI also provides configuration options for LLM selection and response generation. The project is still in early development, so users should expect breaking changes and bugs.
extension-gen-ai
The Looker GenAI Extension provides code examples and resources for building a Looker Extension that integrates with Vertex AI Large Language Models (LLMs). Users can leverage the power of LLMs to enhance data exploration and analysis within Looker. The extension offers generative explore functionality to ask natural language questions about data and generative insights on dashboards to analyze data by asking questions. It leverages components like BQML Remote Models, BQML Remote UDF with Vertex AI, and Custom Fine Tune Model for different integration options. Deployment involves setting up infrastructure with Terraform and deploying the Looker Extension by creating a Looker project, copying extension files, configuring BigQuery connection, connecting to Git, and testing the extension. Users can save example prompts and configure user settings for the extension. Development of the Looker Extension environment includes installing dependencies, starting the development server, and building for production.

raglite
RAGLite is a Python toolkit for Retrieval-Augmented Generation (RAG) with PostgreSQL or SQLite. It offers configurable options for choosing LLM providers, database types, and rerankers. The toolkit is fast and permissive, utilizing lightweight dependencies and hardware acceleration. RAGLite provides features like PDF to Markdown conversion, multi-vector chunk embedding, optimal semantic chunking, hybrid search capabilities, adaptive retrieval, and improved output quality. It is extensible with a built-in Model Context Protocol server, customizable ChatGPT-like frontend, document conversion to Markdown, and evaluation tools. Users can configure RAGLite for various tasks like configuring, inserting documents, running RAG pipelines, computing query adapters, evaluating performance, running MCP servers, and serving frontends.
For similar tasks
well-architected-iac-analyzer
Well-Architected Infrastructure as Code (IaC) Analyzer is a project demonstrating how generative AI can evaluate infrastructure code for alignment with best practices. It features a modern web application allowing users to upload IaC documents, complete IaC projects, or architecture diagrams for assessment. The tool provides insights into infrastructure code alignment with AWS best practices, offers suggestions for improving cloud architecture designs, and can generate IaC templates from architecture diagrams. Users can analyze CloudFormation, Terraform, or AWS CDK templates, architecture diagrams in PNG or JPEG format, and complete IaC projects with supporting documents. Real-time analysis against Well-Architected best practices, integration with AWS Well-Architected Tool, and export of analysis results and recommendations are included.
For similar jobs

minio
MinIO is a High Performance Object Storage released under GNU Affero General Public License v3.0. It is API compatible with Amazon S3 cloud storage service. Use MinIO to build high performance infrastructure for machine learning, analytics and application data workloads.
ai-on-gke
This repository contains assets related to AI/ML workloads on Google Kubernetes Engine (GKE). Run optimized AI/ML workloads with Google Kubernetes Engine (GKE) platform orchestration capabilities. A robust AI/ML platform considers the following layers: Infrastructure orchestration that support GPUs and TPUs for training and serving workloads at scale Flexible integration with distributed computing and data processing frameworks Support for multiple teams on the same infrastructure to maximize utilization of resources
kong
Kong, or Kong API Gateway, is a cloud-native, platform-agnostic, scalable API Gateway distinguished for its high performance and extensibility via plugins. It also provides advanced AI capabilities with multi-LLM support. By providing functionality for proxying, routing, load balancing, health checking, authentication (and more), Kong serves as the central layer for orchestrating microservices or conventional API traffic with ease. Kong runs natively on Kubernetes thanks to its official Kubernetes Ingress Controller.
AI-in-a-Box
AI-in-a-Box is a curated collection of solution accelerators that can help engineers establish their AI/ML environments and solutions rapidly and with minimal friction, while maintaining the highest standards of quality and efficiency. It provides essential guidance on the responsible use of AI and LLM technologies, specific security guidance for Generative AI (GenAI) applications, and best practices for scaling OpenAI applications within Azure. The available accelerators include: Azure ML Operationalization in-a-box, Edge AI in-a-box, Doc Intelligence in-a-box, Image and Video Analysis in-a-box, Cognitive Services Landing Zone in-a-box, Semantic Kernel Bot in-a-box, NLP to SQL in-a-box, Assistants API in-a-box, and Assistants API Bot in-a-box.
awsome-distributed-training
This repository contains reference architectures and test cases for distributed model training with Amazon SageMaker Hyperpod, AWS ParallelCluster, AWS Batch, and Amazon EKS. The test cases cover different types and sizes of models as well as different frameworks and parallel optimizations (Pytorch DDP/FSDP, MegatronLM, NemoMegatron...).
generative-ai-cdk-constructs
The AWS Generative AI Constructs Library is an open-source extension of the AWS Cloud Development Kit (AWS CDK) that provides multi-service, well-architected patterns for quickly defining solutions in code to create predictable and repeatable infrastructure, called constructs. The goal of AWS Generative AI CDK Constructs is to help developers build generative AI solutions using pattern-based definitions for their architecture. The patterns defined in AWS Generative AI CDK Constructs are high level, multi-service abstractions of AWS CDK constructs that have default configurations based on well-architected best practices. The library is organized into logical modules using object-oriented techniques to create each architectural pattern model.
model_server
OpenVINO™ Model Server (OVMS) is a high-performance system for serving models. Implemented in C++ for scalability and optimized for deployment on Intel architectures, the model server uses the same architecture and API as TensorFlow Serving and KServe while applying OpenVINO for inference execution. Inference service is provided via gRPC or REST API, making deploying new algorithms and AI experiments easy.
dify-helm
Deploy langgenius/dify, an LLM based chat bot app on kubernetes with helm chart.