
hound
Language-agnostic AI auditor that autonomously builds and refines adaptive knowledge graphs for deep, iterative code reasoning
Stars: 325
Hound is a security audit automation pipeline for AI-assisted code review that mirrors how expert auditors think, learn, and collaborate. It features graph-driven analysis, sessionized audits, provider-agnostic models, belief system and hypotheses, precise code grounding, and adaptive planning. The system employs a senior/junior auditor pattern where the Scout actively navigates the codebase and annotates knowledge graphs while the Strategist handles high-level planning and vulnerability analysis. Hound is optimized for small-to-medium sized projects like smart contract applications and is language-agnostic.
README:

Autonomous agents for code security auditing
![]()
Overview • Configuration • Workflow • Chatbot • Contributing
Hound is a Language-agnostic AI auditor that autonomously builds and refines adaptive knowledge graphs for deep, iterative code reasoning.
- Graph-driven analysis – Flexible, agent-designed graphs that can model any aspect of a system (e.g. architecture, access control, value flows, math, etc.)
- Relational graph views – High-level graphs support cross-aspect reasoning and precise retrieval of the code snippets that back each subsystem investigated.
- Belief & hypothesis system – Observations, assumptions, and hypotheses evolve with confidence scores, enabling long-horizon reasoning and cumulative audits.
- Dynamic model switching – Lightweight "scout" models handle exploration; heavyweight "strategist" models provide deep reasoning, mirroring expert workflows while keeping costs efficient.
- Strategic audit planning - Balances broad code coverage with focused investigation of the most promising aspects, ensuring both depth and efficiency.
Codebase size considerations: While Hound can analyze any codebase, it's optimized for small-to-medium sized projects like typical smart contract applications. Large enterprise codebases may exceed context limits and require selective analysis of specific subsystems.
pip install -r requirements.txtSet up your OpenAI API key and optional base URL:
export OPENAI_API_KEY=your_key_here
# Optional: override the base URL (defaults to https://api.openai.com)
export OPENAI_BASE_URL=https://api.openai.com
Copy the example configuration and edit as needed:
cp hound/config.yaml.example hound/config.yaml
# then edit hound/config.yaml to select providers/models and options
Notes:
- Defaults work out-of-the-box; you can override many options via CLI flags.
- Keep API keys out of the repo;
API_KEYS.txtis gitignored and can be sourced.
Note: Audit quality scales with time and model capability. Use longer runs and advanced models for more complete results.
Projects organize your audits and store all analysis data:
# Create a project from local code
./hound.py project create myaudit /path/to/code

# List all projects
./hound.py project ls

# View project details and coverage
./hound.py project info myauditHound analyzes your codebase and builds aspect‑oriented knowledge graphs that serve as the foundation for all subsequent analysis.
Recommended (one‑liner):
# Auto-generate a default set of graphs (up to 5) and refine
# Strongly recommended: pass a whitelist of files (comma-separated)
./hound.py graph build myaudit --auto \
  --files "src/A.sol,src/B.sol,src/utils/Lib.sol"

# View generated graphs
./hound.py graph ls myaudit
Alternative (manual guidance):
# 1) Initialize the baseline SystemArchitecture graph
./hound.py graph build myaudit --init \
  --files "src/A.sol,src/B.sol,src/utils/Lib.sol"

# 2) Add a specific graph with your own description (exactly one graph)
./hound.py graph custom myaudit \
  "Call graph focusing on function call relationships across modules" \
  --iterations 2 \
  --files "src/A.sol,src/B.sol,src/utils/Lib.sol"

# (Repeat 'graph custom' for additional targeted graphs as needed)
Operational notes:
-
--autoalways includes the SystemArchitecture graph as the first graph. You do not need to run--initin addition to--auto. - If
--initis used and aSystemArchitecturegraph already exists, initialization is skipped. Use--autoto add more graphs, or remove existing graphs first if you want a clean re‑init. - When running
--autoand graphs already exist, Hound asks for confirmation before updating/overwriting graphs (including SystemArchitecture). To clear graphs:
./hound.py graph rm myaudit --all                 # remove all graphs
./hound.py graph rm myaudit --name SystemArchitecture # remove one graph- For large repos, you can constrain scope with
--files(comma‑separated whitelist) alongside either approach.
Whitelists (strongly recommended):
- Always pass a whitelist of input files via
--files. For the best results, the selected files should fit in the model’s available context window; whitelisting keeps the graph builder focused and avoids token overflows. - If you do not pass
--files, Hound will consider all files in the repository. On large codebases this triggers sampling and may degrade coverage/quality. -
--filesexpects a comma‑separated list of paths relative to the repo root.
Examples:
# Manual (small projects)
./hound.py graph build myaudit --auto \
  --files "src/A.sol,src/B.sol,src/utils/Lib.sol"

# Generate a whitelist automatically (recommended for larger projects)
python whitelist_builder.py \
  --input /path/to/repo \
  --limit-loc 20000 \
  --output whitelists/myaudit

# Use the generated list (newline-separated) as a comma list for --files
./hound.py graph build myaudit --auto \
--files "$(tr '\n' ',' < whitelists/myaudit | sed 's/,$//')"- Refine existing graphs (resume building):
You can resume/refine an existing graph without creating new ones using graph refine. This skips discovery and saves updates incrementally.
# Refine a single graph by name (internal or display)
./hound.py graph refine myaudit SystemArchitecture \
  --iterations 2 \
  --files "src/A.sol,src/B.sol,src/utils/Lib.sol"

# Refine all existing graphs
./hound.py graph refine myaudit --all --iterations 2 \
--files "src/A.sol,src/B.sol,src/utils/Lib.sol"The audit phase uses the senior/junior pattern with planning and investigation:
# 1. Sweep all components for shallow bugs, build code understanding
./hound.py agent audit myaudit --mode sweep

# 2. Intuition-guided search to find complex bugs
./hound.py agent audit myaudit --mode intuition --time-limit 300

# Start with telemetry (connect the Chatbot UI to steer)
./hound.py agent audit myaudit --mode intuition --time-limit 30 --telemetry

# Attach to an existing session and continue where you left off
./hound.py agent audit myaudit --mode intuition --session <session_id>
Tip: When started with --telemetry, you can connect the Chatbot UI and steer the audit interactively (see Chatbot section above).
Audit Modes:
Hound supports two distinct audit modes:
-
Sweep Mode (
--mode sweep): Phase 1 - Systematic component analysis- Performs a broad, systematic analysis of every major component
- Examines each contract, module, and class for vulnerabilities
- Builds comprehensive graph annotations for later analysis
- Terminates when all accessible components have been analyzed
- Best for: Initial vulnerability discovery and building code understanding
-
Intuition Mode (
--mode intuition): Phase 2 - Deep, targeted exploration- Uses intuition-guided search to find high-impact vulnerabilities
- Prioritizes monetary flows, value transfers, and theft opportunities
- Investigates contradictions between assumptions and observations
- Focuses on authentication bypasses and state corruption
- Best for: Finding complex, cross-component vulnerabilities
Key parameters:
- --time-limit: Stop after N minutes (useful for incremental audits)
- --plan-n: Number of investigations per planning batch
- --session: Resume a specific session (continues coverage/planning)
-
--debug: Save all LLM interactions to
.hound_debug/
Normally, you want to run sweep mode first followed by intuition mode. The quality and duration depend heavily on the models used. Faster models provide quick results but may miss subtle issues, while advanced reasoning models find deeper vulnerabilities but require more time.
Check audit progress and findings at any time during the audit. If you started the agent with --telemetry, you can also monitor and steer via the Chatbot UI:
- Open http://127.0.0.1:5280 and attach to the running instance
- Watch live Activity, Plan, and Findings
- Use the Steer form to guide the next investigations
# View current hypotheses (findings)
./hound.py project ls-hypotheses myaudit

# See detailed hypothesis information
./hound.py project hypotheses myaudit --details

# List hypotheses with confidence ratings
./hound.py project hypotheses myaudit

# Check coverage statistics
./hound.py project coverage myaudit

# View session details
./hound.py project sessions myaudit --list
Understanding hypotheses: Each hypothesis represents a potential vulnerability with:
- Confidence score: 0.0-1.0 indicating likelihood of being a real issue
-
Status:
proposed(initial),investigating,confirmed,rejected - Severity: critical, high, medium, low
- Type: reentrancy, access control, logic error, etc.
- Annotations: Exact code locations and evidence
For specific concerns, run focused investigations without full planning:
# Investigate a specific concern
./hound.py agent investigate "Check for reentrancy in withdraw function" myaudit

# Quick investigation with fewer iterations
./hound.py agent investigate "Analyze access control in admin functions" myaudit \
  --iterations 5

# Use specific models for investigation
./hound.py agent investigate "Review emergency functions" myaudit \
  --model gpt-4o \
  --strategist-model gpt-5
When to use targeted investigations:
- Following up on specific concerns after initial audit
- Testing a hypothesis about a particular vulnerability
- Quick checks before full audit
- Investigating areas not covered by automatic planning
Note: These investigations still update the hypothesis store and coverage tracking.
A reasoning model reviews all hypotheses and updates their status based on evidence:
# Run finalization with quality review
./hound.py finalize myaudit
# Re-run all pending (including below threshold)
./hound.py finalize myaudit --include-below-threshold

# Customize confidence threshold
./hound.py finalize myaudit -t 0.7 --model gpt-4o

# Include all findings (not just confirmed)
# (Use on the report command, not finalize)
./hound.py report myaudit --include-all
What happens during finalization:
- A reasoning model (default: GPT-5) reviews each hypothesis
- Evaluates the evidence and code context
- Updates status to
confirmedorrejectedbased on analysis - Adjusts confidence scores based on evidence strength
- Prepares findings for report generation
Important: By default, only confirmed findings appear in the final report. Use --include-all to include all hypotheses regardless of status.
Create and manage proof-of-concept exploits for confirmed vulnerabilities:
# Generate PoC prompts for confirmed vulnerabilities
./hound.py poc make-prompt myaudit

# Generate for a specific hypothesis
./hound.py poc make-prompt myaudit --hypothesis hyp_12345

# Import existing PoC files
./hound.py poc import myaudit hyp_12345 exploit.sol test.js \
  --description "Demonstrates reentrancy exploit"

# List all imported PoCs
./hound.py poc list myaudit
The PoC workflow:
-
make-prompt: Generates detailed prompts for coding agents (like Claude Code)
- Includes vulnerable file paths (project-relative)
- Specifies exact functions to target
- Provides clear exploit requirements
- Saves prompts to
poc_prompts/directory
-
import: Links PoC files to specific vulnerabilities
- Files stored in
poc/[hypothesis-id]/ - Metadata tracks descriptions and timestamps
- Multiple files per vulnerability supported
- Files stored in
-
Automatic inclusion: Imported PoCs appear in reports with syntax highlighting
Produce comprehensive audit reports with all findings and PoCs:
# Generate HTML report (includes imported PoCs)
./hound.py report myaudit

# Include all hypotheses, not just confirmed
./hound.py report myaudit --include-all

# Export report to specific location
./hound.py report myaudit --output /path/to/report.html
Report contents:
- Executive summary: High-level overview and risk assessment
- System architecture: Understanding of the codebase structure
-
Findings: Detailed vulnerability descriptions (only
confirmedby default) - Code snippets: Relevant vulnerable code with line numbers
- Proof-of-concepts: Any imported PoCs with syntax highlighting
- Severity distribution: Visual breakdown of finding severities
- Recommendations: Suggested fixes and improvements
Note: The report uses a professional dark theme and includes all imported PoCs automatically.
Each audit run operates under a session with comprehensive tracking and per-session planning:
- Planning is stored in a per-session PlanStore with statuses:
planned,in_progress,done,dropped,superseded. - Existing
planneditems are executed first; Strategist only tops up new items to reach your--plan-n. - On resume, any stale
in_progressitems are reset toplanned; completed items remaindoneand are not duplicated. - Completed investigations, coverage, and hypotheses are fed back into planning to avoid repeats and guide prioritization.
# View session details
./hound.py project sessions myaudit <session_id>

# List and inspect sessions
./hound.py project sessions myaudit --list
./hound.py project sessions myaudit <session_id>

# Show planned investigations for a session (Strategist PlanStore)
./hound.py project plan myaudit <session_id>

# Session data includes:
# - Coverage statistics (nodes/cards visited)
# - Investigation history
# - Token usage by model
# - Planning decisions
# - Hypothesis formation
Sessions are stored in ~/.hound/projects/myaudit/sessions/ and contain:
-
session_id: Unique identifier -
coverage: Visited nodes and analyzed code -
investigations: All executed investigations -
planning_history: Strategic decisions made -
token_usage: Detailed API usage metrics
Resume/attach to an existing session during an audit run by passing the session ID:
# Attach to a specific session and continue auditing under it
./hound.py agent audit myaudit --session <session_id>
When you attach to a session, its status is set to active while the audit runs and finalized on completion (completed or interrupted if a time limit was hit). Any in_progress plan items are reset to planned so you can continue cleanly.
# Start an audit (creates a session automatically)
./hound.py agent audit myaudit

# List sessions to get the session id
./hound.py project sessions myaudit --list

# Show planned investigations for that session
./hound.py project plan myaudit <session_id>

# Attach later and continue planning/execution under the same session
./hound.py agent audit myaudit --session <session_id>Hound ships with a lightweight web UI for steering and monitoring a running audit session. It discovers local runs via a simple telemetry registry and streams status/decisions live.
Prerequisites:
- Set API keys (at least
OPENAI_API_KEY, optionalOPENAI_BASE_URLfor custom endpoints):source ../API_KEYS.txtor export manually - Install Python deps in this submodule:
pip install -r requirements.txt
- Start the agent with telemetry enabled
# From the hound/ directory
./hound.py agent audit myaudit --telemetry --debug

# Notes
# - The --telemetry flag exposes a local SSE/control endpoint and registers the run
# - Optional: ensure the registry dir matches the chatbot by setting:
# export HOUND_REGISTRY_DIR="$HOME/.local/state/hound/instances"- Launch the chatbot server
# From the hound/ directory
python chatbot/run.py

# Optional: customize host/port
HOST=0.0.0.0 PORT=5280 python chatbot/run.py
Open the UI: http://127.0.0.1:5280
- Select the running instance and stream activity
- The input next to “Start” lists detected instances as
project_path | instance_id. - Click “Start” to attach; the UI auto‑connects the realtime channel and begins streaming decisions/results.
- The lower panel has tabs:
- Activity: live status/decisions
- Plan: current strategist plan (✓ done, ▶ active, • pending)
- Findings: hypotheses with confidence; you can Confirm/Reject manually
- Steer the audit
- Use the “Steer” form (e.g., “Investigate reentrancy across the whole app next”).
- Steering is queued at
<project>/.hound/steering.jsonland consumed exactly once when applied. - Broad, global instructions may preempt the current investigation and trigger immediate replanning.
Troubleshooting
- No instances in dropdown: ensure you started the agent with
--telemetry. - Wrong or stale project shown: clear the input; the UI defaults to the most recent alive instance.
- Registry mismatch: confirm both processes print the same
Using registry dir:or setHOUND_REGISTRY_DIRfor both. - Raw API: open
/api/instancesin the browser to inspect entries (includesaliveflag and registry path).
Hypotheses are the core findings that accumulate across sessions:
# List hypotheses with confidence scores
./hound.py project hypotheses myaudit

# View with full details
./hound.py project hypotheses myaudit --details

# Update hypothesis status
./hound.py project set-hypothesis-status myaudit hyp_12345 confirmed

# Reset hypotheses (creates backup)
./hound.py project reset-hypotheses myaudit

# Force reset without confirmation
./hound.py project reset-hypotheses myaudit --force
Hypothesis statuses:
- proposed: Initial finding, needs review
- investigating: Under active investigation
- confirmed: Verified vulnerability
- rejected: False positive
- resolved: Fixed in code
Override default models per component:
# Use different models for each role
./hound.py agent audit myaudit \
  --platform openai --model gpt-4o-mini \           # Scout
--strategist-platform anthropic --strategist-model claude-3-opus # StrategistCapture all LLM interactions for analysis:
# Enable debug logging
./hound.py agent audit myaudit --debug

# Debug logs saved to .hound_debug/
# Includes HTML reports with all prompts and responsesMonitor audit progress and completeness:
# View coverage statistics
./hound.py project coverage myaudit

# Coverage shows:
# - Graph nodes visited vs total
# - Code cards analyzed vs total
# - Percentage completionSee CONTRIBUTING.md for development setup and guidelines.
Apache 2.0 with additional terms:
You may use Hound however you want, except selling it as an online service or as an appliance - that requires written permission from the author.
- See LICENSE for details.
For Tasks:
Click tags to check more tools for each tasksFor Jobs:
Alternative AI tools for hound
Similar Open Source Tools
hound
Hound is a security audit automation pipeline for AI-assisted code review that mirrors how expert auditors think, learn, and collaborate. It features graph-driven analysis, sessionized audits, provider-agnostic models, belief system and hypotheses, precise code grounding, and adaptive planning. The system employs a senior/junior auditor pattern where the Scout actively navigates the codebase and annotates knowledge graphs while the Strategist handles high-level planning and vulnerability analysis. Hound is optimized for small-to-medium sized projects like smart contract applications and is language-agnostic.
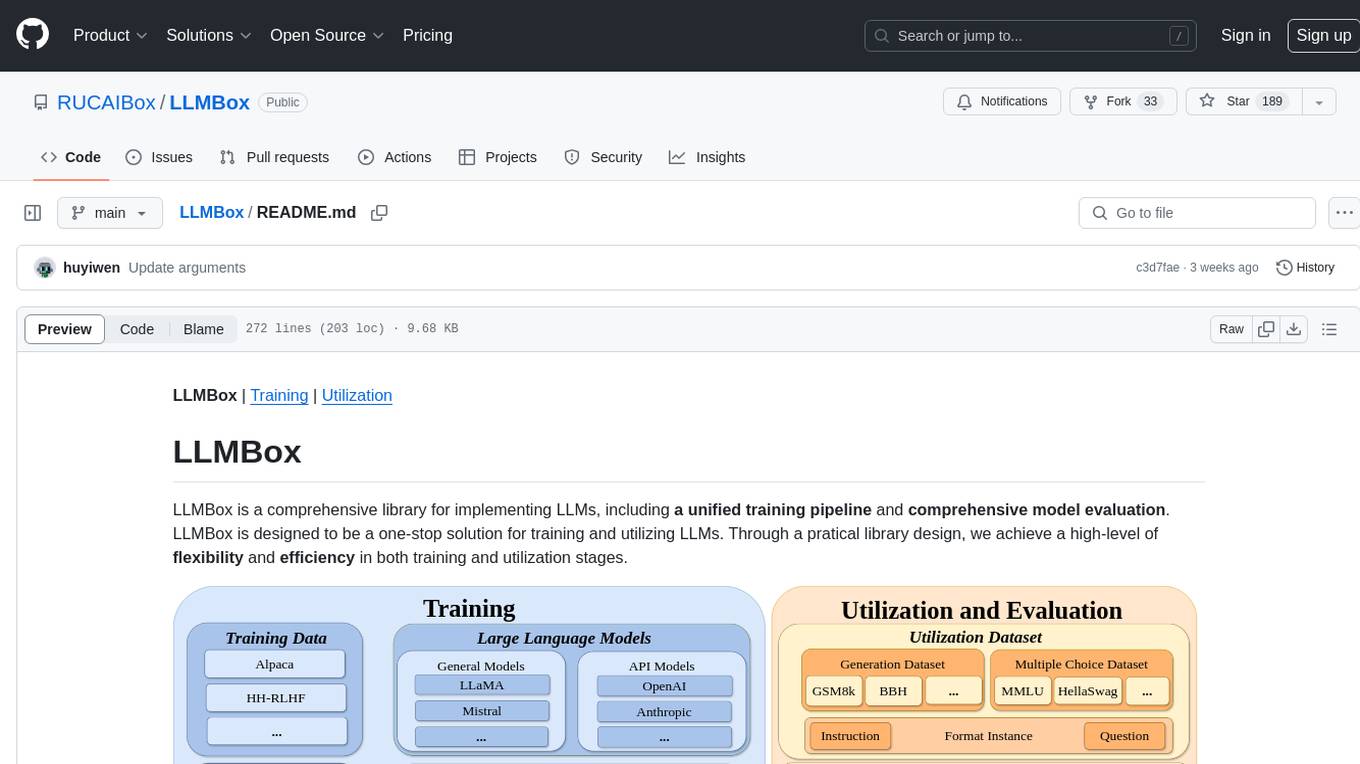
LLMBox
LLMBox is a comprehensive library designed for implementing Large Language Models (LLMs) with a focus on a unified training pipeline and comprehensive model evaluation. It serves as a one-stop solution for training and utilizing LLMs, offering flexibility and efficiency in both training and utilization stages. The library supports diverse training strategies, comprehensive datasets, tokenizer vocabulary merging, data construction strategies, parameter efficient fine-tuning, and efficient training methods. For utilization, LLMBox provides comprehensive evaluation on various datasets, in-context learning strategies, chain-of-thought evaluation, evaluation methods, prefix caching for faster inference, support for specific LLM models like vLLM and Flash Attention, and quantization options. The tool is suitable for researchers and developers working with LLMs for natural language processing tasks.
Biomni
Biomni is a general-purpose biomedical AI agent designed to autonomously execute a wide range of research tasks across diverse biomedical subfields. By integrating cutting-edge large language model (LLM) reasoning with retrieval-augmented planning and code-based execution, Biomni helps scientists dramatically enhance research productivity and generate testable hypotheses.
honcho
Honcho is a platform for creating personalized AI agents and LLM powered applications for end users. The repository is a monorepo containing the server/API for managing database interactions and storing application state, along with a Python SDK. It utilizes FastAPI for user context management and Poetry for dependency management. The API can be run using Docker or manually by setting environment variables. The client SDK can be installed using pip or Poetry. The project is open source and welcomes contributions, following a fork and PR workflow. Honcho is licensed under the AGPL-3.0 License.
llm-consortium
LLM Consortium is a plugin for the `llm` package that implements a model consortium system with iterative refinement and response synthesis. It orchestrates multiple learned language models to collaboratively solve complex problems through structured dialogue, evaluation, and arbitration. The tool supports multi-model orchestration, iterative refinement, advanced arbitration, database logging, configurable parameters, hundreds of models, and the ability to save and load consortium configurations.
evolving-agents
A toolkit for agent autonomy, evolution, and governance enabling agents to learn from experience, collaborate, communicate, and build new tools within governance guardrails. It focuses on autonomous evolution, agent self-discovery, governance firmware, self-building systems, and agent-centric architecture. The toolkit leverages existing frameworks to enable agent autonomy and self-governance, moving towards truly autonomous AI systems.
Pixel-Reasoner
Pixel Reasoner is a framework that introduces reasoning in the pixel-space for Vision-Language Models (VLMs), enabling them to directly inspect, interrogate, and infer from visual evidences. This enhances reasoning fidelity for visual tasks by equipping VLMs with visual reasoning operations like zoom-in and select-frame. The framework addresses challenges like model's imbalanced competence and reluctance to adopt pixel-space operations through a two-phase training approach involving instruction tuning and curiosity-driven reinforcement learning. With these visual operations, VLMs can interact with complex visual inputs such as images or videos to gather necessary information, leading to improved performance across visual reasoning benchmarks.
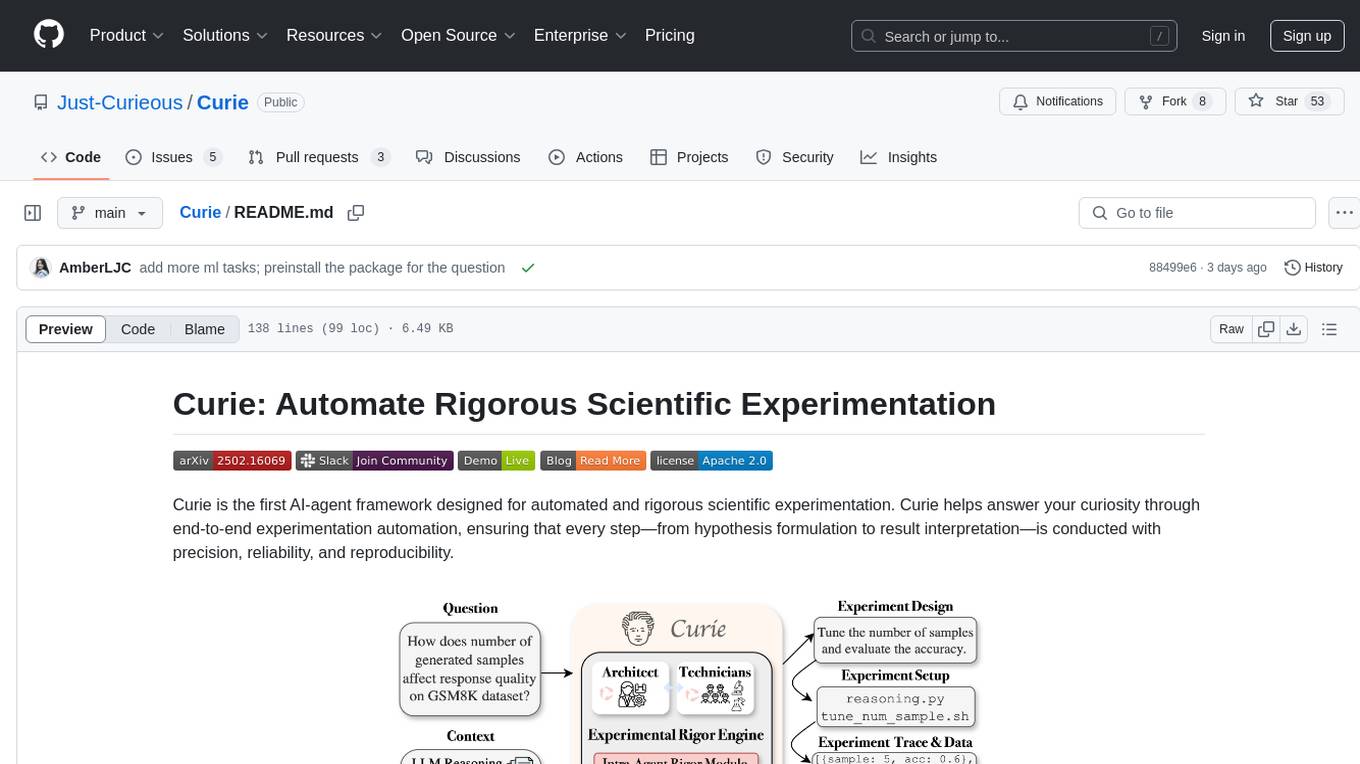
Curie
Curie is an AI-agent framework designed for automated and rigorous scientific experimentation. It automates end-to-end workflow management, ensures methodical procedure, reliability, and interpretability, and supports ML research, system analysis, and scientific discovery. It provides a benchmark with questions from 4 Computer Science domains. Users can customize experiment agents and adapt to their own tasks by configuring base_config.json. Curie is suitable for hyperparameter tuning, algorithm behavior analysis, system performance benchmarking, and automating computational simulations.
can-ai-code
Can AI Code is a self-evaluating interview tool for AI coding models. It includes interview questions written by humans and tests taken by AI, inference scripts for common API providers and CUDA-enabled quantization runtimes, a Docker-based sandbox environment for validating untrusted Python and NodeJS code, and the ability to evaluate the impact of prompting techniques and sampling parameters on large language model (LLM) coding performance. Users can also assess LLM coding performance degradation due to quantization. The tool provides test suites for evaluating LLM coding performance, a webapp for exploring results, and comparison scripts for evaluations. It supports multiple interviewers for API and CUDA runtimes, with detailed instructions on running the tool in different environments. The repository structure includes folders for interviews, prompts, parameters, evaluation scripts, comparison scripts, and more.
sieves
sieves is a library for zero- and few-shot NLP tasks with structured generation, enabling rapid prototyping of NLP applications without the need for training. It simplifies NLP prototyping by bundling capabilities into a single library, providing zero- and few-shot model support, a unified interface for structured generation, built-in tasks for common NLP operations, easy extendability, document-based pipeline architecture, caching to prevent redundant model calls, and more. The tool draws inspiration from spaCy and spacy-llm, offering features like immediate inference, observable pipelines, integrated tools for document parsing and text chunking, ready-to-use tasks such as classification, summarization, translation, and more, persistence for saving and loading pipelines, distillation for specialized model creation, and caching to optimize performance.
deepeval
DeepEval is a simple-to-use, open-source LLM evaluation framework specialized for unit testing LLM outputs. It incorporates various metrics such as G-Eval, hallucination, answer relevancy, RAGAS, etc., and runs locally on your machine for evaluation. It provides a wide range of ready-to-use evaluation metrics, allows for creating custom metrics, integrates with any CI/CD environment, and enables benchmarking LLMs on popular benchmarks. DeepEval is designed for evaluating RAG and fine-tuning applications, helping users optimize hyperparameters, prevent prompt drifting, and transition from OpenAI to hosting their own Llama2 with confidence.
web-codegen-scorer
Web Codegen Scorer is a tool designed to evaluate the quality of web code generated by Large Language Models (LLMs). It allows users to make evidence-based decisions related to AI-generated code by iterating on system prompts, comparing code quality from different models, and monitoring code quality over time. The tool focuses specifically on web code and offers various features such as configuring evaluations, specifying system instructions, using built-in checks for code quality, automatically repairing issues, and viewing results with an intuitive report viewer UI.
ice-score
ICE-Score is a tool designed to instruct large language models to evaluate code. It provides a minimum viable product (MVP) for evaluating generated code snippets using inputs such as problem, output, task, aspect, and model. Users can also evaluate with reference code and enable zero-shot chain-of-thought evaluation. The tool is built on codegen-metrics and code-bert-score repositories and includes datasets like CoNaLa and HumanEval. ICE-Score has been accepted to EACL 2024.

pytest-evals
pytest-evals is a minimalistic pytest plugin designed to help evaluate the performance of Language Model (LLM) outputs against test cases. It allows users to test and evaluate LLM prompts against multiple cases, track metrics, and integrate easily with pytest, Jupyter notebooks, and CI/CD pipelines. Users can scale up by running tests in parallel with pytest-xdist and asynchronously with pytest-asyncio. The tool focuses on simplifying evaluation processes without the need for complex frameworks, keeping tests and evaluations together, and emphasizing logic over infrastructure.
artkit
ARTKIT is a Python framework developed by BCG X for automating prompt-based testing and evaluation of Gen AI applications. It allows users to develop automated end-to-end testing and evaluation pipelines for Gen AI systems, supporting multi-turn conversations and various testing scenarios like Q&A accuracy, brand values, equitability, safety, and security. The framework provides a simple API, asynchronous processing, caching, model agnostic support, end-to-end pipelines, multi-turn conversations, robust data flows, and visualizations. ARTKIT is designed for customization by data scientists and engineers to enhance human-in-the-loop testing and evaluation, emphasizing the importance of tailored testing for each Gen AI use case.
Memori
Memori is a memory fabric designed for enterprise AI that seamlessly integrates into existing software and infrastructure. It is agnostic to LLM, datastore, and framework, providing support for major foundational models and databases. With features like vectorized memories, in-memory semantic search, and a knowledge graph, Memori simplifies the process of attributing LLM interactions and managing sessions. It offers Advanced Augmentation for enhancing memories at different levels and supports various platforms, frameworks, database integrations, and datastores. Memori is designed to reduce development overhead and provide efficient memory management for AI applications.
For similar tasks
hound
Hound is a security audit automation pipeline for AI-assisted code review that mirrors how expert auditors think, learn, and collaborate. It features graph-driven analysis, sessionized audits, provider-agnostic models, belief system and hypotheses, precise code grounding, and adaptive planning. The system employs a senior/junior auditor pattern where the Scout actively navigates the codebase and annotates knowledge graphs while the Strategist handles high-level planning and vulnerability analysis. Hound is optimized for small-to-medium sized projects like smart contract applications and is language-agnostic.

AutoAudit
AutoAudit is an open-source large language model specifically designed for the field of network security. It aims to provide powerful natural language processing capabilities for security auditing and network defense, including analyzing malicious code, detecting network attacks, and predicting security vulnerabilities. By coupling AutoAudit with ClamAV, a security scanning platform has been created for practical security audit applications. The tool is intended to assist security professionals with accurate and fast analysis and predictions to combat evolving network threats.
gigachad-grc
A comprehensive, modular, containerized Governance, Risk, and Compliance (GRC) platform built with modern technologies. Manage your entire security program from compliance tracking to risk management, third-party assessments, and external audits. The platform includes specialized modules for Compliance, Data Management, Risk Management, Third-Party Risk Management, Trust, Audit, Tools, AI & Automation, and Administration. It offers features like controls management, frameworks assessment, policies lifecycle management, vendor risk management, security questionnaires, knowledge base, audit management, awareness training, phishing simulations, AI-powered risk scoring, and MCP server integration. The tech stack includes Node.js, TypeScript, React, PostgreSQL, Keycloak, Traefik, Redis, and RustFS for storage.
explain-openclaw
Explain OpenClaw is a comprehensive documentation repository for the OpenClaw framework, a self-hosted AI assistant platform. It covers various aspects such as plain English explanations, technical architecture, deployment scenarios, privacy and safety measures, security audits, worst-case security scenarios, optimizations, and AI model comparisons. The repository serves as a living knowledge base with beginner-friendly explanations and detailed technical insights for contributors.
For similar jobs
sweep
Sweep is an AI junior developer that turns bugs and feature requests into code changes. It automatically handles developer experience improvements like adding type hints and improving test coverage.
teams-ai
The Teams AI Library is a software development kit (SDK) that helps developers create bots that can interact with Teams and Microsoft 365 applications. It is built on top of the Bot Framework SDK and simplifies the process of developing bots that interact with Teams' artificial intelligence capabilities. The SDK is available for JavaScript/TypeScript, .NET, and Python.
ai-guide
This guide is dedicated to Large Language Models (LLMs) that you can run on your home computer. It assumes your PC is a lower-end, non-gaming setup.

classifai
Supercharge WordPress Content Workflows and Engagement with Artificial Intelligence. Tap into leading cloud-based services like OpenAI, Microsoft Azure AI, Google Gemini and IBM Watson to augment your WordPress-powered websites. Publish content faster while improving SEO performance and increasing audience engagement. ClassifAI integrates Artificial Intelligence and Machine Learning technologies to lighten your workload and eliminate tedious tasks, giving you more time to create original content that matters.
chatbot-ui
Chatbot UI is an open-source AI chat app that allows users to create and deploy their own AI chatbots. It is easy to use and can be customized to fit any need. Chatbot UI is perfect for businesses, developers, and anyone who wants to create a chatbot.
BricksLLM
BricksLLM is a cloud native AI gateway written in Go. Currently, it provides native support for OpenAI, Anthropic, Azure OpenAI and vLLM. BricksLLM aims to provide enterprise level infrastructure that can power any LLM production use cases. Here are some use cases for BricksLLM: * Set LLM usage limits for users on different pricing tiers * Track LLM usage on a per user and per organization basis * Block or redact requests containing PIIs * Improve LLM reliability with failovers, retries and caching * Distribute API keys with rate limits and cost limits for internal development/production use cases * Distribute API keys with rate limits and cost limits for students
uAgents
uAgents is a Python library developed by Fetch.ai that allows for the creation of autonomous AI agents. These agents can perform various tasks on a schedule or take action on various events. uAgents are easy to create and manage, and they are connected to a fast-growing network of other uAgents. They are also secure, with cryptographically secured messages and wallets.
griptape
Griptape is a modular Python framework for building AI-powered applications that securely connect to your enterprise data and APIs. It offers developers the ability to maintain control and flexibility at every step. Griptape's core components include Structures (Agents, Pipelines, and Workflows), Tasks, Tools, Memory (Conversation Memory, Task Memory, and Meta Memory), Drivers (Prompt and Embedding Drivers, Vector Store Drivers, Image Generation Drivers, Image Query Drivers, SQL Drivers, Web Scraper Drivers, and Conversation Memory Drivers), Engines (Query Engines, Extraction Engines, Summary Engines, Image Generation Engines, and Image Query Engines), and additional components (Rulesets, Loaders, Artifacts, Chunkers, and Tokenizers). Griptape enables developers to create AI-powered applications with ease and efficiency.