
FunGen-AI-Powered-Funscript-Generator
None
Stars: 97

FunGen is a Python-based tool that uses AI to generate Funscript files from VR and 2D POV videos. It enables fully automated funscript creation for individual scenes or entire folders of videos. The tool includes features like automatic system scaling support, quick installation guides for Windows, Linux, and macOS, manual installation instructions, NVIDIA GPU setup, AMD GPU acceleration, YOLO model download, GUI settings, GitHub token setup, command-line usage, modular systems for funscript filtering and motion tracking, performance and parallel processing tips, and more. The project is still in early development stages and is not intended for commercial use.
README:
FunGen is a Python-based tool that uses AI to generate Funscript files from VR and 2D POV videos. It enables fully automated funscript creation for individual scenes or entire folders of videos.
Join the Discord community for discussions and support: Discord Community
This project is still at the early stages of development. It is not intended for commercial use. Please, do not use this project for any commercial purposes without prior consent from the author. It is for individual use only.
FunGen now automatically detects your system's display scaling settings (DPI) and adjusts the UI accordingly. This feature works on Windows, macOS, and Linux, ensuring the application looks crisp and properly sized on high-DPI displays.
- Automatically applies the correct font scaling based on your system settings
- Supports Windows display scaling (125%, 150%, etc.)
- Supports macOS Retina displays
- Supports Linux high-DPI configurations
- Can be enabled/disabled in the Settings menu
- Manual detection button available for when you change display settings
Automatic installer that handles everything for you:
- Download: fungen_install.bat
- Double-click to run (or run from command prompt)
- Wait for automatic installation of Python, Git, FFmpeg, and FunGen
curl -fsSL https://raw.githubusercontent.com/ack00gar/FunGen-AI-Powered-Funscript-Generator/main/fungen_install.sh | bashThe installer automatically:
- Installs Python 3.11 (Miniconda)
- Installs Git and FFmpeg/FFprobe
- Downloads and sets up FunGen AI
- Installs all required dependencies
- Creates launcher scripts for easy startup
- Detects your GPU and optimizes PyTorch installation
That's it! The installer creates launch scripts - just run them to start FunGen.
If you prefer manual installation or need custom configuration:
Before using this project, ensure you have the following installed:
- Git https://git-scm.com/downloads/ or 'winget install --id Git.Git -e --source winget' from a command prompt for Windows users as described below for easy install of Miniconda.
- FFmpeg added to your PATH or specified under the settings menu (https://www.ffmpeg.org/download.html)
- Miniconda (https://www.anaconda.com/docs/getting-started/miniconda/install)
Easy install of Miniconda for Windows users:
Open Command Prompt and run: winget install -e --id Anaconda.Miniconda3
After installing Miniconda look for a program called "Anaconda prompt (miniconda3)" in the start menu (on Windows) and open it
conda create -n VRFunAIGen python=3.11
conda activate VRFunAIGen- Please note that any pip or python commands related to this project must be run from within the VRFunAIGen virtual environment.
Open a command prompt and navigate to the folder where you'd like FunGen to be located. For example, if you want it in C:\FunGen, navigate to C:\ ('cd C:'). Then run
git clone --branch main https://github.com/ack00gar/FunGen-AI-Powered-Funscript-Generator.git FunGen
cd FunGenpip install -r core.requirements.txtQuick Setup:
- Install NVIDIA Drivers: Download here
- Install CUDA 12.8: Download here
- Install cuDNN for CUDA 12.8: Download here (requires free NVIDIA account)
Install Python Packages:
For 20xx, 30xx and 40xx-series NVIDIA GPUs:
pip install -r cuda.requirements.txt
pip install tensorrt
For 50xx series NVIDIA GPUs (RTX 5070, 5080, 5090):
pip install -r cuda.50series.requirements.txt
pip install tensorrt
Note: NVIDIA 10xx series GPUs are not supported.
Verify Installation:
nvidia-smi                    # Check GPU and driver
nvcc --version               # Check CUDA version
python -c "import torch; print(torch.cuda.is_available())"  # Check PyTorch CUDA
python -c "import torch; print(torch.backends.cudnn.is_available())" # Check cuDNNpip install -r cpu.requirements.txtROCm is supported for AMD GPUs on Linux. To install the required packages, run:
pip install -r rocm.requirements.txtThe necessary YOLO models will be automatically downloaded on the first startup. If you want to use a specific model, you can download it from our Discord and place it in the models/ sub-directory. If you aren't sure, you can add all the models and let the app decide the best option for you.
python main.pyWe support multiple model formats across Windows, macOS, and Linux.
- NVIDIA Cards: we recommend the .engine model
- AMD Cards: we recommend .pt (requires ROCm see below)
- Mac: we recommend .mlmodel
- .pt (PyTorch): Requires CUDA (for NVIDIA GPUs) or ROCm (for AMD GPUs) for acceleration.
- .onnx (ONNX Runtime): Best for CPU users as it offers broad compatibility and efficiency.
- .engine (TensorRT): For NVIDIA GPUs: Provides very significant efficiency improvements (this file needs to be build by running "Generate TensorRT.bat" after adding the base ".pt" model to the models directory)
- .mlpackage (Core ML): Optimized for macOS users. Runs efficiently on Apple devices with Core ML.
In most cases, the app will automatically detect the best model from your models directory at launch, but if the right model wasn't present at this time or the right dependencies where not installed, you might need to override it under settings. The same applies when we release a new version of the model.
Common Issues:
- Driver version mismatch: Ensure NVIDIA drivers are compatible with your CUDA version
- PATH issues: Make sure CUDA bin directory is in your system PATH
- Version conflicts: Ensure all components (driver, CUDA, cuDNN, PyTorch) are compatible versions
Verification Commands:
nvidia-smi                    # Check GPU and driver
nvcc --version               # Check CUDA version
python -c "import torch; print(torch.cuda.is_available())"  # Check PyTorch CUDA
python -c "import torch; print(torch.backends.cudnn.is_available())" # Check cuDNNFind the settings menu in the app to configure optional option.
You can use Start windows.bat to launch the gui on windows.
FunGen includes an update system that allows you to download and switch between different versions of the application. To use this feature, you'll need to set up a GitHub Personal Access Token. This is optional and only required for the update functionality.
GitHub's API has rate limits:
- Without a token: 60 requests per hour
- With a token: 5,000 requests per hour
This allows FunGen to fetch commit information, changelogs, and version data without hitting rate limits.
-
Go to GitHub Settings:
- Visit GitHub Settings
- Sign in to your GitHub account
-
Navigate to Developer Settings:
- Click your GitHub avatar (top right) → "Settings"
- Scroll down to the bottom left of the Settings page
- Click "Developer settings" in the left menu list
-
Create a Personal Access Token:
- Click "Personal access tokens" → "Tokens (classic)"
- Click "Generate new token" → "Generate new token (classic)"
-
Confirm Access
- If you created a 2FA you will be prompted to eter it
- If you have not yet created a 2FA you will be prompted to do so
-
Configure the Token:
- Note: Give it a descriptive name like "FunGen Updates"
- Expiration: Choose an appropriate expiration (30 days, 60 days, etc.)
-
Scopes: Select only these scopes:
-
public_repo(to read public repository information) -
read:user(to read your user information for validation)
-
-
Generate and Copy:
- Click "Generate token"
- Important: Copy the token immediately - you won't be able to see it again!
- Open FunGen and go to the Updates menu
- Click "Select Update Commit"
- Go to the "GitHub Token" tab
- Paste your token in the text field
- Click "Test Token" to verify it works
- Click "Save Token" to store it
The GitHub token enables these features in FunGen:
-
Version Selection: Browse and download specific commits from the
mainbranch - Changelog Display: View detailed changes between versions
- Update Notifications: Check for new versions and updates
- Rate Limit Management: Avoid hitting GitHub's API rate limits
- The token is stored locally in
github_token.ini - Only
public_repoandread:userpermissions are required - The token is used only for reading public repository data
- You can revoke the token anytime from your GitHub settings
FunGen can be run in two modes: a graphical user interface (GUI) or a command-line interface (CLI) for automation and batch processing.
To start the GUI, simply run the script without any arguments:
python main.pyTo use the CLI mode, you must provide an input path to a video or a folder.
To generate a script for a single video with default settings:
python main.py "/path/to/your/video.mp4"To process an entire folder of videos recursively using a specific mode and overwrite existing funscripts:
python main.py "/path/to/your/folder" --mode <your_mode> --overwrite --recursive| Argument | Short | Description |
|---|---|---|
input_path |
Required for CLI mode. Path to a single video file or a folder containing videos. | |
--mode |
Sets the processing mode. The available modes are discovered dynamically. | |
--od-mode |
Sets the oscillation detector mode to use in Stage 3. Choices: current, legacy. Default is current. |
|
--overwrite |
Forces the app to re-process and overwrite any existing funscripts. By default, it skips videos that already have a funscript. | |
--no-autotune |
Disables the automatic application of Ultimate Autotune after generation. | |
--no-copy |
Prevents saving a copy of the final funscript next to the video file. It will only be saved in the application's output folder. | |
--recursive |
-r |
If the input path is a folder, this flag enables scanning for videos in all its subdirectories. |
FunGen features a modular architecture for both funscript filtering and motion tracking, allowing for easy extension and customization.
The funscript filter system allows you to apply a variety of transformations to your generated funscripts. These can be chained together to achieve complex effects.
- Amplify: Amplifies or reduces position values around a center point.
- Autotune SG: Automatically finds optimal Savitzky-Golay filter parameters.
- Clamp: Clamps all positions to a specific value.
- Invert: Inverts position values (0 becomes 100, etc.).
- Keyframes: Simplifies the script to significant peaks and valleys.
- Resample: Resamples the funscript at regular intervals while preserving peak timing.
- Simplify (RDP): Simplifies the funscript by removing redundant points using the RDP algorithm.
- Smooth (SG): Applies a Savitzky-Golay smoothing filter.
- Speed Limiter: Limits speed and adds vibrations for hardware device compatibility.
- Threshold Clamp: Clamps positions to 0/100 based on thresholds.
- Ultimate Autotune: A comprehensive 7-stage enhancement pipeline.
The tracker system is responsible for analyzing the video and generating the raw motion data. Trackers are organized into categories based on their functionality.
These trackers process the video in real-time.
- Hybrid Intelligence Tracker: A multi-modal approach combining frame differentiation, optical flow, YOLO detection, and oscillation analysis.
- Oscillation Detector (Experimental 2): A hybrid approach combining experimental timing precision with legacy amplification and signal conditioning.
- Oscillation Detector (Legacy): The original oscillation tracker with cohesion analysis and superior amplification.
- Relative Distance Tracker: An optimized high-performance tracker with vectorized operations and intelligent caching.
- User ROI Tracker: A manual ROI definition with optical flow tracking and optional sub-tracking.
- YOLO ROI Tracker: Automatic ROI detection using YOLO object detection with optical flow tracking.
These trackers process the video in stages for higher accuracy.
- Contact Analysis (2-Stage): Offline contact detection and analysis using YOLO detection results.
- Mixed Processing (3-Stage): A hybrid approach using Stage 2 signals and selective live ROI tracking for BJ/HJ chapters.
- Optical Flow Analysis (3-Stage): Offline optical flow tracking using live tracker algorithms on Stage 2 segments.
These trackers are in development and may not be as stable as the others.
- Enhanced Axis Projection Tracker: A production-grade motion tracking system with multi-scale analysis, temporal coherence, and adaptive thresholding.
- Working Axis Projection Tracker: A simplified but reliable motion tracking with axis projection.
- Beat Marker (Visual/Audio): Generates actions from visual brightness changes, audio beats, or metronome.
- DOT Marker (Manual Point): Tracks a manually selected colored dot/point on screen.
- Community Example Tracker: A template tracker showing basic motion detection and funscript generation.
Our pipeline's current bottleneck lies in the Python code within YOLO.track (the object detection library we use), which is challenging to parallelize effectively in a single process.
However, when you have high-performance hardware you can use the command line (see above) to processes multiple videos simultaneously. Alternatively you can launch multiple instances of the GUI.
We tested speeds of about 60 to 110 fps for 8k 8bit vr videos when running a single process. Which translates to faster then realtime processing already. However, running in parallel mode we tested speeds of about 160 to 190 frames per second (for object detection). Meaning processing times of about 20 to 30 minutes for 8bit 8k VR videos for the complete process. More then twice the speed of realtime!
Keep in mind your results may vary as this is very dependent on your hardware. Cuda capable cards will have an advantage here. However, since the pipeline is largely CPU and video decode bottlenecked a top of the line card like the 4090 is not required to get similar results. Having enough VRAM to run 3-6 processes, paired with a good CPU, will speed things up considerably though.
Important considerations:
- Each instance requires the YOLO model to load which means you'll need to keep checks on your VRAM to see how many you can load.
- The optimal number of instances depends on a combination of factors, including your CPU, GPU, RAM, and system configuration. So experiment with different setups to find the ideal configuration for your hardware! 😊
- For VR only sbs (side by side) Fisheye and Equirectangular 180° videos are supported at the moment
- 2D POV videos are supported but work best when they are centered properly
- 2D / VR is automatically detected as is fisheye / equirectangular and FOV (make sure you keep the file format information in the filename _FISHEYE190, _MKX200, _LR_180, etc.)
- Detection settings can also be overwritten in the UI if the app doesn't detect it properly
The script generates the following files in a dedicated subfolder within your specified output directory:
-
_preprocessed.mkv: A standardized video file used by the analysis stages for reliable frame processing. -
.msgpack: Raw YOLO detection data from Stage 1. Can be re-used to accelerate subsequent runs. -
_stage2_overlay.msgpack: Detailed tracking and segmentation data from Stage 2, used for debugging and visualization. -
_t1_raw.funscript: The raw, unprocessed funscript generated by the analysis before any enhancements are applied. -
.funscript: The final, post-processed funscript file for the primary (up/down) axis. -
.roll.funscript: The final funscript file for the secondary (roll/twist) axis, generated in 3-stage mode. -
.fgp(FunGen Project): A project file containing all settings, chapter data, and paths related to the video.
The pipeline for generating Funscript files is as follows:
- YOLO Object Detection: A YOLO model detects relevant objects (e.g., penis, hands, mouth, etc.) in each frame of the video.
- Tracking and Segmentation: A custom tracking algorithm processes the YOLO detections to identify and segment continuous actions and interactions over time.
- Funscript Generation: Based on the mode (2-stage, 3-stage, etc.), the tracked data is used to generate a raw Funscript file.
-
Post-Processing: The raw Funscript is enhanced with features like Ultimate Autotune to smooth motion, normalize intensity, and improve the overall quality of the final
.funscriptfile.
This project started as a dream to automate Funscript generation for VR videos. Here’s a brief history of its development:
- Initial Approach (OpenCV Trackers): The first version relied on OpenCV trackers to detect and track objects in the video. While functional, the approach was slow (8–20 FPS) and struggled with occlusions and complex scenes.
- Transition to YOLO: To improve accuracy and speed, the project shifted to using YOLO object detection. A custom YOLO model was trained on a dataset of 1000nds annotated VR video frames, significantly improving detection quality.
- Original Post: For more details and discussions, check out the original post on EroScripts: VR Funscript Generation Helper (Python + CV/AI)
Contributions are welcome! If you'd like to contribute, please follow these steps:
- Fork the repository.
- Create a new branch for your feature or bug fix.
- Commit your changes.
- Submit a pull request.
This project is licensed under the Non-Commercial License. You are free to use the software for personal, non-commercial purposes only. Commercial use, redistribution, or modification for commercial purposes is strictly prohibited without explicit permission from the copyright holder.
This project is not intended for commercial use, nor for generating and distributing in a commercial environment.
For commercial use, please contact me.
See the LICENSE file for full details.
- YOLO: Thanks to the Ultralytics team for the YOLO implementation.
- FFmpeg: For video processing capabilities.
- Eroscripts Community: For the inspiration and use cases.
If you see [unknown@unknown] in the application logs or git errors like "returned non-zero exit status 128":
Cause: The installer was run with administrator privileges, causing git permission/ownership issues.
Solution 1 - Fix git permissions:
cd "C:\path\to\your\FunGen\FunGen"
git config --add safe.directory .
Solution 2 - Reinstall as normal user:
- Redownload
fungen_install.bat - Run it as a normal user (NOT as administrator)
- Use the launcher script (
launch.bat) instead ofpython main.py
If you get "ffmpeg/ffprobe not found" errors:
-
Use the launcher script (
launch.batorlaunch.sh) instead of runningpython main.pydirectly - Rerun the installer to get updated launcher scripts with FFmpeg PATH fixes
- The launcher automatically adds FFmpeg to PATH
-
Always use launcher scripts - Don't run
python main.pydirectly - Run installer as normal user - Avoid administrator mode
- Rerun installer for updates - Get latest fixes by rerunning the installer
- Check working directory - Make sure you're in the FunGen project folder
For detailed diagnostics, run:
cd "C:\path\to\your\FunGen\FunGen"
python debug_git.pyIf you encounter any issues or have questions, please open an issue on GitHub.
Join the Discord community for discussions and support: Discord Community
For Tasks:
Click tags to check more tools for each tasksFor Jobs:
Alternative AI tools for FunGen-AI-Powered-Funscript-Generator
Similar Open Source Tools
FunGen-AI-Powered-Funscript-Generator
FunGen is a Python-based tool that uses AI to generate Funscript files from VR and 2D POV videos. It enables fully automated funscript creation for individual scenes or entire folders of videos. The tool includes features like automatic system scaling support, quick installation guides for Windows, Linux, and macOS, manual installation instructions, NVIDIA GPU setup, AMD GPU acceleration, YOLO model download, GUI settings, GitHub token setup, command-line usage, modular systems for funscript filtering and motion tracking, performance and parallel processing tips, and more. The project is still in early development stages and is not intended for commercial use.

easydiffusion
Easy Diffusion 3.0 is a user-friendly tool for installing and using Stable Diffusion on your computer. It offers hassle-free installation, clutter-free UI, task queue, intelligent model detection, live preview, image modifiers, multiple prompts file, saving generated images, UI themes, searchable models dropdown, and supports various image generation tasks like 'Text to Image', 'Image to Image', and 'InPainting'. The tool also provides advanced features such as custom models, merge models, custom VAE models, multi-GPU support, auto-updater, developer console, and more. It is designed for both new users and advanced users looking for powerful AI image generation capabilities.

AmigaGPT
AmigaGPT is a versatile ChatGPT client for AmigaOS 3.x, 4.1, and MorphOS. It brings the capabilities of OpenAI’s GPT to Amiga systems, enabling text generation, question answering, and creative exploration. AmigaGPT can generate images using DALL-E, supports speech output, and seamlessly integrates with AmigaOS. Users can customize the UI, choose fonts and colors, and enjoy a native user experience. The tool requires specific system requirements and offers features like state-of-the-art language models, AI image generation, speech capability, and UI customization.

restai
RestAI is an AIaaS (AI as a Service) platform that allows users to create and consume AI agents (projects) using a simple REST API. It supports various types of agents, including RAG (Retrieval-Augmented Generation), RAGSQL (RAG for SQL), inference, vision, and router. RestAI features automatic VRAM management, support for any public LLM supported by LlamaIndex or any local LLM supported by Ollama, a user-friendly API with Swagger documentation, and a frontend for easy access. It also provides evaluation capabilities for RAG agents using deepeval.

exllamav3
ExLlamaV3 is an inference library for running local LLMs on modern consumer GPUs. It features a new EXL3 quantization format based on QTIP, flexible tensor-parallel and expert-parallel inference, OpenAI-compatible server via TabbyAPI, continuous dynamic batching, HF Transformers plugin, speculative decoding, multimodal support, and more. The library supports various architectures and aims to simplify and optimize the quantization process for large models, offering efficient conversion with reduced GPU-hours and cost. It provides a streamlined variant of QTIP, enabling fast and memory-bound latency for inference on GPUs.
Simplifine
Simplifine is an open-source library designed for easy LLM finetuning, enabling users to perform tasks such as supervised fine tuning, question-answer finetuning, contrastive loss for embedding tasks, multi-label classification finetuning, and more. It provides features like WandB logging, in-built evaluation tools, automated finetuning parameters, and state-of-the-art optimization techniques. The library offers bug fixes, new features, and documentation updates in its latest version. Users can install Simplifine via pip or directly from GitHub. The project welcomes contributors and provides comprehensive documentation and support for users.
pocketpal-ai
PocketPal AI is a versatile virtual assistant tool designed to streamline daily tasks and enhance productivity. It leverages artificial intelligence technology to provide personalized assistance in managing schedules, organizing information, setting reminders, and more. With its intuitive interface and smart features, PocketPal AI aims to simplify users' lives by automating routine activities and offering proactive suggestions for optimal time management and task prioritization.
kollektiv
Kollektiv is a Retrieval-Augmented Generation (RAG) system designed to enable users to chat with their favorite documentation easily. It aims to provide LLMs with access to the most up-to-date knowledge, reducing inaccuracies and improving productivity. The system utilizes intelligent web crawling, advanced document processing, vector search, multi-query expansion, smart re-ranking, AI-powered responses, and dynamic system prompts. The technical stack includes Python/FastAPI for backend, Supabase, ChromaDB, and Redis for storage, OpenAI and Anthropic Claude 3.5 Sonnet for AI/ML, and Chainlit for UI. Kollektiv is licensed under a modified version of the Apache License 2.0, allowing free use for non-commercial purposes.
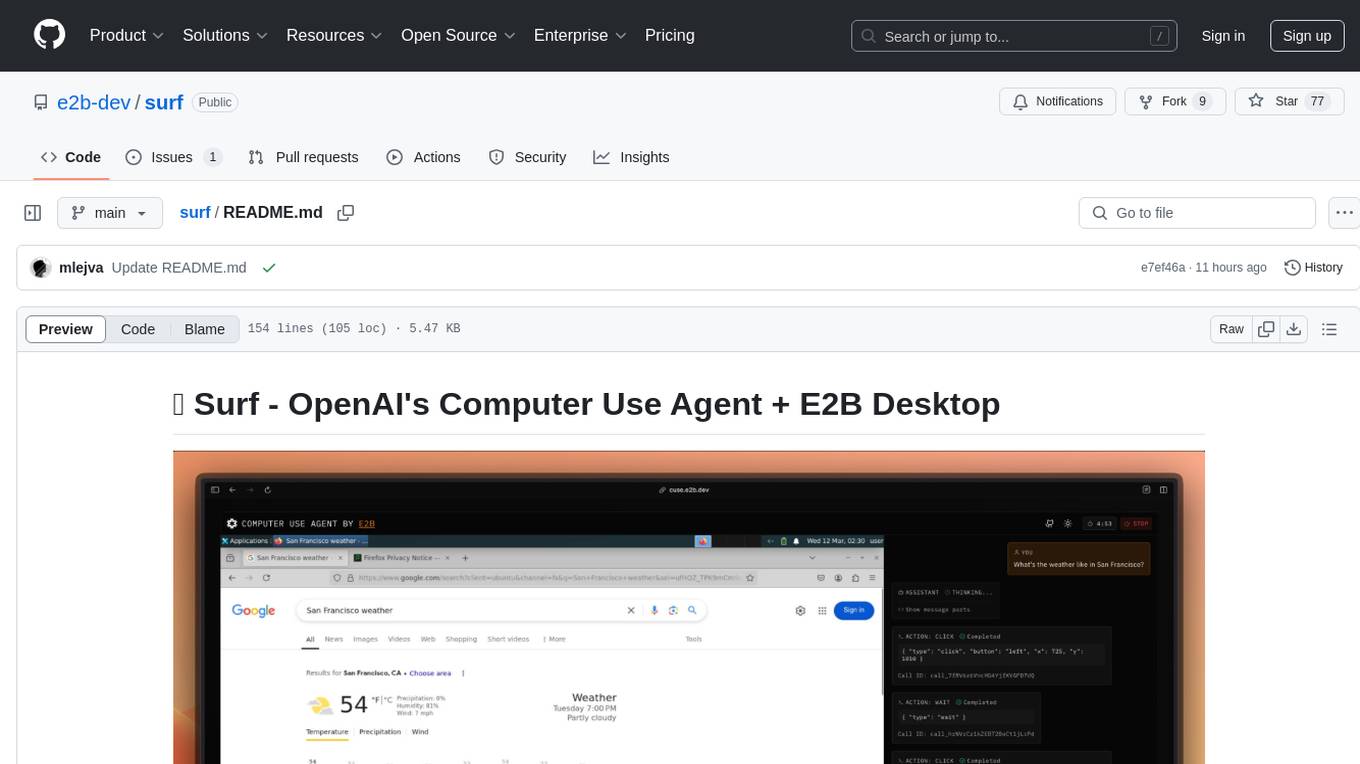
surf
Surf is a Next.js application that integrates E2B's desktop sandbox with OpenAI's API to create an AI agent that can perform tasks on a virtual computer through natural language instructions. It provides a web interface for users to start a virtual desktop sandbox environment, send instructions to the AI agent, watch AI actions in real-time, and interact with the AI through a chat interface. The application uses Server-Sent Events (SSE) for seamless communication between frontend and backend components.
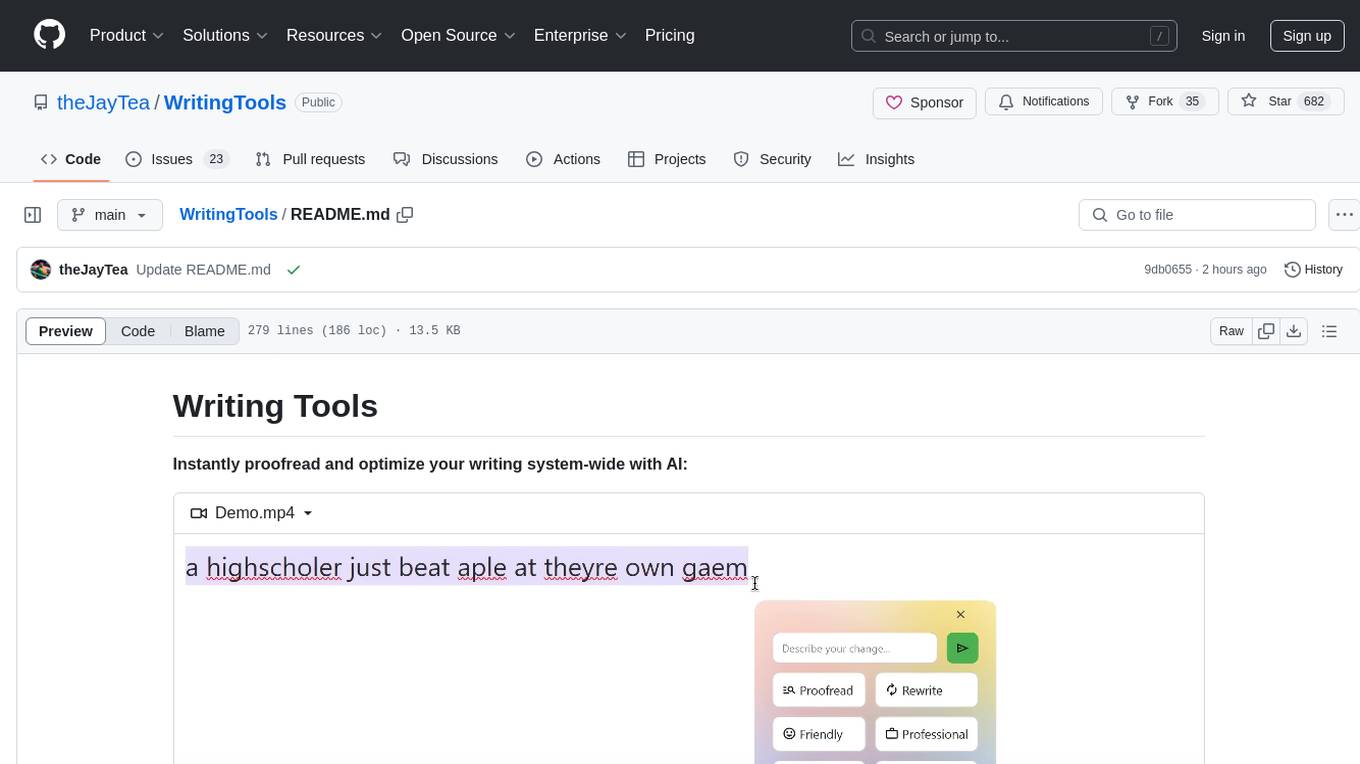
WritingTools
Writing Tools is an Apple Intelligence-inspired application for Windows, Linux, and macOS that supercharges your writing with an AI LLM. It allows users to instantly proofread, optimize text, and summarize content from webpages, YouTube videos, documents, etc. The tool is privacy-focused, open-source, and supports multiple languages. It offers powerful features like grammar correction, content summarization, and LLM chat mode, making it a versatile writing assistant for various tasks.

Groqqle
Groqqle 2.1 is a revolutionary, free AI web search and API that instantly returns ORIGINAL content derived from source articles, websites, videos, and even foreign language sources, for ANY target market of ANY reading comprehension level! It combines the power of large language models with advanced web and news search capabilities, offering a user-friendly web interface, a robust API, and now a powerful Groqqle_web_tool for seamless integration into your projects. Developers can instantly incorporate Groqqle into their applications, providing a powerful tool for content generation, research, and analysis across various domains and languages.
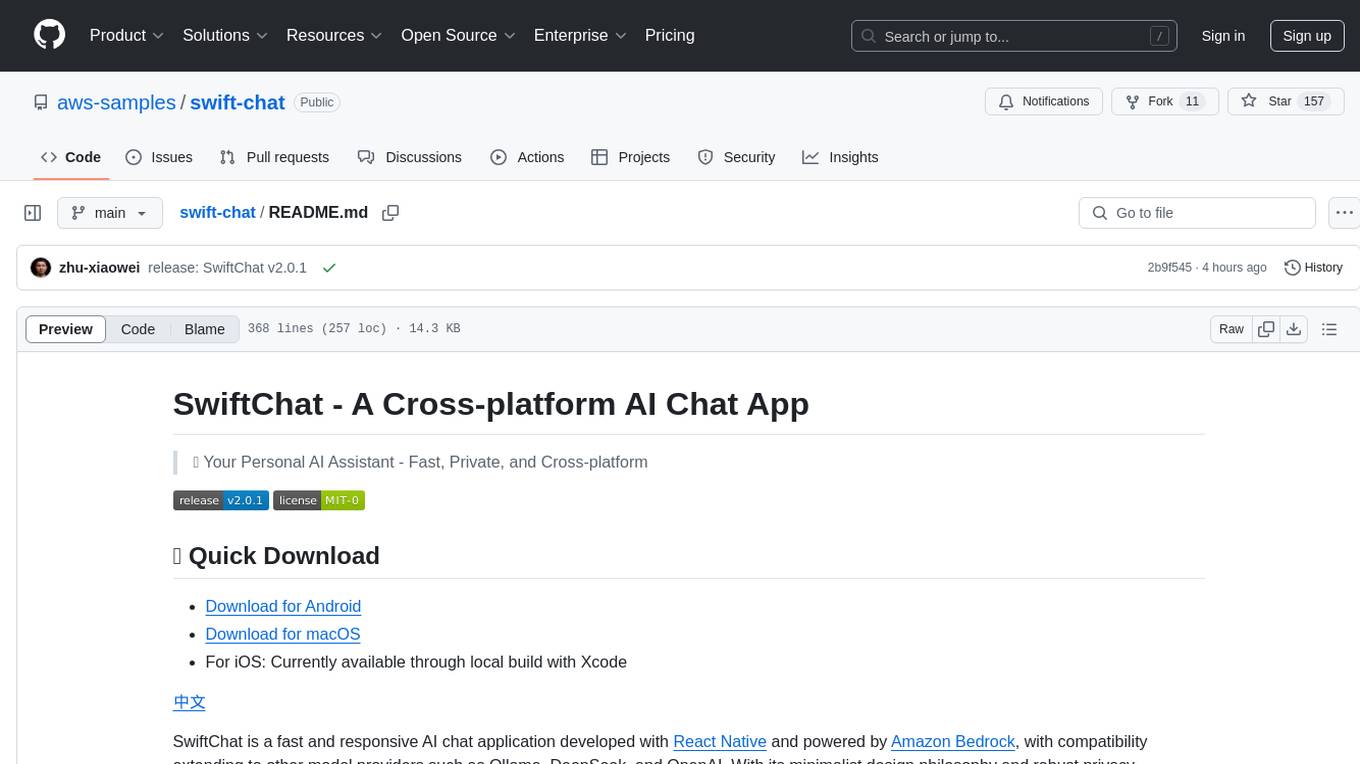
swift-chat
SwiftChat is a fast and responsive AI chat application developed with React Native and powered by Amazon Bedrock. It offers real-time streaming conversations, AI image generation, multimodal support, conversation history management, and cross-platform compatibility across Android, iOS, and macOS. The app supports multiple AI models like Amazon Bedrock, Ollama, DeepSeek, and OpenAI, and features a customizable system prompt assistant. With a minimalist design philosophy and robust privacy protection, SwiftChat delivers a seamless chat experience with various features like rich Markdown support, comprehensive multimodal analysis, creative image suite, and quick access tools. The app prioritizes speed in launch, request, render, and storage, ensuring a fast and efficient user experience. SwiftChat also emphasizes app privacy and security by encrypting API key storage, minimal permission requirements, local-only data storage, and a privacy-first approach.
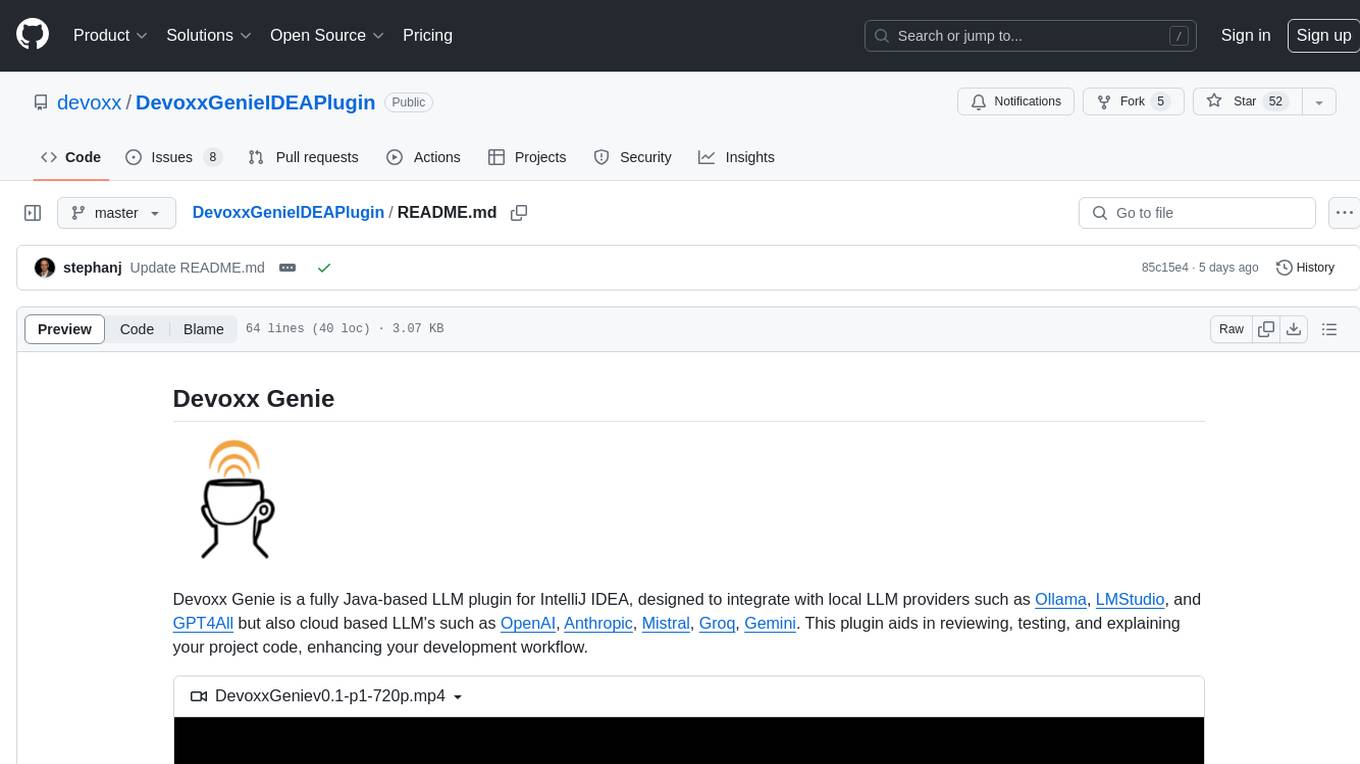
DevoxxGenieIDEAPlugin
Devoxx Genie is a Java-based IntelliJ IDEA plugin that integrates with local and cloud-based LLM providers to aid in reviewing, testing, and explaining project code. It supports features like code highlighting, chat conversations, and adding files/code snippets to context. Users can modify REST endpoints and LLM parameters in settings, including support for cloud-based LLMs. The plugin requires IntelliJ version 2023.3.4 and JDK 17. Building and publishing the plugin is done using Gradle tasks. Users can select an LLM provider, choose code, and use commands like review, explain, or generate unit tests for code analysis.
langmanus
LangManus is a community-driven AI automation framework that combines language models with specialized tools for tasks like web search, crawling, and Python code execution. It implements a hierarchical multi-agent system with agents like Coordinator, Planner, Supervisor, Researcher, Coder, Browser, and Reporter. The framework supports LLM integration, search and retrieval tools, Python integration, workflow management, and visualization. LangManus aims to give back to the open-source community and welcomes contributions in various forms.
plandex
Plandex is an open source, terminal-based AI coding engine designed for complex tasks. It uses long-running agents to break up large tasks into smaller subtasks, helping users work through backlogs, navigate unfamiliar technologies, and save time on repetitive tasks. Plandex supports various AI models, including OpenAI, Anthropic Claude, Google Gemini, and more. It allows users to manage context efficiently in the terminal, experiment with different approaches using branches, and review changes before applying them. The tool is platform-independent and runs from a single binary with no dependencies.
For similar tasks
FunGen-AI-Powered-Funscript-Generator
FunGen is a Python-based tool that uses AI to generate Funscript files from VR and 2D POV videos. It enables fully automated funscript creation for individual scenes or entire folders of videos. The tool includes features like automatic system scaling support, quick installation guides for Windows, Linux, and macOS, manual installation instructions, NVIDIA GPU setup, AMD GPU acceleration, YOLO model download, GUI settings, GitHub token setup, command-line usage, modular systems for funscript filtering and motion tracking, performance and parallel processing tips, and more. The project is still in early development stages and is not intended for commercial use.
For similar jobs
sweep
Sweep is an AI junior developer that turns bugs and feature requests into code changes. It automatically handles developer experience improvements like adding type hints and improving test coverage.
teams-ai
The Teams AI Library is a software development kit (SDK) that helps developers create bots that can interact with Teams and Microsoft 365 applications. It is built on top of the Bot Framework SDK and simplifies the process of developing bots that interact with Teams' artificial intelligence capabilities. The SDK is available for JavaScript/TypeScript, .NET, and Python.
ai-guide
This guide is dedicated to Large Language Models (LLMs) that you can run on your home computer. It assumes your PC is a lower-end, non-gaming setup.

classifai
Supercharge WordPress Content Workflows and Engagement with Artificial Intelligence. Tap into leading cloud-based services like OpenAI, Microsoft Azure AI, Google Gemini and IBM Watson to augment your WordPress-powered websites. Publish content faster while improving SEO performance and increasing audience engagement. ClassifAI integrates Artificial Intelligence and Machine Learning technologies to lighten your workload and eliminate tedious tasks, giving you more time to create original content that matters.
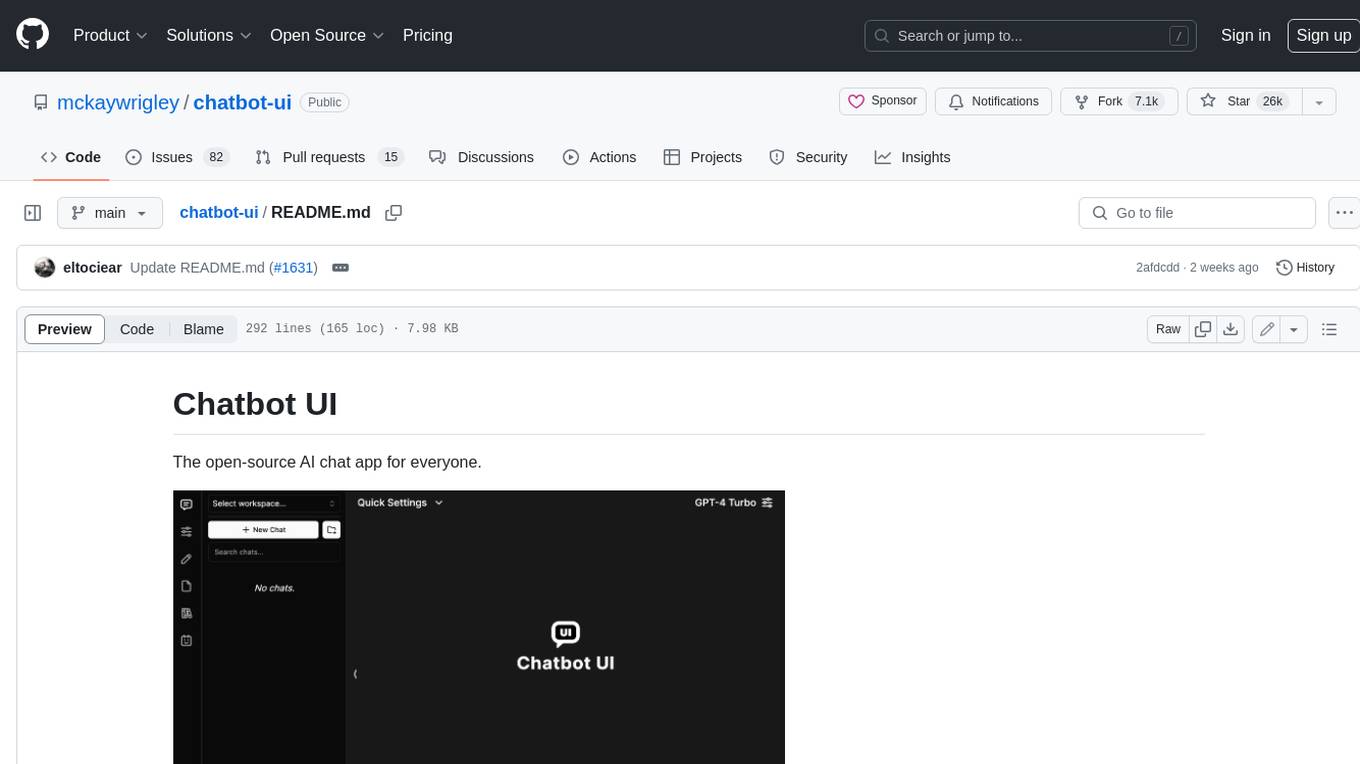
chatbot-ui
Chatbot UI is an open-source AI chat app that allows users to create and deploy their own AI chatbots. It is easy to use and can be customized to fit any need. Chatbot UI is perfect for businesses, developers, and anyone who wants to create a chatbot.
BricksLLM
BricksLLM is a cloud native AI gateway written in Go. Currently, it provides native support for OpenAI, Anthropic, Azure OpenAI and vLLM. BricksLLM aims to provide enterprise level infrastructure that can power any LLM production use cases. Here are some use cases for BricksLLM: * Set LLM usage limits for users on different pricing tiers * Track LLM usage on a per user and per organization basis * Block or redact requests containing PIIs * Improve LLM reliability with failovers, retries and caching * Distribute API keys with rate limits and cost limits for internal development/production use cases * Distribute API keys with rate limits and cost limits for students
uAgents
uAgents is a Python library developed by Fetch.ai that allows for the creation of autonomous AI agents. These agents can perform various tasks on a schedule or take action on various events. uAgents are easy to create and manage, and they are connected to a fast-growing network of other uAgents. They are also secure, with cryptographically secured messages and wallets.
griptape
Griptape is a modular Python framework for building AI-powered applications that securely connect to your enterprise data and APIs. It offers developers the ability to maintain control and flexibility at every step. Griptape's core components include Structures (Agents, Pipelines, and Workflows), Tasks, Tools, Memory (Conversation Memory, Task Memory, and Meta Memory), Drivers (Prompt and Embedding Drivers, Vector Store Drivers, Image Generation Drivers, Image Query Drivers, SQL Drivers, Web Scraper Drivers, and Conversation Memory Drivers), Engines (Query Engines, Extraction Engines, Summary Engines, Image Generation Engines, and Image Query Engines), and additional components (Rulesets, Loaders, Artifacts, Chunkers, and Tokenizers). Griptape enables developers to create AI-powered applications with ease and efficiency.