
0chain
Züs (formerly 0Chain) is a decentralized blockchain-based storage platform with no vendor lock-in and a 3-layer security - fragmentation, proxy re-encryption, and immutability. It has close to wire speed data performance, free reads, and is ideal for apps as well as backups, AI data, disaster recovery.
Stars: 113
Züs is a high-performance cloud on a fast blockchain offering privacy and configurable uptime. It uses erasure code to distribute data between data and parity servers, allowing flexibility for IT managers to design for security and uptime. Users can easily share encrypted data with business partners through a proxy key sharing protocol. The ecosystem includes apps like Blimp for cloud migration, Vult for personal cloud storage, and Chalk for NFT artists. Other apps include Bolt for secure wallet and staking, Atlus for blockchain explorer, and Chimney for network participation. The QoS protocol challenges providers based on response time, while the privacy protocol enables secure data sharing. Züs supports hybrid and multi-cloud architectures, allowing users to improve regulatory compliance and security requirements.
README:
# Züs TestNet Setup with Docker Containers
![]()
![]()

- Züs Overview
- Changelog
- Initial Setup
- Run 0chain on ec2 / vm / bare metal
- Run 0chain on ec2 / vm / bare metal over https
- Development
Züs is a high-performance cloud on a fast blockchain offering privacy and configurable uptime. It is an alternative to traditional cloud S3 and has shown better performance on a test network due to its parallel data architecture. The technology uses erasure code to distribute the data between data and parity servers. Züs storage is configurable to provide flexibility for IT managers to design for desired security and uptime, and can design a hybrid or a multi-cloud architecture with a few clicks using Blimp's workflow, and can change redundancy and providers on the fly.
For instance, the user can start with 10 data and 5 parity providers and select where they are located globally, and later decide to add a provider on-the-fly to increase resilience, performance, or switch to a lower cost provider.
Users can also add their own servers to the network to operate in a hybrid cloud architecture. Such flexibility allows the user to improve their regulatory, content distribution, and security requirements with a true multi-cloud architecture. Users can also construct a private cloud with all of their own servers rented across the globe to have a better content distribution, highly available network, higher performance, and lower cost.
The QoS protocol is time-based where the blockchain challenges a provider on a file that the provider must respond within a certain time based on its size to pass. This forces the provider to have a good server and data center performance to earn rewards and income.
The privacy protocol from Züs is unique where a user can easily share their encrypted data with their business partners, friends, and family through a proxy key sharing protocol, where the key is given to the providers, and they re-encrypt the data using the proxy key so that only the recipient can decrypt it with their private key.
Züs has ecosystem apps to encourage traditional storage consumption such as Blimp, a S3 server and cloud migration platform, and Vult, a personal cloud app to store encrypted data and share privately with friends and family, and Chalk, a high-performance story-telling storage solution for NFT artists.
Other apps are Bolt, a wallet that is very secure with air-gapped 2FA split-key protocol to prevent hacks from compromising your digital assets, and it enables you to stake and earn from the storage providers; Atlus, a blockchain explorer and Chimney, which allows anyone to join the network and earn using their server or by just renting one, with no prior knowledge required.
Docker and Go must be installed to run the testnet containers. Get Docker from here and Go from here.
./macos_network.shRun powershell as administrator
./windows_network.ps1Run the following script
./wsl_ubuntu_network_iptables.shIn the git/0chain run the following command
./docker.local/bin/init.setup.sh
Set up a network called testnet0 for each of these node containers to talk to each other.
Note: The config file should be providing the IP address of the nodes as per the IP addresses in this network.
./docker.local/bin/setup.network.sh
-
Open 5 terminal tabs. Use the first one for building the containers by being in git/0chain directory. Use the next 3 for 3 miners and be in the respective miner directories created above in docker.local. Use the 5th terminal and be in the sharder1 directory.
1.1) First build the base containers, zchain_build_base and zchain_run_base
./docker.local/bin/build.base.sh -
Build mocks from the Makefile in the repo, from git/0chain directory run:
make build-mocksNote: Mocks have to be built once in the beginning. Building mocks require mockery and brew which can be installed from here.
-
Building the miners and sharders. From the git/0chain directory use
3.1) To build the miner containers
./docker.local/bin/build.miners.sh3.2) To build the sharder containers
./docker.local/bin/build.sharders.sh3.3) Syncing time (the host and the containers are being offset by a few seconds that throws validation errors as we accept transactions that are within 5 seconds of creation). This step is needed periodically when you see the validation error.
./docker.local/bin/sync_clock.sh
- Use
./docker.local/config/0chain.yamlto configure the blockchain properties. The default options are set up for running the blockchain fast in development.
1.1) If you want the logs to appear on the console - change logging.console from false to true
1.2) If you want the debug statements in the logs to appear - change logging.level from "info" to "debug"
1.3) If you want to change the block size, set the value of server_chain.block.size
1.4) If you want to adjust the network relay time, set the value of network.relay_time
1.5) If you want to turn off fees adjust server_chain.smart_contract.miner from true to false
Note: Remove sharder72 and miner75 from docker.local/config/b0snode2_keys.txt and docker.local/config/b0mnode5_keys.txt respectively if you are joining to local network.
- Starting the nodes. On each of the miner terminals use the commands (note the
..at the beginning. This is because, these commands are run from within thedocker.local/<miner/sharder|i>directories and thebinis one level above relative to these directories)
Start sharder first because miners need the genesis magic block. On the sharder terminal, use
../bin/start.b0sharder.sh
Wait till the cassandra is started and the sharder is ready to listen to requests.
On the respective miner terminal, use
../bin/start.b0miner.sh
- Ensure the port mapping is all correct:
docker ps
This should display a few containers and should include containers with images miner1_miner, miner2_miner and miner3_miner, and they should have the ports mapped like "0.0.0.0:7071->7071/tcp"
- Confirming the servers are up and running. From a browser, visit
to see the status of the miners.
Similarly, following links can be used to see the status of the sharders
- Connecting to redis servers running within the containers (you are within the appropriate miner directories)
Default redis (used for clients and state):
../bin/run.miner.sh redis redis-cli
Redis used for transactions:
../bin/run.miner.sh redis_txns redis-cli
- Connecting to cassandra used in the sharder (you are within the appropriate sharder directories)
../bin/run.sharder.sh cassandra cqlsh
To reflect a change in config files 0chain.yaml and sc.yaml, just restart the miner or sharder to take the new configuration. If you're doing a code change locally or pulling updates from GitHub, you need to build.
git pull
docker.local/bin/build.base.sh && docker.local/bin/build.sharders.sh && docker.local/bin/build.miners.sh
For existing code and if you have tried running once, make sure there are no previous files and processes.
docker stop $(docker ps -a -q)
docker.local/bin/clean.sh
docker.local/bin/init.setup.sh
docker.local/bin/sync_clock.sh
Then go to individual miner/sharder:
../bin/start.b0sharder.sh (start sharders first!)
../bin/start.b0miner.sh
- If you want to restart the blockchain from the beginning
./docker.local/bin/clean.sh
This cleans up the directories within docker.local/miner* and docker.local/sharder*
Note: this script can take a while if the blockchain generated a lot of blocks as the script deletes the databases and also all the blocks that are stored by the sharders. Since each block is stored as a separate file, deleting thousands of such files will take some time.
- If you want to get rid of old unused docker resources:
docker system prune
Library by herumi for working with BLS threshold signatures requires this flag turned on:
setsebool -P selinuxuser_execheap 1
If you are curious about the reasons for this, this thread sheds some light on the topic:
https://github.com/herumi/xbyak/issues/9
The following is no longer required as the schema is automatically loaded.
Start the sharder service that also brings up the cassandra service. To run commands on cassandra, use the following command
../bin/run.sharder.sh cassandra cqlsh
- To create zerochain keyspace, do the following
../bin/run.sharder.sh cassandra cqlsh -f /0chain/sql/zerochain_keyspace.sql
- To create the tables, do the following
../bin/run.sharder.sh cassandra cqlsh -k zerochain -f /0chain/sql/txn_summary.sql
- When you want to truncate existing data (use caution), do the following
../bin/run.sharder.sh cassandra cqlsh -k zerochain -f /0chain/sql/truncate_tables.sql
Run the following command to install the msgp tool:
make install-msgpWe are using msgp to encode/decode data that store in MPT, it is unnecessary to touch it unless there are data struct changes or new type of data structs need to store in MPT.
When we need to add a new data struct to MPT, for example:
//go:generate msgp -io=false -tests=false -v
package main

type Foo struct {
	Name string
}
Note:
-
msgpdoes not support system type alias, so please do not usedatastore.Keyin MPT data struct, it is an alias of system typestring. - The
//go:generate msgp -io=false ...works on file level, i.e, we only need to define it once a file, so please check if it is already defined before adding.
Then run the following command from the project root to generate methods for serialization.
make msgpA new file will then be generated as {file}_gen.go in the same dir where the data struct is defined.
You need to install rocksdb and herumi/bls, refer to docker.local/build.base/Dockerfile.build_base for necessary steps.
For local compilation it should be enough of go build from a submodule folder, e.g.
cd code/go/0chain.net/miner
go build
You can pass tag development if you want to simulate n2n delays.
And you also need tag bn256 to build the same code as in production:
go build -tags "bn256 development"
./0chain_dev_deployment.shIf you want to run a debug 0chain build you can follow the details contained in the
0chain/local folder.
Only one miner and one sharder can be run on any single machine, so you will need at least three machines to for a working 0chain.
The logs of the nodes are stored in log directory (/0chain/log on the container and docker.local/miner|sharder[n]/log in the host). The 0chain.log contains all the logs related to the protocol and the n2n.log contains all the node to node communication logs. The typical issues that need to be debugged is errors in the log, why certain things have not happened which requires reviewing the timestamp of a sequence of events in the network. Here is an example set of commands to do some debugging.
Find errors in all the miner nodes (from git/0chain)
grep ERROR docker.local/miner*/log/0chain.log
This gives a set of errors in the log. Say an error indicates a problem for a specific block, say abc, then
grep abc docker.local/miner*/log/0chain.log
gives all the logs related to block 'abc'
To get the start time of all the rounds
grep 'starting round' docker.local/miner*/log/0chain.log
This gives the start timestamps that can be used to correlate the events and their timings.
0chain unit tests verify the behaviour of individual parts of the program. A config for the base docker image can be provided on run to execute general unit tests.

Navigate to 0chain folder and run the script to build base docker image for unit testing :
cd 0chain
./docker.local/bin/build.base.sh
The base image includes all the dependencies required to test the 0chain code.
Now run the script containing unit tests .
./docker.local/bin/unit_test.sh
OR to run the unit tests without the mocks,
./docker.local/bin/unit_test.sh --no-mocks
The list of packages is optional, and if provided runs only the tests from those packages. The command for running unit tests with specific packages.
./docker.local/bin/unit_test.sh [<packages>]
Unit testing happens over a series of steps one after the other.
This FROMstep does the required preparation and specifies the underlying OS architecture to use the build image. Here we are using the base image created in the build phase.
The SRC_DIR variable is a reference to a filepath which contains the code from your pull request. Here /0chain directory is specified as it is the one which was cloned.
GO111MODULE is an environment variable that can be set when using go for changing how Go imports packages. It was introduced to help ensure a smooth transition to the module system.
GO111MODULE=on will force using Go modules even if the project is in your GOPATH. Requires go.mod to work.
Note: The default behavior in Go 1.16 is now GO111MODULE=on
This step copies the code from the source path to the destination path.
The RUN command is an image build step which allows installing of application and packages requited for testing while thego mod download downloads the specific module versions you've specified in the go.modfile.
Step 6: RUN cd $GOPATH/pkg/mod/github.com/valyala/[email protected]. && chmod -R +w . && make clean libzstd.a
This step runs the gozstd package and provides write permissions to the directory. gozstd which is a go wrapper for zstd (library) provides Go bindings for the libzstd C library. The make clean is run in the last to clean up the code and remove all the compiled object files from the source code
This step defines the working directory for running unit tests which is (0chain/code/go/0chain.net/).For all the running general unit tests their code coverage will be defined in the terminal like this
ok 0chain.net/chaincore/block 0.128s coverage: 98.9% of statements
The above output shows 98.9% of code statements was covered with tests.
First build the magic block image.
./docker.local/bin/build.magic_block.sh
Next, set the configuration file. To do this edit the docker.local/build.magicBlock/docker-compose.yml file. On line 13 is a flag "--config_file" set it to the magic block configuration file you want to use.
To create the magic block.
./docker.local/bin/create.magic_block.sh
The magic block and the dkg summary json files will appear in the docker.local/config under the name given in the configuration file.
The magic_block_file setting in the 0chain.yaml file needs to be updated with the new name of the magic block created.
Update the miner config file, so it is set to the new dkg summaries. To do this edit the docker.local/build.miner/b0docker-compose.yml file. On line 55 is a flag "--dkg_file" set it to the dkg summary files created with the magic block.
The balance for the various nodes is set up in a initial_state.yaml file.
This file is a list of node ids and token amounts.
The initial state yaml file is entered as a command line argument when
running a sharder or miner, falling that the 0chain.yaml
network.inital_states entry is used to find the initial state file.
An example, that can be used with the preset ids, can be found at 0chain/docker.local/config/initial_state.yaml`
Benchmark 0chain smart-contract endpoints.
Runs testing.Benchmark on each 0chain endpoint. The blockchain database used in these tests is constructed from the parameters in the benchmark.yaml. file. Smartcontracts do not (or should not) access tha chain so a populated MPT database is enough to give a realistic benchmark.
More info in read.me
Integration testing combines individual 0chain modules and test them as a group. Integration testing evaluates the compliance of a system for specific functional requirements and usually occurs after unit testing .
For integration testing, A conductor which is RPC(Remote Procedure Call) server is implemented to control behaviour of nodes .To know more about the conductor refer to the conductor documentation
A conductor requires the nodes to be built in a certain order to control them during the tests. A config file is defined in conductor.config.yaml which contains important details such as details of all nodes used and custom commands used in integration testing.

For running multiple test cases,conductor uses a test suite which contains multiple sets of tests .A test suites can be categorized into 3 types of tests
standard tests - Checks whether chain continue to function properly despite bad miner and sharder participants
view-change tests - Checks whether addition and removal of nodes is working
.blobber tests - Checks whether storage functions continue to work properly despite bad or lost blobber, and confirms expected storage function failures
Below is an example of conductor test suite.
# Under `enable` is the list of sets that will be run.
enable:
  - "Miner down/up"
  - "Blobber tests"

# Test sets defines the test cases it covers.
sets:
  - name: "Miner down/up"
    tests:
      - "Miner: 50 (switch to contribute)"
      - "Miner: 100 (switch to share)"
  - name: "Blobber tests"
    tests:
      - "All blobber tests"

# Test cases defines the execution flow for the tests.
tests:
  - name: "Miner: 50 (switch to contribute)"
    flow:
    # Flow is a series of directives.
    # The directive can either be built-in in the conductor
    # or custom command defined in "conductor.config.yaml"
      - set_monitor: "sharder-1" # Most directive refer to node by name, these are defined in `conductor.config.yaml`
      - cleanup_bc: {} # A sample built-in command that triggers stop on all nodes and clean up.
      - start: ['sharder-1']
      - start: ['miner-1', 'miner-2', 'miner-3']
      - wait_phase:
          phase: 'contribute'
      - stop: ['miner-1']
      - start: ['miner-1']
      - wait_view_change:
          timeout: '5m'
          expect_magic_block:
            miners: ['miner-1', 'miner-2', 'miner-3']
            sharders: ['sharder-1']
  - name: "Miner: 100 (switch to share)"
    flow:
    ...
  - name: "All blobber tests"
    flow:
      - command:
          name: 'build_test_blobbers' # Sample custom command that executes `build_test_blobbers`
    ...
...
Docker and Git must be installed to run the tests .
Install Git using the following command:
sudo apt install git
Docker installation instructions can be found here.
Clone the 0chain repository:
git clone https://github.com/0chain/0chain.git
Build miner docker image for integration test
(cd 0chain && ./docker.local/bin/build.miners-integration-tests.sh)
Build sharder docker image for integration test
(cd 0chain && ./docker.local/bin/build.sharders-integration-tests.sh)
NOTE: The miner and sharder images are designed for integration tests only. If wanted to run chain normally, rebuild the original images.
(cd 0chain && ./docker.local/bin/build.sharders.sh && ./docker.local/bin/build.miners.sh)
Confirm that view change rounds are set to 50 on 0chain/docker.local/config.yaml
    start_rounds: 50
    contribute_rounds: 50
    share_rounds: 50
    publish_rounds: 50
    wait_rounds: 50
Run miners test
(cd 0chain && ./docker.local/bin/start.conductor.sh miners)
Run sharders test
(cd 0chain && ./docker.local/bin/start.conductor.sh sharders)
- These 2 scripts should be run with
view_change: falsein0chain/docker.local/config.yaml1.1.(cd 0chain && ./docker.local/bin/start.conductor.sh no-view-change.byzantine)1.2.(cd 0chain && ./docker.local/bin/start.conductor.sh no-view-change.fault-tolerance) - Set
view_change: truein0chain/docker.local/config.yamlfor the following 2 scripts 2.1.(cd 0chain && ./docker.local/bin/start.conductor.sh view-change.byzantine)2.2.(cd 0chain && ./docker.local/bin/start.conductor.sh view-change.fault-tolerance*)
Refer to conductor documentation
New tests can be easily added to the conductor check Updating conductor tests in the conductor documentation for more information.
Check Temporarily disabling tests in the conductor documentation for more information
Check the supported directives in the conductor documentation for more information.
Check Custom Commands in the conductor documentation for more information
To generate swagger documentation you need go-swagger installed, visit https://goswagger.io/install.html for details.
You then need to run the makefile
make swaggerThe documentation will be in docs/swagger.md and docs/swagger.yaml.
For Tasks:
Click tags to check more tools for each tasksFor Jobs:
Alternative AI tools for 0chain
Similar Open Source Tools
0chain
Züs is a high-performance cloud on a fast blockchain offering privacy and configurable uptime. It uses erasure code to distribute data between data and parity servers, allowing flexibility for IT managers to design for security and uptime. Users can easily share encrypted data with business partners through a proxy key sharing protocol. The ecosystem includes apps like Blimp for cloud migration, Vult for personal cloud storage, and Chalk for NFT artists. Other apps include Bolt for secure wallet and staking, Atlus for blockchain explorer, and Chimney for network participation. The QoS protocol challenges providers based on response time, while the privacy protocol enables secure data sharing. Züs supports hybrid and multi-cloud architectures, allowing users to improve regulatory compliance and security requirements.

MegatronApp
MegatronApp is a toolchain built around the Megatron-LM training framework, offering performance tuning, slow-node detection, and training-process visualization. It includes modules like MegaScan for anomaly detection, MegaFBD for forward-backward decoupling, MegaDPP for dynamic pipeline planning, and MegaScope for visualization. The tool aims to enhance large-scale distributed training by providing valuable capabilities and insights.
seer
Seer is a service that provides AI capabilities to Sentry by running inference on Sentry issues and providing user insights. It is currently in early development and not yet compatible with self-hosted Sentry instances. The tool requires access to internal Sentry resources and is intended for internal Sentry employees. Users can set up the environment, download model artifacts, integrate with local Sentry, run evaluations for Autofix AI agent, and deploy to a sandbox staging environment. Development commands include applying database migrations, creating new migrations, running tests, and more. The tool also supports VCRs for recording and replaying HTTP requests.
aisheets
Hugging Face AI Sheets is an open-source tool for building, enriching, and transforming datasets using AI models with no code. It can be deployed locally or on the Hub, providing access to thousands of open models. Users can easily generate datasets, run data generation scripts, and customize inference endpoints for text generation. The tool supports custom LLMs and offers advanced configuration options for authentication, inference, and miscellaneous settings. With AI Sheets, users can leverage the power of AI models without writing any code, making dataset management and transformation efficient and accessible.
gpt-subtrans
GPT-Subtrans is an open-source subtitle translator that utilizes large language models (LLMs) as translation services. It supports translation between any language pairs that the language model supports. Note that GPT-Subtrans requires an active internet connection, as subtitles are sent to the provider's servers for translation, and their privacy policy applies.
llm-subtrans
LLM-Subtrans is an open source subtitle translator that utilizes LLMs as a translation service. It supports translating subtitles between any language pairs supported by the language model. The application offers multiple subtitle formats support through a pluggable system, including .srt, .ssa/.ass, and .vtt files. Users can choose to use the packaged release for easy usage or install from source for more control over the setup. The tool requires an active internet connection as subtitles are sent to translation service providers' servers for translation.
azure-search-openai-javascript
This sample demonstrates a few approaches for creating ChatGPT-like experiences over your own data using the Retrieval Augmented Generation pattern. It uses Azure OpenAI Service to access the ChatGPT model (gpt-35-turbo), and Azure AI Search for data indexing and retrieval.
geti-sdk
The Intel® Geti™ SDK is a python package that enables teams to rapidly develop AI models by easing the complexities of model development and enhancing collaboration between teams. It provides tools to interact with an Intel® Geti™ server via the REST API, allowing for project creation, downloading, uploading, deploying for local inference with OpenVINO, setting project and model configuration, launching and monitoring training jobs, and media upload and prediction. The SDK also includes tutorial-style Jupyter notebooks demonstrating its usage.
fasttrackml
FastTrackML is an experiment tracking server focused on speed and scalability, fully compatible with MLFlow. It provides a user-friendly interface to track and visualize your machine learning experiments, making it easy to compare different models and identify the best performing ones. FastTrackML is open source and can be easily installed and run with pip or Docker. It is also compatible with the MLFlow Python package, making it easy to integrate with your existing MLFlow workflows.
metaflow-service
Metaflow Service is a metadata service implementation for Metaflow, providing a thin wrapper around a database to keep track of metadata associated with Flows, Runs, Steps, Tasks, and Artifacts. It includes features for managing DB migrations, launching compatible versions of the metadata service, and executing flows locally. The service can be run using Docker or as a standalone service, with options for testing and running unit/integration tests. Users can interact with the service via API endpoints or utility CLI tools.
airbyte_serverless
AirbyteServerless is a lightweight tool designed to simplify the management of Airbyte connectors. It offers a serverless mode for running connectors, allowing users to easily move data from any source to their data warehouse. Unlike the full Airbyte-Open-Source-Platform, AirbyteServerless focuses solely on the Extract-Load process without a UI, database, or transform layer. It provides a CLI tool, 'abs', for managing connectors, creating connections, running jobs, selecting specific data streams, handling secrets securely, and scheduling remote runs. The tool is scalable, allowing independent deployment of multiple connectors. It aims to streamline the connector management process and provide a more agile alternative to the comprehensive Airbyte platform.
mosec
Mosec is a high-performance and flexible model serving framework for building ML model-enabled backend and microservices. It bridges the gap between any machine learning models you just trained and the efficient online service API. * **Highly performant** : web layer and task coordination built with Rust 🦀, which offers blazing speed in addition to efficient CPU utilization powered by async I/O * **Ease of use** : user interface purely in Python 🐍, by which users can serve their models in an ML framework-agnostic manner using the same code as they do for offline testing * **Dynamic batching** : aggregate requests from different users for batched inference and distribute results back * **Pipelined stages** : spawn multiple processes for pipelined stages to handle CPU/GPU/IO mixed workloads * **Cloud friendly** : designed to run in the cloud, with the model warmup, graceful shutdown, and Prometheus monitoring metrics, easily managed by Kubernetes or any container orchestration systems * **Do one thing well** : focus on the online serving part, users can pay attention to the model optimization and business logic

CLI
Bito CLI provides a command line interface to the Bito AI chat functionality, allowing users to interact with the AI through commands. It supports complex automation and workflows, with features like long prompts and slash commands. Users can install Bito CLI on Mac, Linux, and Windows systems using various methods. The tool also offers configuration options for AI model type, access key management, and output language customization. Bito CLI is designed to enhance user experience in querying AI models and automating tasks through the command line interface.
geti-sdk
The Intel® Geti™ SDK is a python package that enables teams to rapidly develop AI models by easing the complexities of model development and fostering collaboration. It provides tools to interact with an Intel® Geti™ server via the REST API, allowing for project creation, downloading, uploading, deploying for local inference with OpenVINO, configuration management, training job monitoring, media upload, and prediction. The repository also includes tutorial-style Jupyter notebooks demonstrating SDK usage.

Mapperatorinator
Mapperatorinator is a multi-model framework that uses spectrogram inputs to generate fully featured osu! beatmaps for all gamemodes and assist modding beatmaps. The project aims to automatically generate rankable quality osu! beatmaps from any song with a high degree of customizability. The tool is built upon osuT5 and osu-diffusion, utilizing GPU compute and instances on vast.ai for development. Users can responsibly use AI in their beatmaps with this tool, ensuring disclosure of AI usage. Installation instructions include cloning the repository, creating a virtual environment, and installing dependencies. The tool offers a Web GUI for user-friendly experience and a Command-Line Inference option for advanced configurations. Additionally, an Interactive CLI script is available for terminal-based workflow with guided setup. The tool provides generation tips and features MaiMod, an AI-driven modding tool for osu! beatmaps. Mapperatorinator tokenizes beatmaps, utilizes a model architecture based on HF Transformers Whisper model, and offers multitask training format for conditional generation. The tool ensures seamless long generation, refines coordinates with diffusion, and performs post-processing for improved beatmap quality. Super timing generator enhances timing accuracy, and LoRA fine-tuning allows adaptation to specific styles or gamemodes. The project acknowledges credits and related works in the osu! community.
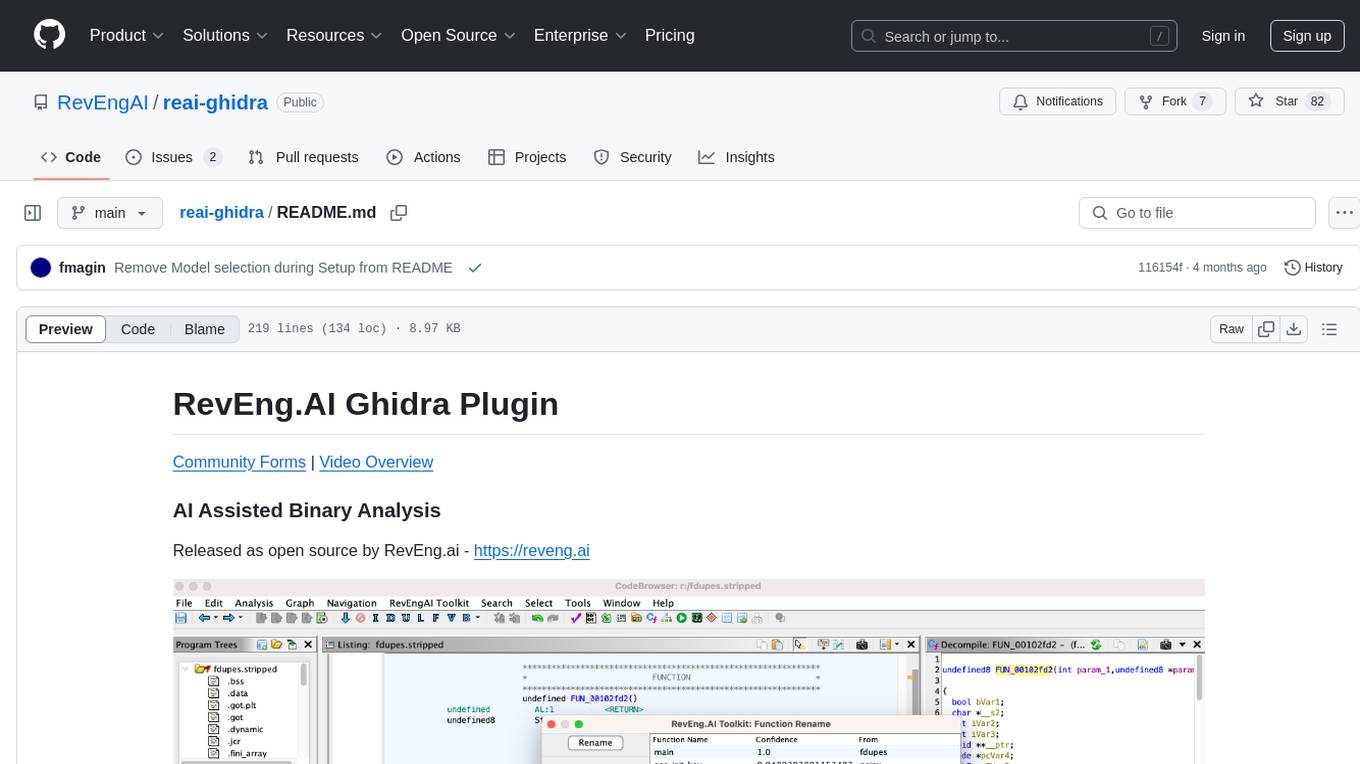
reai-ghidra
The RevEng.AI Ghidra Plugin by RevEng.ai allows users to interact with their API within Ghidra for Binary Code Similarity analysis to aid in Reverse Engineering stripped binaries. Users can upload binaries, rename functions above a confidence threshold, and view similar functions for a selected function.
For similar tasks
0chain
Züs is a high-performance cloud on a fast blockchain offering privacy and configurable uptime. It uses erasure code to distribute data between data and parity servers, allowing flexibility for IT managers to design for security and uptime. Users can easily share encrypted data with business partners through a proxy key sharing protocol. The ecosystem includes apps like Blimp for cloud migration, Vult for personal cloud storage, and Chalk for NFT artists. Other apps include Bolt for secure wallet and staking, Atlus for blockchain explorer, and Chimney for network participation. The QoS protocol challenges providers based on response time, while the privacy protocol enables secure data sharing. Züs supports hybrid and multi-cloud architectures, allowing users to improve regulatory compliance and security requirements.
For similar jobs
ethereum-etl-airflow
This repository contains Airflow DAGs for extracting, transforming, and loading (ETL) data from the Ethereum blockchain into BigQuery. The DAGs use the Google Cloud Platform (GCP) services, including BigQuery, Cloud Storage, and Cloud Composer, to automate the ETL process. The repository also includes scripts for setting up the GCP environment and running the DAGs locally.
airnode
Airnode is a fully-serverless oracle node that is designed specifically for API providers to operate their own oracles.
CHATPGT-MEV-BOT
The 𝓜𝓔𝓥-𝓑𝓞𝓣 is a revolutionary tool that empowers users to maximize their ETH earnings through advanced slippage techniques within the Ethereum ecosystem. Its user-centric design, optimized earning mechanism, and comprehensive security measures make it an indispensable tool for traders seeking to enhance their crypto trading strategies. With its current free access, there's no better time to explore the 𝓜𝓔𝓥-𝓑𝓞𝓣's capabilities and witness the transformative impact it can have on your crypto trading journey.
CortexTheseus
CortexTheseus is a full node implementation of the Cortex blockchain, written in C++. It provides a complete set of features for interacting with the Cortex network, including the ability to create and manage accounts, send and receive transactions, and participate in consensus. CortexTheseus is designed to be scalable, secure, and easy to use, making it an ideal choice for developers building applications on the Cortex blockchain.

CHATPGT-MEV-BOT-ETH
This tool is a bot that monitors the performance of MEV transactions on the Ethereum blockchain. It provides real-time data on MEV profitability, transaction volume, and network congestion. The bot can be used to identify profitable MEV opportunities and to track the performance of MEV strategies.
airdrop-checker
Airdrop-checker is a tool that helps you to check if you are eligible for any airdrops. It supports multiple airdrops, including Altlayer, Rabby points, Zetachain, Frame, Anoma, Dymension, and MEME. To use the tool, you need to install it using npm and then fill the addresses files in the addresses folder with your wallet addresses. Once you have done this, you can run the tool using npm start.
go-cyber
Cyber is a superintelligence protocol that aims to create a decentralized and censorship-resistant internet. It uses a novel consensus mechanism called CometBFT and a knowledge graph to store and process information. Cyber is designed to be scalable, secure, and efficient, and it has the potential to revolutionize the way we interact with the internet.
bittensor
Bittensor is an internet-scale neural network that incentivizes computers to provide access to machine learning models in a decentralized and censorship-resistant manner. It operates through a token-based mechanism where miners host, train, and procure machine learning systems to fulfill verification problems defined by validators. The network rewards miners and validators for their contributions, ensuring continuous improvement in knowledge output. Bittensor allows anyone to participate, extract value, and govern the network without centralized control. It supports tasks such as generating text, audio, images, and extracting numerical representations.