
media-stack
A self-hosted stack for media management and streaming, with AI-powered movie and show recommendations. Includes Sonarr, Radarr, qBitTorrent, Prowlarr, Jellyfin, Jellyseerr, Recommendarr, and VPN support.
Stars: 948
media-stack is a self-hosted media ecosystem that combines media management, streaming, AI-powered recommendations, and VPN. It includes tools like Radarr for movie management, Sonarr for TV show management, Prowlarr for torrent indexing, qBittorrent for downloading media, Jellyseerr for media requests, Jellyfin for media streaming, and Recommendarr for AI-powered recommendations. The stack can be deployed with or without a VPN and offers detailed configuration steps for each tool.
README:

A self-hosted media ecosystem that combines media management, streaming, AI-powered recommendations, and VPN.
This stack includes:
- VPN: For secure and private media downloading
- Radarr: For movie management
- Sonarr: For TV show management
- Prowlarr: A torrent indexer manager for Radarr/Sonarr
- qBittorrent: Torrent client for downloading media
- Jellyseerr: To manage media requests
- Jellyfin: Open-source media streamer
- Recommendarr: For AI-powered movie and show recommendations
- Docker version 28.0.1 or later
- Docker compose version v2.33.1 or later
- Older versions may work, but they have not been tested.
⚠️ Warning for ARMv7 Users:
Jellyseerr v2.0.x introduces breaking changes, dropping support for the ARMv7 container image. However, ARM64 support remains available. You will not be able to run Jellyseerr in ARMv7 CPU.
There are three ways to deploy this stack:
- With a VPN (Recommended)
- Without a VPN
- With Recommendarr (An optional tool for AI-generated movie and show recommendations)
NOTE: If you are installing this stack without a VPN, you must use the
no-vpnprofile.
This requirement prevents accidental or unintentional deployment of media-stack without VPN.Running the
docker composecommand without a profile will not deploy anything.Check the installation steps below.
Before deploying the stack, you must first create a Docker network:
docker network create --subnet 172.20.0.0/16 mynetwork
# Update the CIDR range based on your available IP range
When VPN is enabled, qBittorrent and Prowlarr will run behind the VPN for added privacy.
By default, NordVPN is used in docker-compose.yml, but you can switch to:
- ExpressVPN
- SurfShark
- ProtonVPN
- Custom OpenVPN
- WireGuard VPN
All providers use the OpenVPN protocol.
➡️ Full list of supported VPN providers: VPN Providers
Refer to your VPN provider's documentation to generate an OpenVPN username and password.
For setup instructions, check:
➡️ Gluetun VPN Setup Guide
By default, VPN is disabled in docker-compose.yml. To enable it, simply comment/uncomment the required lines in the file.
The docker-compose.yml file includes clear instructions in the comments to guide you through the process.
Once updated, follow the steps below to deploy the stack with VPN.
VPN_SERVICE_PROVIDER=nordvpn OPENVPN_USER=openvpn-username OPENVPN_PASSWORD=openvpn-password SERVER_COUNTRIES=Switzerland RADARR_STATIC_CONTAINER_IP=radarr-container-static-ip SONARR_STATIC_CONTAINER_IP=sonarr-container-static-ip docker compose --profile vpn up -d

# OPTIONAL: Use Nginx as a reverse proxy
# docker compose -f docker-compose-nginx.yml up -dA static container IP address is needed when Prowlarr is behind a VPN.
Since Prowlarr can only communicate with Radarr and Sonarr using their container IP addresses,
these must be manually assigned to avoid connection issues when containers restart.
Use the following environment variables to set static IPs:
RADARR_STATIC_CONTAINER_IPSONARR_STATIC_CONTAINER_IP
🚨 Warning: Deploying without a VPN is highly discouraged as it may expose your IP address when torrenting media.
To proceed without VPN, run the following command:
docker compose --profile no-vpn up -d

# OPTIONAL: Use Nginx as a reverse proxy
# docker compose -f docker-compose-nginx.yml up -dRecommendarr is a web application that uses AI to generate personalized TV show and movie recommendations based on your:
- Sonarr library
- Radarr library
- Jellyfin watchlist and library
- Trakt watchlist (Optional)
Run the following command based on your setup:
COMPOSE_PROFILES=vpn,recommendarr docker compose up -d  # With VPN

# COMPOSE_PROFILES=no-vpn,recommendarr docker compose up -d # Without VPN- Open qBitTorrent at http://localhost:5080. Default username is
admin. Temporary password can be collected from container logdocker logs qbittorrent - Go to Tools --> Options --> WebUI --> Change password
- Run below commands on the server
docker exec -it qbittorrent bash # Get inside qBittorrent container

# Above command will get you inside qBittorrent interactive terminal, Run below command in qbt terminal
mkdir /downloads/movies /downloads/tvshows
chown 1000:1000 /downloads/movies /downloads/tvshows- Open Radarr at http://localhost:7878
- Settings --> Media Management --> Check mark "Movies deleted from disk are automatically unmonitored in Radarr" under File management section --> Save
- Settings --> Media Management --> Scroll to bottom --> Add Root Folder --> Browse to /downloads/movies --> OK
- Settings --> Download clients --> qBittorrent --> Add Host (qbittorrent) and port (5080) --> Username and password --> Test --> Save Note: If VPN is enabled, then qbittorrent is reachable on vpn's service name. In this case use
vpnin Host field. - Settings --> General --> Enable advance setting --> Select Authentication and add username and password
- Indexer will get automatically added during configuration of Prowlarr. See 'Configure Prowlarr' section.
Sonarr can also be configured in similar way.
Add a movie (After Prowlarr is configured)
- Movies --> Search for a movie --> Add Root folder (/downloads/movies) --> Quality profile --> Add movie
- All queued movies download can be checked here, Activities --> Queue
- Go to qBittorrent (http://localhost:5080) and see if movie is getting downloaded (After movie is queued. This depends on availability of movie in indexers configured in Prowlarr.)
- Open Jellyfin at http://localhost:8096
- When you access the jellyfin for first time using browser, A guided configuration will guide you to configure jellyfin. Just follow the guide.
- Add media library folder and choose /data/movies/
- Open Jellyfin at http://localhost:5055
- When you access the jellyseerr for first time using browser, A guided configuration will guide you to configure jellyseerr. Just follow the guide and provide the required details about sonarr and Radarr.
- Follow the Overseerr document (Jellyseerr is fork of overseerr) for detailed setup - https://docs.overseerr.dev/
- Open Prowlarr at http://localhost:9696
- Settings --> General --> Authentications --> Select Authentication and add username and password
- Add Indexers, Indexers --> Add Indexer --> Search for indexer --> Choose base URL --> Test and Save
- Add application, Settings --> Apps --> Add application --> Choose Radarr --> Prowlarr server (http://prowlarr:9696) --> Radarr server (http://radarr:7878) --> API Key --> Test and Save
- Add application, Settings --> Apps --> Add application --> Choose Sonarr --> Prowlarr server (http://prowlarr:9696) --> Sonarr server (http://sonarr:8989) --> API Key --> Test and Save
- This will add indexers in respective apps automatically.
Note: If VPN is enabled, then Prowlarr will not be able to reach radarr and sonarr with localhost or container service name. In that case use static IP for sonarr and radarr in radarr/sonarr server field (for e.g. http://172.19.0.5:8989). Prowlar will also be not reachable with its container/service name. Use http://vpn:9696 instead in prowlar server field.
Recommendarr is an AI based movies/tvshows recommendation tool. To use this you will need any OpenAI API URL and API key with atleast one LLM model running. You can host your own OpenAI server with AI model using ollama or LM Studio. Or you can check https://openrouter.ai for limited-free LLMs.
- Open Recommendarr at http://localhost:3000
- Login with default username
adminand password1234 - Settings --> Account --> Change Password and change your admin password
- Settings --> AI service --> API URL (Add OpenAI server API URL) --> API Key (Add OpenAPI server API key) --> Fetch available models --> Set Max tokens (best to keep it under 2000) --> Set Temperature (Best to keep at 0.8)
- Settings --> Sonarr --> Sonarr URL (http://sonarr:8989) --> API Keys (Sonarr API Key) --> Test Connection --> Save Sonarr setting
- Settings --> Radarr --> Radarr URL (http://radarr:7878) --> API Keys (Radarr API Key) --> Test Connection --> Save Radarr setting
- Settings --> Jellyfin --> Jellyfin URL (http://jellyfin:8096) --> API Keys (Jellyfin API Key) --> User ID (Add your jellyfin user id) --> Test Connection --> Save Jellyfin settings
- Test recommendarr: Recommendations --> Choose LLM Model from drop down list --> Enable Jellyfin Watch History toggle --> Select language --> Choose genres --> Discover recommendations
- You should be able to see recommendations based on your Jellyfin watch history
- Get inside Nginx container
cd /etc/nginx/conf.d- Add proxies for all tools.
docker cp nginx.conf nginx:/etc/nginx/conf.d/default.conf && docker exec -it nginx nginx -s reload
- Close ports of other tools in firewall/security groups except port 80 and 443.
- Open port 80 and 443.
- Get inside Nginx container and install certbot and certbot-nginx
apk add certbot certbot-nginx - Add URL in server block. e.g.
server_name localhost mediastack.example.com;in /etc/nginx/conf.d/default.conf - Run
certbot --nginxand provide details asked.
- Settings --> General --> URL Base --> Add base (/radarr)
- Add below proxy in nginx configuration
location /radarr {
    proxy_pass http://radarr:7878;
    proxy_set_header Host $host;
    proxy_set_header X-Real-IP $remote_addr;
    proxy_set_header X-Forwarded-For $proxy_add_x_forwarded_for;
    proxy_http_version 1.1;
    proxy_set_header Upgrade $http_upgrade;
    proxy_set_header Connection $http_connection;
  }
- Restart containers.
- Settings --> General --> URL Base --> Add base (/sonarr)
- Add below proxy in nginx configuration
location /sonarr {
    proxy_pass http://sonarr:8989;
    proxy_set_header Host $host;
    proxy_set_header X-Real-IP $remote_addr;
    proxy_set_header X-Forwarded-For $proxy_add_x_forwarded_for;
    proxy_http_version 1.1;
    proxy_set_header Upgrade $http_upgrade;
    proxy_set_header Connection $http_connection;
  }
- Settings --> General --> URL Base --> Add base (/prowlarr)
- Add below proxy in nginx configuration
This may need to change configurations in indexers and base in URL.
location /prowlarr {
    proxy_pass http://prowlarr:9696; # Comment this line if VPN is enabled.
    # proxy_pass http://vpn:9696; # Uncomment this line if VPN is enabled.
    proxy_set_header Host $host;
    proxy_set_header X-Real-IP $remote_addr;
    proxy_set_header X-Forwarded-For $proxy_add_x_forwarded_for;
    proxy_http_version 1.1;
    proxy_set_header Upgrade $http_upgrade;
    proxy_set_header Connection $http_connection;
  }
- Restart containers.
Note: If VPN is enabled, then Prowlarr is reachable on vpn's service name
location /qbt/ {
    proxy_pass         http://qbittorrent:5080/; # Comment this line if VPN is enabled.
    # proxy_pass         http://vpn:5080/; # Uncomment this line if VPN is enabled.
    proxy_http_version 1.1;

    proxy_set_header   Host               http://qbittorrent:5080; # Comment this line if VPN is enabled.
    # proxy_set_header   Host               http://vpn:5080; # Uncomment this line if VPN is enabled.
    proxy_set_header   X-Forwarded-Host   $http_host;
    proxy_set_header   X-Forwarded-For    $remote_addr;
    proxy_cookie_path  /                  "/; Secure";
}
Note: If VPN is enabled, then qbittorrent is reachable on vpn's service name
- Add base URL, Admin Dashboard -> Networking -> Base URL (/jellyfin)
- Add below config in Ngix config
 location /jellyfin {
        return 302 $scheme://$host/jellyfin/;
    }

    location /jellyfin/ {

        proxy_pass http://jellyfin:8096/jellyfin/;

        proxy_pass_request_headers on;

        proxy_set_header Host $host;

        proxy_set_header X-Real-IP $remote_addr;
        proxy_set_header X-Forwarded-For $proxy_add_x_forwarded_for;
        proxy_set_header X-Forwarded-Proto $scheme;
        proxy_set_header X-Forwarded-Host $http_host;

        proxy_set_header Upgrade $http_upgrade;
        proxy_set_header Connection $http_connection;

        # Disable buffering when the nginx proxy gets very resource heavy upon streaming
        proxy_buffering off;
    }
Currently Jellyseerr/Overseerr doesnot officially support the subfolder/path reverse proxy. They have a workaround documented here without an official support. Find it here
location / {
        proxy_pass http://127.0.0.1:5055;

        proxy_set_header Referer $http_referer;
        proxy_set_header Host $host;
        proxy_set_header X-Real-IP $remote_addr;
        proxy_set_header X-Real-Port $remote_port;
        proxy_set_header X-Forwarded-Host $host:$remote_port;
        proxy_set_header X-Forwarded-Server $host;
        proxy_set_header X-Forwarded-Port $remote_port;
        proxy_set_header X-Forwarded-For $proxy_add_x_forwarded_for;
        proxy_set_header X-Forwarded-Proto $scheme;
        proxy_set_header X-Forwarded-Ssl on;
    }
- Restart containers
Neither the author nor the developers of the code in this repository condone or encourage downloading, sharing, seeding, or peering of copyrighted material.
Such activities are illegal under international laws.This project is intended for educational purposes only.
For Tasks:
Click tags to check more tools for each tasksFor Jobs:
Alternative AI tools for media-stack
Similar Open Source Tools
media-stack
media-stack is a self-hosted media ecosystem that combines media management, streaming, AI-powered recommendations, and VPN. It includes tools like Radarr for movie management, Sonarr for TV show management, Prowlarr for torrent indexing, qBittorrent for downloading media, Jellyseerr for media requests, Jellyfin for media streaming, and Recommendarr for AI-powered recommendations. The stack can be deployed with or without a VPN and offers detailed configuration steps for each tool.
AIClient-2-API
AIClient-2-API is a versatile and lightweight API proxy designed for developers, providing ample free API request quotas and comprehensive support for various mainstream large models like Gemini, Qwen Code, Claude, etc. It converts multiple backend APIs into standard OpenAI format interfaces through a Node.js HTTP server. The project adopts a modern modular architecture, supports strategy and adapter patterns, comes with complete test coverage and health check mechanisms, and is ready to use after 'npm install'. By easily switching model service providers in the configuration file, any OpenAI-compatible client or application can seamlessly access different large model capabilities through the same API address, eliminating the hassle of maintaining multiple sets of configurations for different services and dealing with incompatible interfaces.
vibesdk
Cloudflare VibeSDK is an open source full-stack AI webapp generator built on Cloudflare's developer platform. It allows companies to build AI-powered platforms, enables internal development for non-technical teams, and supports SaaS platforms to extend product functionality. The platform features AI code generation, live previews, interactive chat, modern stack generation, one-click deploy, and GitHub integration. It is built on Cloudflare's platform with frontend in React + Vite, backend in Workers with Durable Objects, database in D1 (SQLite) with Drizzle ORM, AI integration via multiple LLM providers, sandboxed app previews and execution in containers, and deployment to Workers for Platforms with dispatch namespaces. The platform also offers an SDK for programmatic access to build apps programmatically using TypeScript SDK.
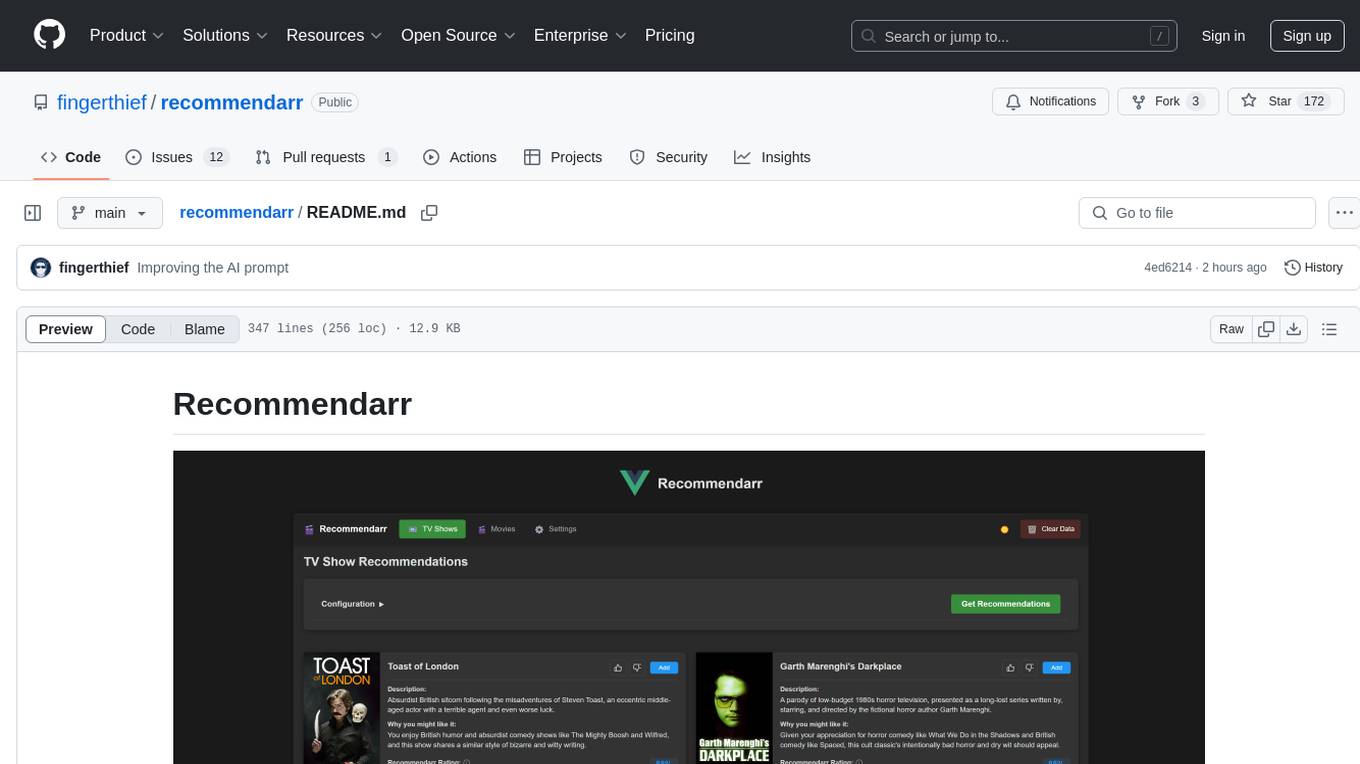
recommendarr
Recommendarr is a tool that generates personalized TV show and movie recommendations based on your Sonarr, Radarr, Plex, and Jellyfin libraries using AI. It offers AI-powered recommendations, media server integration, flexible AI support, watch history analysis, customization options, and dark/light mode toggle. Users can connect their media libraries and watch history services, configure AI service settings, and get personalized recommendations based on genre, language, and mood/vibe preferences. The tool works with any OpenAI-compatible API and offers various recommended models for different cost options and performance levels. It provides personalized suggestions, detailed information, filter options, watch history analysis, and one-click adding of recommended content to Sonarr/Radarr.
Free-GPT4-WEB-API
FreeGPT4-WEB-API is a Python server that allows you to have a self-hosted GPT-4 Unlimited and Free WEB API, via the latest Bing's AI. It uses Flask and GPT4Free libraries. GPT4Free provides an interface to the Bing's GPT-4. The server can be configured by editing the `FreeGPT4_Server.py` file. You can change the server's port, host, and other settings. The only cookie needed for the Bing model is `_U`.
legacy-use
Legacy-use is a tool that transforms legacy applications into modern REST APIs using AI. It allows users to dynamically generate and customize API endpoints for legacy or desktop applications, access systems running legacy software, track and resolve issues with built-in observability tools, ensure secure and compliant automation, choose model providers independently, and deploy with enterprise-grade security and compliance. The tool provides a quick setup process, automatic API key generation, and supports Windows VM automation. It offers a user-friendly interface for adding targets, running jobs, and writing effective prompts. Legacy-use also supports various connectivity technologies like OpenVPN, Tailscale, WireGuard, VNC, RDP, and TeamViewer. Telemetry data is collected anonymously to improve the product, and users can opt-out of tracking. Optional configurations include enabling OpenVPN target creation and displaying backend endpoints documentation. Contributions to the project are welcome.

Zero
Zero is an open-source AI email solution that allows users to self-host their email app while integrating external services like Gmail. It aims to modernize and enhance emails through AI agents, offering features like open-source transparency, AI-driven enhancements, data privacy, self-hosting freedom, unified inbox, customizable UI, and developer-friendly extensibility. Built with modern technologies, Zero provides a reliable tech stack including Next.js, React, TypeScript, TailwindCSS, Node.js, Drizzle ORM, and PostgreSQL. Users can set up Zero using standard setup or Dev Container setup for VS Code users, with detailed environment setup instructions for Better Auth, Google OAuth, and optional GitHub OAuth. Database setup involves starting a local PostgreSQL instance, setting up database connection, and executing database commands for dependencies, tables, migrations, and content viewing.
inference-gateway
The Inference Gateway is an open-source proxy server designed to simplify access to various language model APIs. It allows users to interact with different language models through a unified interface, stream tokens in real-time, process images alongside text, and use Docker or Kubernetes for deployment. The gateway supports Model Context Protocol integration, provides metrics and observability features, and is production-ready with minimal resource consumption. It offers middleware control and bypass mechanisms, enabling users to manage capabilities like MCP and vision support. The CLI tool provides status monitoring, interactive chat, configuration management, project initialization, and tool execution functionalities. The project aims to provide a flexible solution for AI Agents, supporting self-hosted LLMs and avoiding vendor lock-in.
LlamaBarn
LlamaBarn is a macOS menu bar app designed for running local LLMs. It allows users to install models from a built-in catalog, connect various applications such as chat UIs, editors, CLI tools, and scripts, and manage the loading and unloading of models based on usage. The app ensures all processing is done locally on the user's device, with a small app footprint and zero configuration required. It offers a smart model catalog, self-contained storage for models and configurations, and is built on llama.cpp from the GGML org.
kubewall
kubewall is an open-source, single-binary Kubernetes dashboard with multi-cluster management and AI integration. It provides a simple and rich real-time interface to manage and investigate your clusters. With features like multi-cluster management, AI-powered troubleshooting, real-time monitoring, single-binary deployment, in-depth resource views, browser-based access, search and filter capabilities, privacy by default, port forwarding, live refresh, aggregated pod logs, and clean resource management, kubewall offers a comprehensive solution for Kubernetes cluster management.
tingly-box
Tingly Box is a tool that helps in deciding which model to call, compressing context, and routing requests efficiently. It offers secure, reliable, and customizable functional extensions. With features like unified API, smart routing, context compression, auto API translation, blazing fast performance, flexible authentication, visual control panel, and client-side usage stats, Tingly Box provides a comprehensive solution for managing AI models and tokens. It supports integration with various IDEs, CLI tools, SDKs, and AI applications, making it versatile and easy to use. The tool also allows seamless integration with OAuth providers like Claude Code, enabling users to utilize existing quotas in OpenAI-compatible tools. Tingly Box aims to simplify AI model management and usage by providing a single endpoint for multiple providers with minimal configuration, promoting seamless integration with SDKs and CLI tools.
pgedge-postgres-mcp
The pgedge-postgres-mcp repository contains a set of tools and scripts for managing and monitoring PostgreSQL databases in an edge computing environment. It provides functionalities for automating database tasks, monitoring database performance, and ensuring data integrity in edge computing scenarios. The tools are designed to be lightweight and efficient, making them suitable for resource-constrained edge devices. With pgedge-postgres-mcp, users can easily deploy and manage PostgreSQL databases in edge computing environments with minimal overhead.
opencode-manager
OpenCode Manager is a mobile-first web interface for managing and coding with OpenCode AI agents. It allows users to control and code from any device, including phones, tablets, and desktops. The tool provides features for repository and Git management, file management, chat and sessions, AI configuration, as well as mobile and PWA support. Users can clone and manage multiple git repos, work on multiple branches simultaneously, view changes, commits, and branches in a unified interface, create pull requests, navigate files with tree view and search, preview code with syntax highlighting, and perform various file operations. Additionally, the tool supports real-time streaming, slash commands, file mentions, plan/build modes, Mermaid diagrams, text-to-speech, speech-to-text, model selection, provider management, OAuth support, custom agents creation, and more. It is optimized for mobile devices, installable as a PWA, and offers push notifications for agent events.
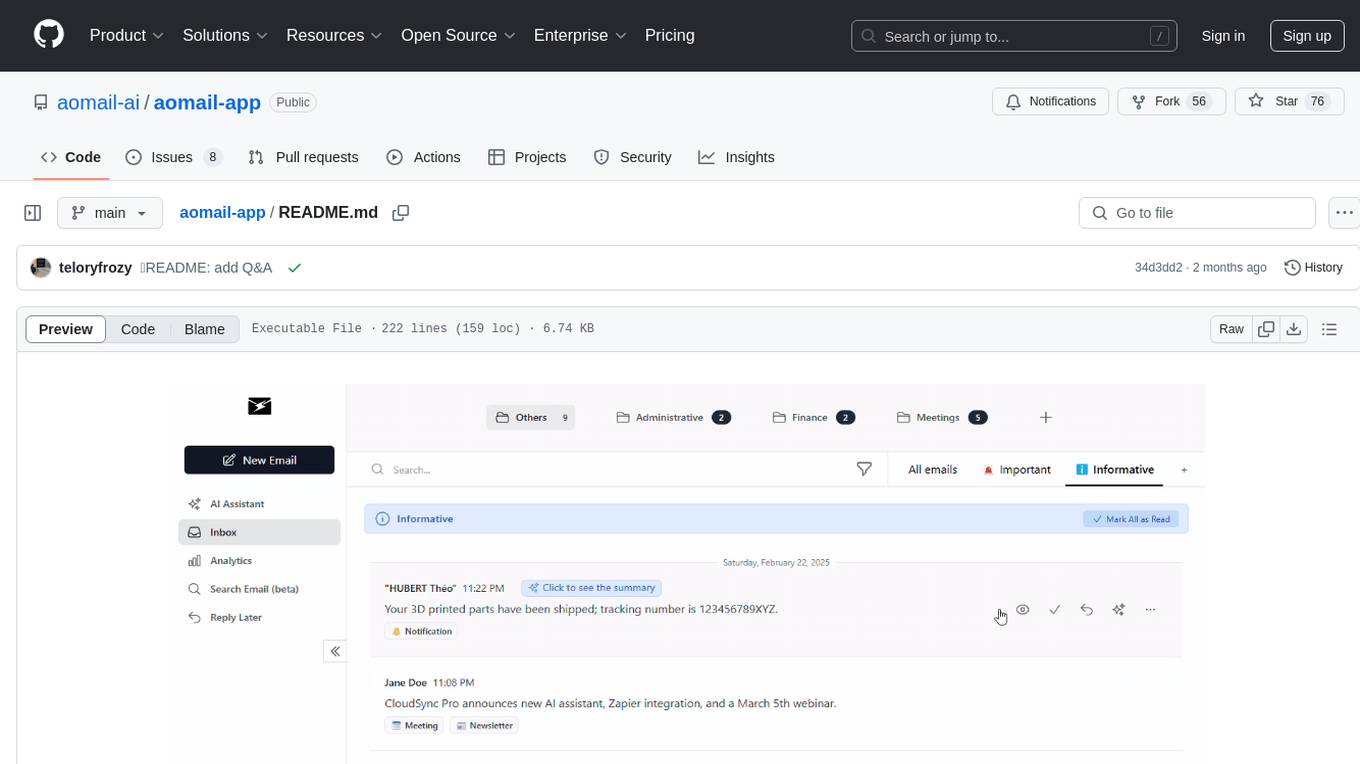
aomail-app
Aomail is an intelligent, open-source email management platform with AI capabilities. It offers email provider integration, AI-powered tools for smart categorization and assistance, analytics and management features. Users can self-host for complete control. Coming soon features include AI custom rules, platform integration with Discord & Slack, and support for various AI providers. The tool is designed to revolutionize email management by providing advanced AI features and analytics.
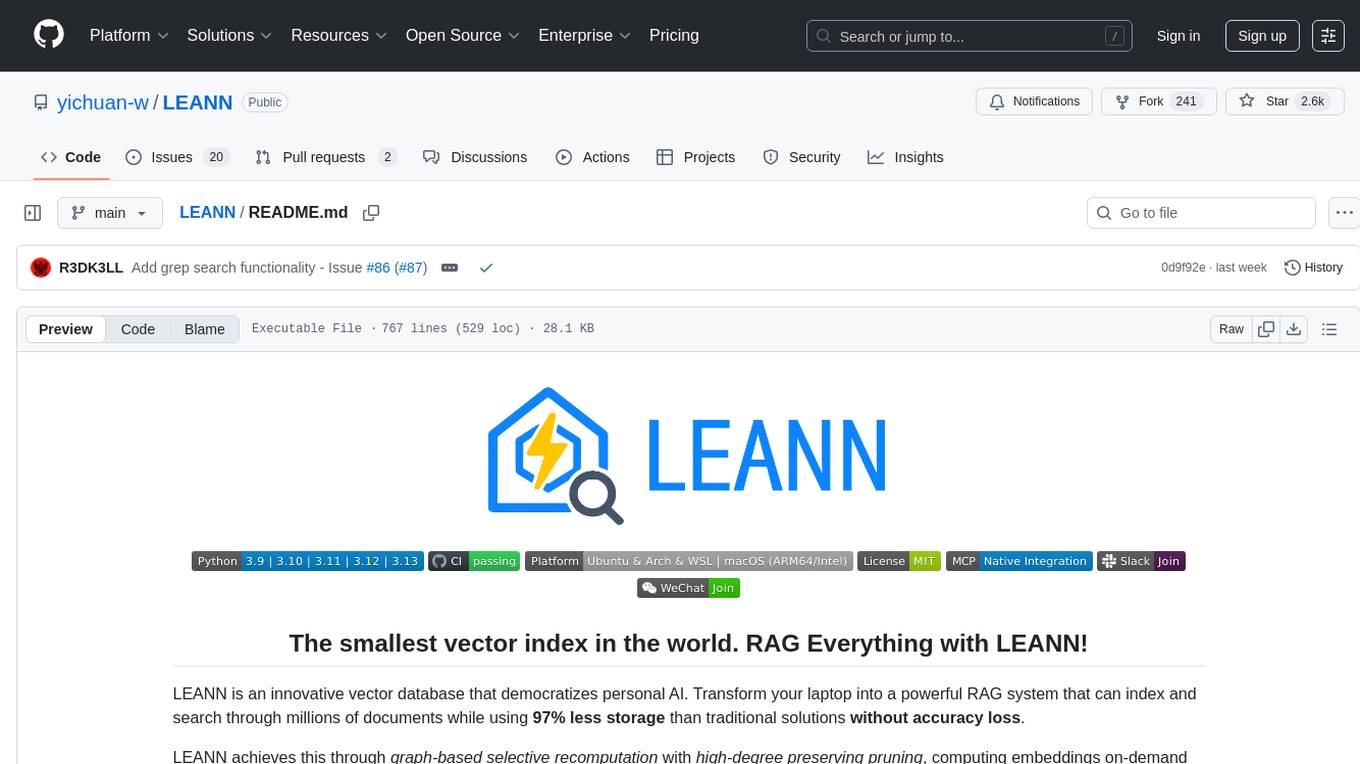
LEANN
LEANN is an innovative vector database that democratizes personal AI, transforming your laptop into a powerful RAG system that can index and search through millions of documents using 97% less storage than traditional solutions without accuracy loss. It achieves this through graph-based selective recomputation and high-degree preserving pruning, computing embeddings on-demand instead of storing them all. LEANN allows semantic search of file system, emails, browser history, chat history, codebase, or external knowledge bases on your laptop with zero cloud costs and complete privacy. It is a drop-in semantic search MCP service fully compatible with Claude Code, enabling intelligent retrieval without changing your workflow.
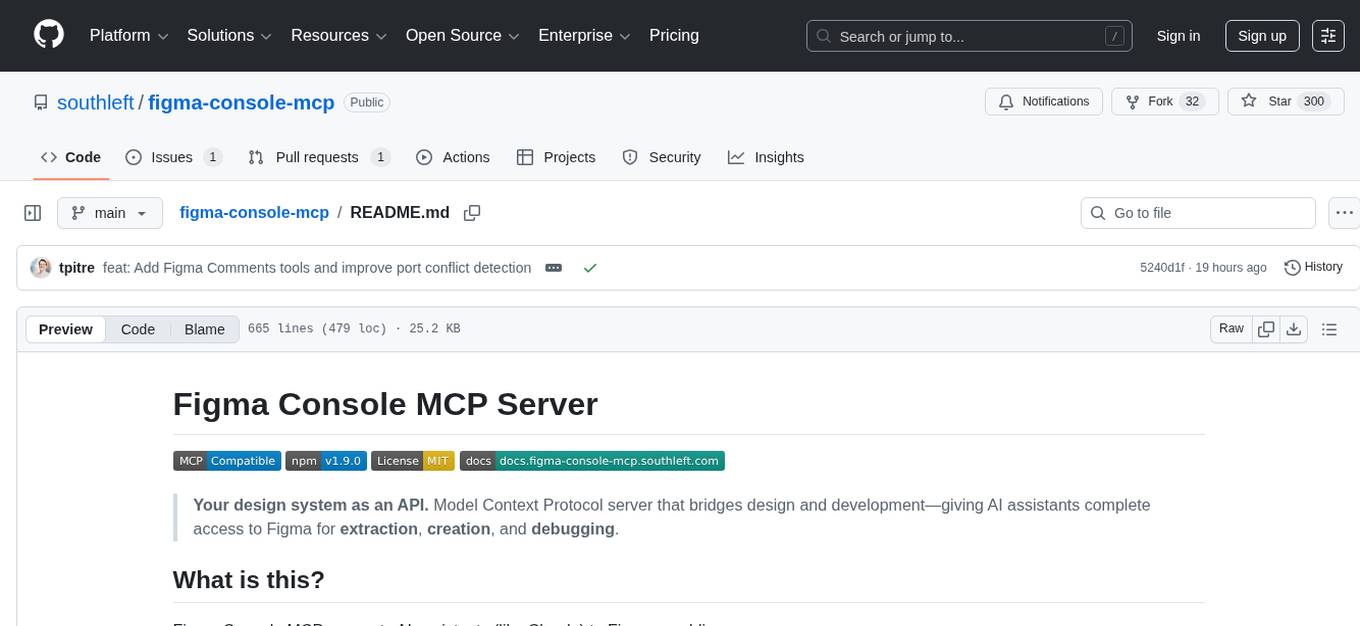
figma-console-mcp
Figma Console MCP is a Model Context Protocol server that bridges design and development, giving AI assistants complete access to Figma for extraction, creation, and debugging. It connects AI assistants like Claude to Figma, enabling plugin debugging, visual debugging, design system extraction, design creation, variable management, real-time monitoring, and three installation methods. The server offers 53+ tools for NPX and Local Git setups, while Remote SSE provides read-only access with 16 tools. Users can create and modify designs with AI, contribute to projects, or explore design data. The server supports authentication via personal access tokens and OAuth, and offers tools for navigation, console debugging, visual debugging, design system extraction, design creation, design-code parity, variable management, and AI-assisted design creation.
For similar tasks

trieve
Trieve is an advanced relevance API for hybrid search, recommendations, and RAG. It offers a range of features including self-hosting, semantic dense vector search, typo tolerant full-text/neural search, sub-sentence highlighting, recommendations, convenient RAG API routes, the ability to bring your own models, hybrid search with cross-encoder re-ranking, recency biasing, tunable popularity-based ranking, filtering, duplicate detection, and grouping. Trieve is designed to be flexible and customizable, allowing users to tailor it to their specific needs. It is also easy to use, with a simple API and well-documented features.
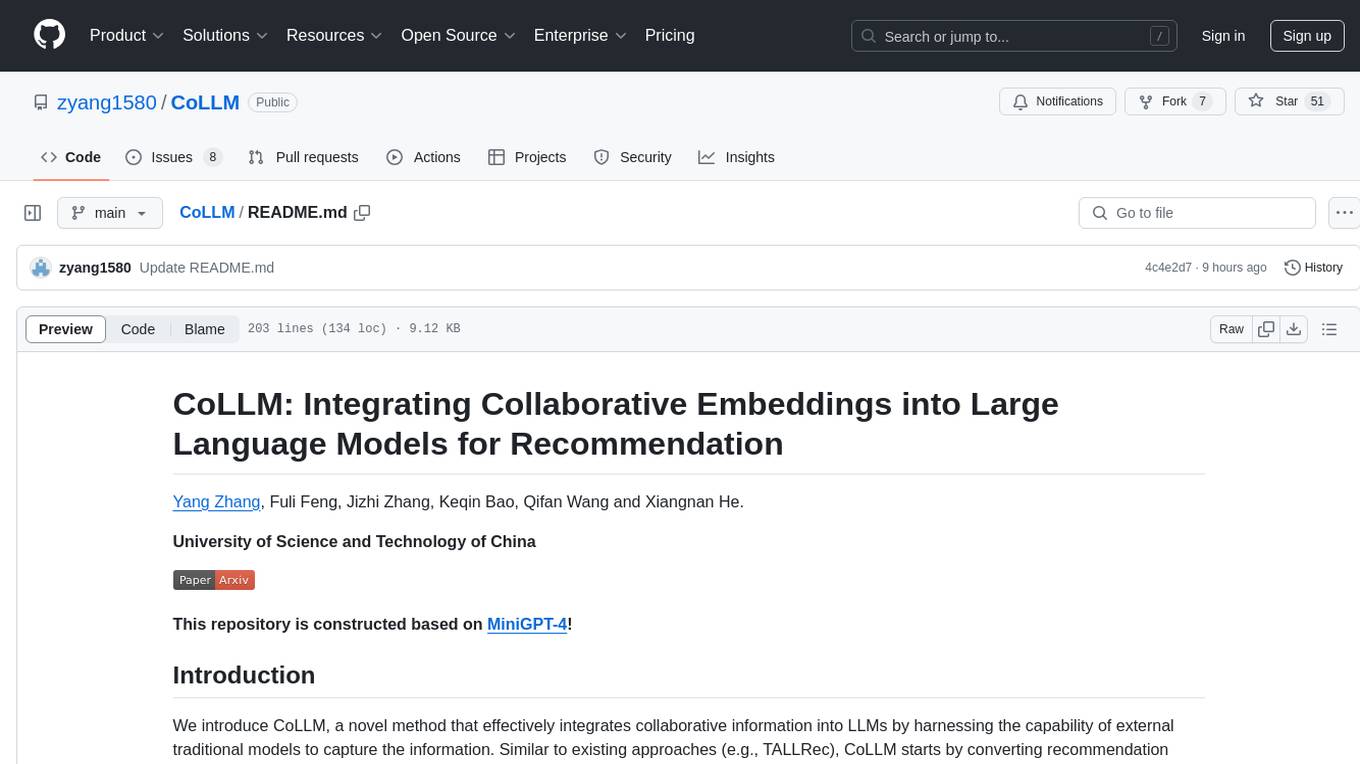
CoLLM
CoLLM is a novel method that integrates collaborative information into Large Language Models (LLMs) for recommendation. It converts recommendation data into language prompts, encodes them with both textual and collaborative information, and uses a two-step tuning method to train the model. The method incorporates user/item ID fields in prompts and employs a conventional collaborative model to generate user/item representations. CoLLM is built upon MiniGPT-4 and utilizes pretrained Vicuna weights for training.
media-stack
media-stack is a self-hosted media ecosystem that combines media management, streaming, AI-powered recommendations, and VPN. It includes tools like Radarr for movie management, Sonarr for TV show management, Prowlarr for torrent indexing, qBittorrent for downloading media, Jellyseerr for media requests, Jellyfin for media streaming, and Recommendarr for AI-powered recommendations. The stack can be deployed with or without a VPN and offers detailed configuration steps for each tool.
Genkit
Genkit is an open-source framework for building full-stack AI-powered applications, used in production by Google's Firebase. It provides SDKs for JavaScript/TypeScript (Stable), Go (Beta), and Python (Alpha) with unified interface for integrating AI models from providers like Google, OpenAI, Anthropic, Ollama. Rapidly build chatbots, automations, and recommendation systems using streamlined APIs for multimodal content, structured outputs, tool calling, and agentic workflows. Genkit simplifies AI integration with open-source SDK, unified APIs, and offers text and image generation, structured data generation, tool calling, prompt templating, persisted chat interfaces, AI workflows, and AI-powered data retrieval (RAG).
gorse
Gorse is an AI-powered open-source recommender system engine written in Go. It aims to be a universal recommender system that can be integrated into various online services quickly. Gorse supports multi-source recommendations, multimodal content, classical and LLM-based recommenders, GUI dashboard, and RESTful APIs. It provides a playground mode for beginners to set up a recommender system for GitHub repositories easily. The system architecture includes a master node, worker nodes, and server nodes for training, recommendation, and API exposure. Gorse is suitable for developers looking to implement personalized recommendation systems efficiently.
Olares
Olares is an open-source sovereign cloud OS designed for local AI, enabling users to build their own AI assistants, sync data across devices, self-host their workspace, stream media, and more within a sovereign cloud environment. Users can effortlessly run leading AI models, deploy open-source AI apps, access AI apps and models anywhere, and benefit from integrated AI for personalized interactions. Olares offers features like edge AI, personal data repository, self-hosted workspace, private media server, smart home hub, and user-owned decentralized social media. The platform provides enterprise-grade security, secure application ecosystem, unified file system and database, single sign-on, AI capabilities, built-in applications, seamless access, and development tools. Olares is compatible with Linux, Raspberry Pi, Mac, and Windows, and offers a wide range of system-level applications, third-party components and services, and additional libraries and components.
For similar jobs
media-stack
media-stack is a self-hosted media ecosystem that combines media management, streaming, AI-powered recommendations, and VPN. It includes tools like Radarr for movie management, Sonarr for TV show management, Prowlarr for torrent indexing, qBittorrent for downloading media, Jellyseerr for media requests, Jellyfin for media streaming, and Recommendarr for AI-powered recommendations. The stack can be deployed with or without a VPN and offers detailed configuration steps for each tool.
AIOLists
AIOLists is a stateless open source list management addon for Stremio that allows users to import and manage lists from various sources in one place. It offers unified search, metadata customization, Trakt integration, MDBList integration, external lists import, list sorting, customization options, watchlist updates, RPDB support, genre filtering, discovery lists, and shareable configurations. The addon aims to enhance the list management experience for Stremio users by providing a comprehensive set of features and functionalities.