
ai-telephony-demo
Build an AI Telephony Agent for Inbound and Outbound Calls
Stars: 218
Build a fully functional AI telephony agent using VideoSDK Agent. The project covers setting up the agent locally, configuring SIP trunks for inbound and outbound calls, and connecting the agent to the phone network. It provides step-by-step instructions, including creating environment variables, installing dependencies, and running the Python script. The agent can handle incoming calls, greet users, engage in conversations using natural speech, and respond using the Gemini Live model with voice synthesis. Additionally, it explains how to make outbound calls through API requests to the VideoSDK SIP endpoint. The project aims to help users create and deploy an AI agent for telephony tasks.
README:
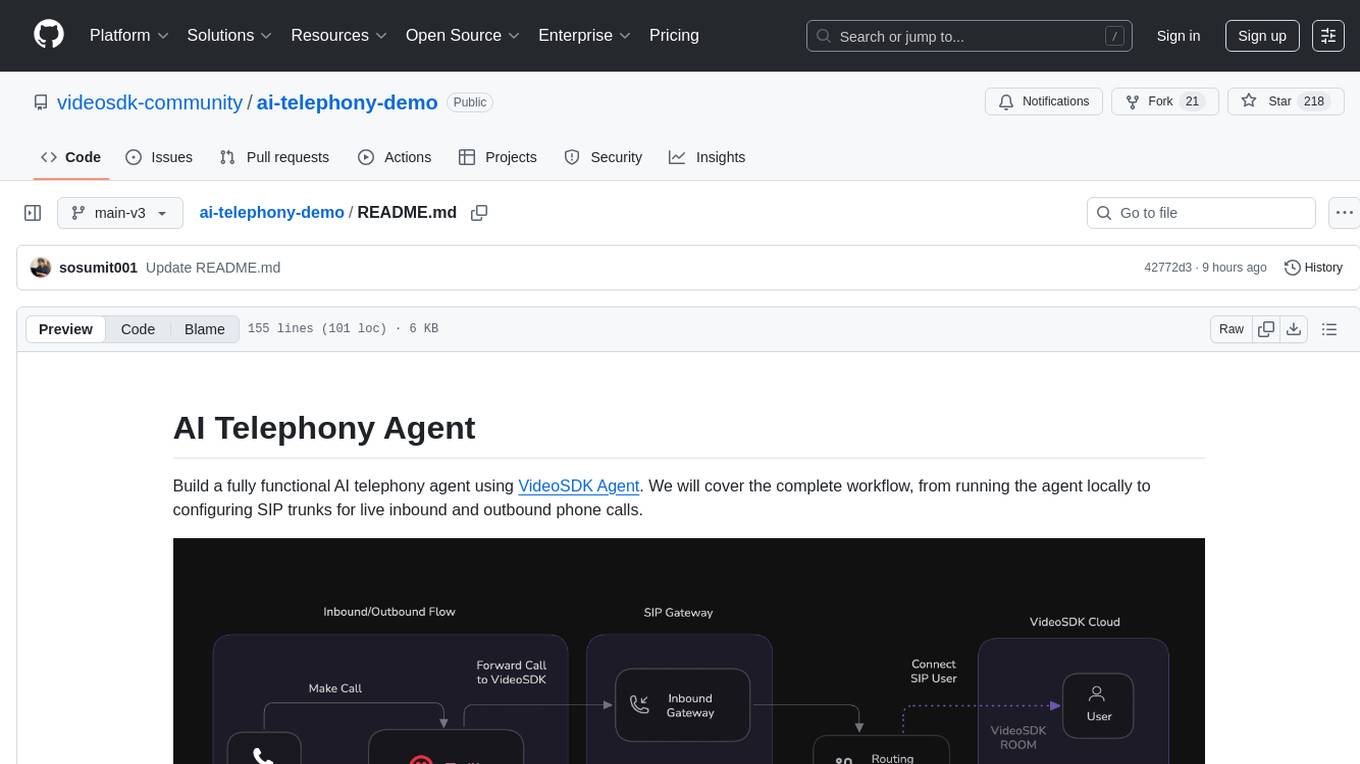
Build a fully functional AI telephony agent using VideoSDK Agent. We will cover the complete workflow, from running the agent locally to configuring SIP trunks for live inbound and outbound phone calls.
This simple structure is our final goal for the worker. By following along, you'll create this complete project from scratch.
worker/
├── main.py                 # The core logic for your AI voice agent
├── requirements.txt        # Python package dependencies
└── .env.example            # Environment variables
- Python 3.12 or newer
- VideoSDK Account and generate videosdk token
- Google API key (for Gemini model)
Create a .env file with your credentials from template .env.example:
VIDEOSDK_TOKEN=your_videosdk_token_here
GOOGLE_API_KEY=your_google_api_key_here
API Keys - Get GOOGLE API KEY ↗, and sign up to VideoSDK Dashboard ↗ to generate videosdk token
- On MacOS/Linux
python3 -m venv .venv- On Windows
Next, Activate it! Command differ based on your environment
source .venv/bin/activateYou'll know the environment is active when you see (.venv) at the beginning of your terminal prompt.
With the virtual environment active, install the necessary Python packages listed in your requirements.txt file:
pip install -r requirements.txtFinally, run the agent:
python main.pyThis will start your agent locally and register it with VideoSDK. You should see output confirming that your agent is running and registered with the agent_id "agent1".
Important: Keep this terminal running! Your agent needs to stay active to handle incoming calls.
- In the VideoSDK Dashboard ↗, go to
Telephony>Inbound Gatewaysand click Add. - Name the gateway, add your phone number, and copy the generated Inbound Gateway URL.
- In your SIP provider's dashboard (e.g., Twilio ↗), paste this URL into the Origination SIP URI field.

- In VideoSDK, go to
Telephony>Outbound Gatewaysand click Add. - Name the gateway and paste the Termination SIP URI from your SIP provider into the Address field.

- Go to
Telephony>Routing Rulesand click Add. - Configure the rule:
- Gateway: Choose the gateway you just created.
-
Agent Type: Set to
Self Hosted. -
Agent ID: Enter
agent1(this matches the agent_id in your main.py file). - Click Create to link the gateway to your agent.

Once your routing rule is configured, you can test your AI agent by making an inbound call:
- Call your SIP provider number (the number you configured in your Inbound Gateway)
- Your AI agent will automatically answer and start the conversation
- The agent will greet you with: "Hello! I'm your real-time AI avatar assistant. How can I help you today?"
- You can have a conversation with the AI agent using natural speech
- The agent will respond using the Gemini Live model with voice synthesis
To trigger an outbound call from your agent, you can make a simple API request to the VideoSDK SIP endpoint.
Use a POST request with your VIDEOSDK_TOKEN for authorization. In the body, specify the gatewayId (from your Outbound Gateway) and the phone number to call in sipCallTo.
curl --request POST \
  --url <https://api.videosdk.live/v2/sip/call> \
  --header 'Authorization: YOUR_VIDEOSDK_TOKEN' \
  --header 'Content-Type: application/json' \
  --data '{
    "gatewayId": "gw_123456789",
    "sipCallTo": "+14155550123"
}'That's it! You've successfully built a Python AI agent, run it locally, and connected it to the global telephone network for both inbound and outbound calls. Simply make a call to your SIP provider number and your AI agent will handle the conversation!
For Tasks:
Click tags to check more tools for each tasksFor Jobs:
Alternative AI tools for ai-telephony-demo
Similar Open Source Tools
ai-telephony-demo
Build a fully functional AI telephony agent using VideoSDK Agent. The project covers setting up the agent locally, configuring SIP trunks for inbound and outbound calls, and connecting the agent to the phone network. It provides step-by-step instructions, including creating environment variables, installing dependencies, and running the Python script. The agent can handle incoming calls, greet users, engage in conversations using natural speech, and respond using the Gemini Live model with voice synthesis. Additionally, it explains how to make outbound calls through API requests to the VideoSDK SIP endpoint. The project aims to help users create and deploy an AI agent for telephony tasks.
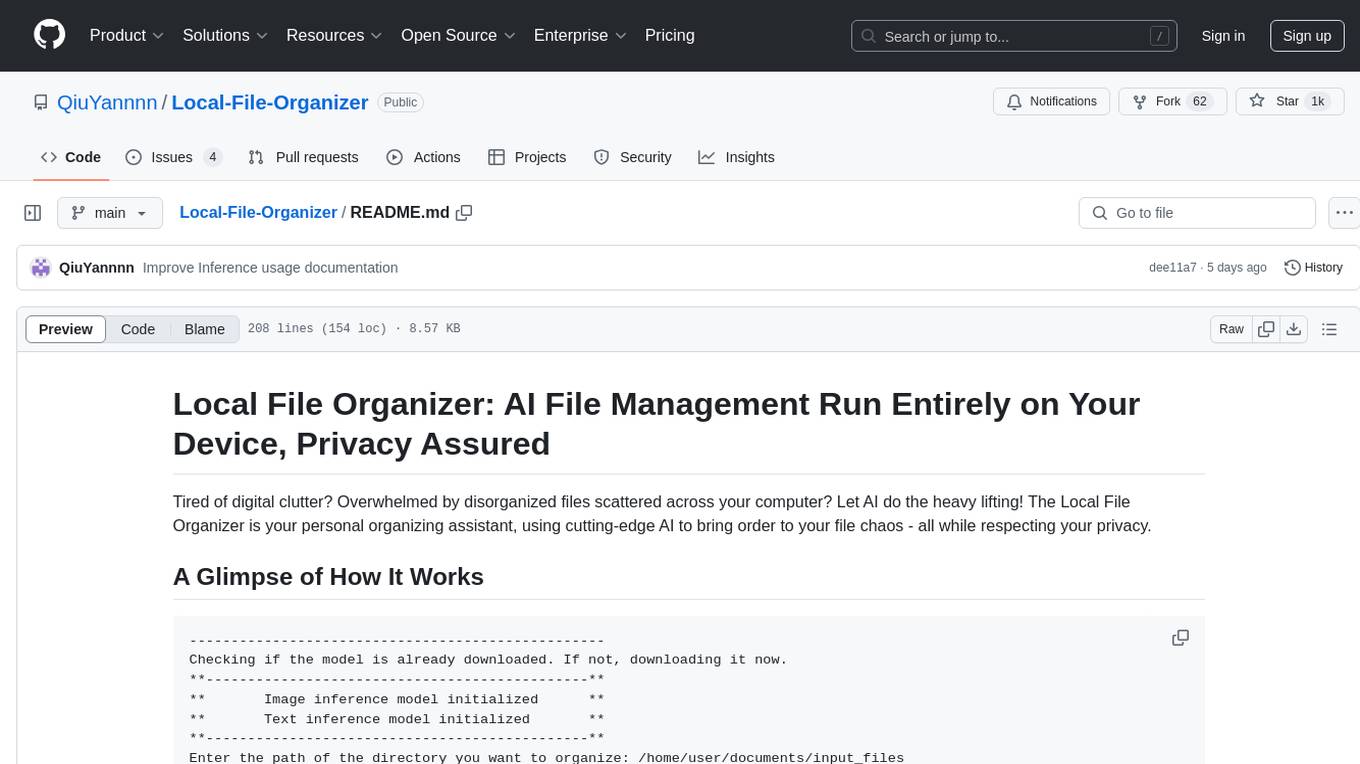
Local-File-Organizer
The Local File Organizer is an AI-powered tool designed to help users organize their digital files efficiently and securely on their local device. By leveraging advanced AI models for text and visual content analysis, the tool automatically scans and categorizes files, generates relevant descriptions and filenames, and organizes them into a new directory structure. All AI processing occurs locally using the Nexa SDK, ensuring privacy and security. With support for multiple file types and customizable prompts, this tool aims to simplify file management and bring order to users' digital lives.
mobile-use
Mobile-use is an open-source AI agent that controls Android or IOS devices using natural language. It understands commands to perform tasks like sending messages and navigating apps. Features include natural language control, UI-aware automation, data scraping, and extensibility. Users can automate their mobile experience by setting up environment variables, customizing LLM configurations, and launching the tool via Docker or manually for development. The tool supports physical Android phones, Android simulators, and iOS simulators. Contributions are welcome, and the project is licensed under MIT.

t3rn-airdrop-bot
A bot designed to automate transactions and bridge assets on the t3rn network, making the process seamless and efficient. It supports multiple wallets through a JSON file containing private keys, with robust error handling and retry mechanisms. The tool is user-friendly, easy to set up, and supports bridging from Optimism Sepolia and Arbitrum Sepolia.
langmanus
LangManus is a community-driven AI automation framework that combines language models with specialized tools for tasks like web search, crawling, and Python code execution. It implements a hierarchical multi-agent system with agents like Coordinator, Planner, Supervisor, Researcher, Coder, Browser, and Reporter. The framework supports LLM integration, search and retrieval tools, Python integration, workflow management, and visualization. LangManus aims to give back to the open-source community and welcomes contributions in various forms.
preswald
Preswald is a full-stack platform for building, deploying, and managing interactive data applications in Python. It simplifies the process by combining ingestion, storage, transformation, and visualization into one lightweight SDK. With Preswald, users can connect to various data sources, customize app themes, and easily deploy apps locally. The platform focuses on code-first simplicity, end-to-end coverage, and efficiency by design, making it suitable for prototyping internal tools or deploying production-grade apps with reduced complexity and cost.
open-webui
Open WebUI is an extensible, feature-rich, and user-friendly self-hosted WebUI designed to operate entirely offline. It supports various LLM runners, including Ollama and OpenAI-compatible APIs. For more information, be sure to check out our Open WebUI Documentation.
Toolify
Toolify is a middleware proxy that empowers Large Language Models (LLMs) and OpenAI API interfaces by enabling function calling capabilities. It acts as an intermediary between applications and LLM APIs, injecting prompts and parsing tool calls from the model's response. Key features include universal function calling, multiple function calls support, flexible initiation, compatibility with
ai_automation_suggester
An integration for Home Assistant that leverages AI models to understand your unique home environment and propose intelligent automations. By analyzing your entities, devices, areas, and existing automations, the AI Automation Suggester helps you discover new, context-aware use cases you might not have considered, ultimately streamlining your home management and improving efficiency, comfort, and convenience. The tool acts as a personal automation consultant, providing actionable YAML-based automations that can save energy, improve security, enhance comfort, and reduce manual intervention. It turns the complexity of a large Home Assistant environment into actionable insights and tangible benefits.
trip_planner_agent
VacAIgent is an AI tool that automates and enhances trip planning by leveraging the CrewAI framework. It integrates a user-friendly Streamlit interface for interactive travel planning. Users can input preferences and receive tailored travel plans with the help of autonomous AI agents. The tool allows for collaborative decision-making on cities and crafting complete itineraries based on specified preferences, all accessible via a streamlined Streamlit user interface. VacAIgent can be customized to use different AI models like GPT-3.5 or local models like Ollama for enhanced privacy and customization.
aisdk-prompt-optimizer
AISDK Prompt Optimizer is an open-source tool designed to transform AI interactions by optimizing prompts. It utilizes the GEPA reflective optimizer to evolve textual components of AI systems, providing features such as reflective prompt mutation, rich textual feedback, and Pareto-based selection. Users can teach their AI desired behaviors, collect ideal samples, run optimization to generate optimized prompts, and deploy the results in their applications. The tool leverages advanced optimization algorithms to guide AI through interactive conversations and refine prompt candidates for improved performance.
rag-gpt
RAG-GPT is a tool that allows users to quickly launch an intelligent customer service system with Flask, LLM, and RAG. It includes frontend, backend, and admin console components. The tool supports cloud-based and local LLMs, enables deployment of conversational service robots in minutes, integrates diverse knowledge bases, offers flexible configuration options, and features an attractive user interface.
Director
Director is a framework to build video agents that can reason through complex video tasks like search, editing, compilation, generation, etc. It enables users to summarize videos, search for specific moments, create clips instantly, integrate GenAI projects and APIs, add overlays, generate thumbnails, and more. Built on VideoDB's 'video-as-data' infrastructure, Director is perfect for developers, creators, and teams looking to simplify media workflows and unlock new possibilities.
LLMstudio
LLMstudio by TensorOps is a platform that offers prompt engineering tools for accessing models from providers like OpenAI, VertexAI, and Bedrock. It provides features such as Python Client Gateway, Prompt Editing UI, History Management, and Context Limit Adaptability. Users can track past runs, log costs and latency, and export history to CSV. The tool also supports automatic switching to larger-context models when needed. Coming soon features include side-by-side comparison of LLMs, automated testing, API key administration, project organization, and resilience against rate limits. LLMstudio aims to streamline prompt engineering, provide execution history tracking, and enable effortless data export, offering an evolving environment for teams to experiment with advanced language models.
gitdiagram
GitDiagram is a tool that turns any GitHub repository into an interactive diagram for visualization in seconds. It offers instant visualization, interactivity, fast generation, customization, and API access. The tool utilizes a tech stack including Next.js, FastAPI, PostgreSQL, Claude 3.5 Sonnet, Vercel, EC2, GitHub Actions, PostHog, and Api-Analytics. Users can self-host the tool for local development and contribute to its development. GitDiagram is inspired by Gitingest and has future plans to use larger context models, allow user API key input, implement RAG with Mermaid.js docs, and include font-awesome icons in diagrams.

mattermost-plugin-agents
The Mattermost Agents Plugin integrates AI capabilities directly into your Mattermost workspace, allowing users to run local LLMs on their infrastructure or connect to cloud providers. It offers multiple AI assistants with specialized personalities, thread and channel summarization, action item extraction, meeting transcription, semantic search, smart reactions, direct conversations with AI assistants, and flexible LLM support. The plugin comes with comprehensive documentation, installation instructions, system requirements, and development guidelines for users to interact with AI features and configure LLM providers.
For similar tasks
ai-telephony-demo
Build a fully functional AI telephony agent using VideoSDK Agent. The project covers setting up the agent locally, configuring SIP trunks for inbound and outbound calls, and connecting the agent to the phone network. It provides step-by-step instructions, including creating environment variables, installing dependencies, and running the Python script. The agent can handle incoming calls, greet users, engage in conversations using natural speech, and respond using the Gemini Live model with voice synthesis. Additionally, it explains how to make outbound calls through API requests to the VideoSDK SIP endpoint. The project aims to help users create and deploy an AI agent for telephony tasks.
claude-api
claude-api is a web conversation library for ClaudeAI implemented in GoLang. It provides functionalities to interact with ClaudeAI for web-based conversations. Users can easily integrate this library into their Go projects to enable chatbot capabilities and handle conversations with ClaudeAI. The library includes features for sending messages, receiving responses, and managing chat sessions, making it a valuable tool for developers looking to incorporate AI-powered chatbots into their applications.
llm
The 'llm' package for Emacs provides an interface for interacting with Large Language Models (LLMs). It abstracts functionality to a higher level, concealing API variations and ensuring compatibility with various LLMs. Users can set up providers like OpenAI, Gemini, Vertex, Claude, Ollama, GPT4All, and a fake client for testing. The package allows for chat interactions, embeddings, token counting, and function calling. It also offers advanced prompt creation and logging capabilities. Users can handle conversations, create prompts with placeholders, and contribute by creating providers.
prism
Prism is a Laravel package for integrating Large Language Models (LLMs) into applications. It simplifies text generation, multi-step conversations, and AI tools integration. Focus on developing exceptional AI applications without technical complexities.
ai
Jetify's AI SDK for Go is a unified interface for interacting with multiple AI providers including OpenAI, Anthropic, and more. It addresses the challenges of fragmented ecosystems, vendor lock-in, poor Go developer experience, and complex multi-modal handling by providing a unified interface, Go-first design, production-ready features, multi-modal support, and extensible architecture. The SDK supports language models, embeddings, image generation, multi-provider support, multi-modal inputs, tool calling, and structured outputs.
ASTRA.ai
ASTRA is an open-source platform designed for developing applications utilizing large language models. It merges the ideas of Backend-as-a-Service and LLM operations, allowing developers to swiftly create production-ready generative AI applications. Additionally, it empowers non-technical users to engage in defining and managing data operations for AI applications. With ASTRA, you can easily create real-time, multi-modal AI applications with low latency, even without any coding knowledge.
For similar jobs
sweep
Sweep is an AI junior developer that turns bugs and feature requests into code changes. It automatically handles developer experience improvements like adding type hints and improving test coverage.
teams-ai
The Teams AI Library is a software development kit (SDK) that helps developers create bots that can interact with Teams and Microsoft 365 applications. It is built on top of the Bot Framework SDK and simplifies the process of developing bots that interact with Teams' artificial intelligence capabilities. The SDK is available for JavaScript/TypeScript, .NET, and Python.
ai-guide
This guide is dedicated to Large Language Models (LLMs) that you can run on your home computer. It assumes your PC is a lower-end, non-gaming setup.

classifai
Supercharge WordPress Content Workflows and Engagement with Artificial Intelligence. Tap into leading cloud-based services like OpenAI, Microsoft Azure AI, Google Gemini and IBM Watson to augment your WordPress-powered websites. Publish content faster while improving SEO performance and increasing audience engagement. ClassifAI integrates Artificial Intelligence and Machine Learning technologies to lighten your workload and eliminate tedious tasks, giving you more time to create original content that matters.
chatbot-ui
Chatbot UI is an open-source AI chat app that allows users to create and deploy their own AI chatbots. It is easy to use and can be customized to fit any need. Chatbot UI is perfect for businesses, developers, and anyone who wants to create a chatbot.
BricksLLM
BricksLLM is a cloud native AI gateway written in Go. Currently, it provides native support for OpenAI, Anthropic, Azure OpenAI and vLLM. BricksLLM aims to provide enterprise level infrastructure that can power any LLM production use cases. Here are some use cases for BricksLLM: * Set LLM usage limits for users on different pricing tiers * Track LLM usage on a per user and per organization basis * Block or redact requests containing PIIs * Improve LLM reliability with failovers, retries and caching * Distribute API keys with rate limits and cost limits for internal development/production use cases * Distribute API keys with rate limits and cost limits for students
uAgents
uAgents is a Python library developed by Fetch.ai that allows for the creation of autonomous AI agents. These agents can perform various tasks on a schedule or take action on various events. uAgents are easy to create and manage, and they are connected to a fast-growing network of other uAgents. They are also secure, with cryptographically secured messages and wallets.
griptape
Griptape is a modular Python framework for building AI-powered applications that securely connect to your enterprise data and APIs. It offers developers the ability to maintain control and flexibility at every step. Griptape's core components include Structures (Agents, Pipelines, and Workflows), Tasks, Tools, Memory (Conversation Memory, Task Memory, and Meta Memory), Drivers (Prompt and Embedding Drivers, Vector Store Drivers, Image Generation Drivers, Image Query Drivers, SQL Drivers, Web Scraper Drivers, and Conversation Memory Drivers), Engines (Query Engines, Extraction Engines, Summary Engines, Image Generation Engines, and Image Query Engines), and additional components (Rulesets, Loaders, Artifacts, Chunkers, and Tokenizers). Griptape enables developers to create AI-powered applications with ease and efficiency.