
mcphub.nvim
A powerful Neovim plugin for managing MCP (Model Context Protocol) servers
Stars: 448
MCPHub.nvim is a powerful Neovim plugin that integrates MCP (Model Context Protocol) servers into your workflow. It offers a centralized config file for managing servers and tools, with an intuitive UI for testing resources. Ideal for LLM integration, it provides programmatic API access and interactive testing through the `:MCPHub` command.
README:
A powerful Neovim plugin that integrates MCP (Model Context Protocol) servers into your workflow. Configure and manage MCP servers through a centralized config file while providing an intuitive UI for browsing, installing and testing tools and resources. Perfect for LLM integration, offering both programmatic API access and interactive testing capabilities through the :MCPHub command.
Discord: Join our Discord server for discussions, help, and updates
graph TD
subgraph "MCP Servers"
subgraph "Native MCP Servers"
N1["Buffer (Tools)"]
N2["LSP (Resources)"]
end
subgraph "Community"
C1["GitHub (Tools )"]
C2["Figma (Tools)"]
end
end

H[MCPHub]
M["@mcp tool + MCP Servers in text representation"]

subgraph "Chat Plugins"
A["Avante + @mcp tool"]
CC["CodeCompanion + @mcp tool"]
O[Others + @mcp tool]
end

subgraph "LLM Providers"
OAI[OpenAI]
AC[Claude]
M1[Mistral]
G[Grok]
D[DeepSeek]
end

%% MCP Servers provide capabilities
N1 & N2 --> H
C1 & C2 --> H

%% MCPHub transforms capabilities into system prompt
H --> M

%% Tools to plugins
M --> A
M --> CC
M --> O

%% Plugin to LLM connections
A --> OAI & AC
CC --> M1 & G
O --> DFor detailed documentation, visit our Wiki:
MCPHub is an open source project that relies on your support. If you like this project, please consider supporting to help maintain and improve the project by Sponsoring or ☕ Buying A Coffee
Thank you to the following amazing people:


Simple Command Interface
- Single command
:MCPHubto access all functionality
Integrated Hub View
- Dynamically enable/disable servers and tools to optimize token usage
- Start/stop servers with persistent state
- Enable/disable specific tools per server
- Configure custom instructions per server
- State persists across restarts
Native MCP Server Support
- Create Lua-based MCP servers directly in Neovim (detailed guide)
- Automatically create lua native MCP servers using LLMs with built-in templates
- Write once, use everywhere design
- Clean chained API for tools, resources, and prompts
- Full URI-based resource system with templates
- Chat-style prompts with role management
- Centralized lifecycle management
Built-in MCP Servers
- Neovim Server: Pre-configured with essential development tools
- File operations (read, write, search, replace)
- Command execution and terminal integration
- LSP integration with diagnostics
- Buffer and environment access
- Interactive chat prompts
- Can be disabled if not needed
Chat Plugin Integration
- Deep integration with popular Neovim chat plugins:
- Avante.nvim: Full MCP tool support with auto-approval option
- CodeCompanion.nvim: MCP resources as chat variables and slash commands for prompts
- Real-time variable updates when servers change
- Automatic resource syncing and prompt registration
- Example: MCP resources as chat variables, prompts as slash_commands
Marketplace Integration
- Browse available MCP servers with details and stats
- Sort, filter by category, and search servers
- View server documentation and installation guides
- One-click installation via Avante/CodeCompanion
Interactive Testing
- Real-time tool testing interface
- Resource browsing and access
- Built-in documentation and help
Performance and Reliability
- Parallel startup for improved performance
- Automatic server lifecycle management
- Smart shutdown handling with configurable delay
Developer-friendly
- Both sync and async operations supported
- Clean client registration/cleanup
- Comprehensive API for tool and resource access
Using lazy.nvim:
{
    "ravitemer/mcphub.nvim",
    dependencies = {
      "nvim-lua/plenary.nvim",  -- Required for Job and HTTP requests
    },
    -- comment the following line to ensure hub will be ready at the earliest
    cmd = "MCPHub",  -- lazy load by default
    build = "npm install -g mcp-hub@latest",  -- Installs required mcp-hub npm module
    -- uncomment this if you don't want mcp-hub to be available globally or can't use -g
    -- build = "bundled_build.lua",  -- Use this and set use_bundled_binary = true in opts  (see Advanced configuration)
    config = function()
      require("mcphub").setup()
    end,
}Default Config
All options are optional with sensible defaults. Here's a complete example with all available options:
require("mcphub").setup({
    port = 37373,  -- Default port for MCP Hub
    config = vim.fn.expand("~/.config/mcphub/servers.json"),  -- Absolute path to config file location (will create if not exists)
    native_servers = {}, -- add your native servers here

    auto_approve = false, -- Auto approve mcp tool calls
    -- Extensions configuration
	extensions = {
		avante = {
		},
		codecompanion = {
			-- Show the mcp tool result in the chat buffer
			-- NOTE:if the result is markdown with headers, content after the headers wont be sent by codecompanion
			show_result_in_chat = false,
			make_vars = true, -- make chat #variables from MCP server resources
            make_slash_commands = true, -- make /slash commands from MCP server prompts
		},
	},

    -- Default window settings
    ui = {
      window = {
        width = 0.8, -- 0-1 (ratio); "50%" (percentage); 50 (raw number)
        height = 0.8, -- 0-1 (ratio); "50%" (percentage); 50 (raw number)
        relative = "editor",
        zindex = 50,
        border = "rounded", -- "none", "single", "double", "rounded", "solid", "shadow"
      },
    },

    -- Event callbacks
    on_ready = function(hub)
      -- Called when hub is ready
    end,
    on_error = function(err)
      -- Called on errors
    end,

    --set this to true when using build = "bundled_build.lua"
    use_bundled_binary = false,  -- Uses bundled mcp-hub instead of global installation

    --WARN: Use the custom setup if you can't use `npm install -g mcp-hub` or cant have `build = "bundled_build.lua"`
    -- Custom Server command configuration
    --cmd = "node", -- The command to invoke the MCP Hub Server
    --cmdArgs = {"/path/to/node_modules/mcp-hub/dist/cli.js"},    -- Additional arguments for the command

    -- Common command configurations (when not using bundled binary):
    -- 1. Global installation (default):
    --   cmd = "mcp-hub"
    --   cmdArgs = {}
    -- 2. Local npm package:
    --   cmd = "node"
    --   cmdArgs = {"/path/to/node_modules/mcp-hub/dist/cli.js"}
    -- 3. Custom binary:
    --   cmd = "/usr/local/bin/custom-mcp-hub"
    --   cmdArgs = {"--custom-flag"}

    -- Logging configuration
    log = {
      level = vim.log.levels.WARN,
      to_file = false,
      file_path = nil,
      prefix = "MCPHub"
    }
})
~/.config/mcphub/servers.json
MCPHub uses a JSON configuration file to define MCP servers. The default location is ~/.config/mcphub/servers.json.
{
  "mcpServers": {
    "fetch": {
      "command": "uvx",
      "args": ["mcp-server-fetch"],
      "env": {
        "API_KEY": "",                 // Falls back to process.env.API_KEY
        "SERVER_URL": null,            // Falls back to process.env.SERVER_URL
        "DEBUG": "true"               // Direct value, no fallback
      }
    }
  }
}-
command: The command to run the server -
args: Command arguments as array -
disabled: Optional boolean to disable server -
disabled_tools: Optional array of tool names to disable -
env: Optional environment variables. Special values:-
""(empty string): Falls back to process.env.[VAR_NAME] -
null: Falls back to process.env.[VAR_NAME] - Any other value is used as-is
-
-
custom_instructions: Optional custom instructions for the server
Using empty string ("") or null in the env field provides several benefits:
- Keep sensitive values like API keys out of version control
- Use environment variables for deployment-specific settings
- Override environment variables when needed
- Share server configurations safely with placeholder values
Open the MCPHub UI to manage servers, test tools and monitor status:
:MCPHubUse hub instance api in your code
local hub = mcphub.get_hub_instance()

-- Call a tool (sync)
  local response, err = hub:call_tool("server-name", "tool-name", {
      param1 = "value1"
      }, {
      return_text = true -- Parse response to LLM-suitable text
      })

-- Call a tool (async)
  hub:call_tool("server-name", "tool-name", {
      param1 = "value1"
      }, {
      return_text = true,
      callback = function(response, err)
      -- Use response
      end
      })

-- Access resource (sync)
  local response, err = hub:access_resource("server-name", "resource://uri", {
      return_text = true
      })

-- Get prompt helpers for system prompts
local prompts = hub:generate_prompts()
-- prompts.active_servers: Lists currently active servers
-- prompts.use_mcp_tool: Instructions for tool usage with example
-- prompts.access_mcp_resource: Instructions for resource access with exampleMCPHub.nvim provides extensions that integrate with popular Neovim chat plugins. These extensions allow you to use MCP tools and resources directly within your chat interfaces.
Add MCP capabilities to Avante by including the MCP tool in your setup:
Set
config.auto_approve = trueorvim.g.mcphub_auto_approve = trueto automatically approve mcp tool requests.
extensions = {
    avante = {
    }
}require("avante").setup({
-- other config
-- The system_prompt type supports both a string and a function that returns a string. Using a function here allows dynamically updating the prompt with mcphub
system_prompt = function()
local hub = require("mcphub").get_hub_instance()
return hub:get_active_servers_prompt()
end,
-- The custom_tools type supports both a list and a function that returns a list. Using a function here prevents requiring mcphub before it's loaded
custom_tools = function()
return {
require("mcphub.extensions.avante").mcp_tool(),
}
end,
})If you are using the builtin Neovim server, you might have to disable the following tools in your avante config to avoid any conflicts.
disabled_tools = {
    "list_files",
    "search_files",
    "read_file",
    "create_file",
    "rename_file",
    "delete_file",
    "create_dir",
    "rename_dir",
    "delete_dir",
    "bash",
},Add MCP capabilities to CodeCompanion.
Set
config.auto_approve = trueorvim.g.mcphub_auto_approve = trueto automatically approve tool requests.
Set
make_vars = trueto show resources as #variables in the chat buffer
Set
make_slash_commands = trueto show prompts as /slash_commands in the chat buffer
- Server prompts become available as
/mcp:prompt_namecommands in chat - Prompts with arguments are handled using vim.ui.input
- If the last message is of
userrole, it will be added to the chat buffer. - You can create your own prompt just like other capabilities with
mcphub.add_promptor by adding a native server toconfig.native_server.
-
Whenever the servers are updated, the variables and slash_commands will also be updated in realtime
-
E.g LSP current file diagnostics
Set
show_result_in_chat = trueto view the mcp tool call result in the chat buffer. Note that, If the tool call return markdown with headers, the content after the headers wont be sent
extensions = {
    codecompanion = {
        -- Show the mcp tool result in the chat buffer
        -- NOTE:if the result is markdown with headers, content after the headers wont be sent by codecompanion
        show_result_in_chat = true,
        make_vars = true, -- make chat #variables from MCP server resources
        make_slash_commands = true, -- make /slash_commands from MCP server prompts
    },
}require("codecompanion").setup({
strategies = {
chat = {
tools = {
["mcp"] = {
-- calling it in a function would prevent mcphub from being loaded before it's needed
callback = function() return require("mcphub.extensions.codecompanion") end,
description = "Call tools and resources from the MCP Servers",
}
}
}
}
})
require('lualine').setup {
    sections = {
        lualine_x = {
            {require('mcphub.extensions.lualine')},
        },
    },
}
When connecting show warning state.
When idle shows total number of connected servers.
When a tool or resources is being called, shows spinner.
🎉Lua Native MCP Servers (detailed guide)
🎉Lua Native MCP Servers (detailed guide)
Many Neovim chat plugins like Avante and CodeCompanion already provide ways to add custom tools:
-- Avante's custom tools
require("avante").setup({
    custom_tools = {
        get_weather = {
            name,
            description,
            param,
            returns,
            func
        }
    }
})
-- CodeCompanion's tools
require("codecompanion").setup({
    chat = {
        tools = {
            get_weather = {
                 name,
                 description,
                 cmds,
                 schema,
                 output,
            }
        }
    }
})
This leads to several limitations:
| Feature | Regular tools | MCPHub Native Servers |
|---|---|---|
| Implementation | Needs reimplementing for each plugin | Write once, works everywhere |
| Api | Needs plugin specific docs | Intuitive chained api res:text():image():send()
|
| Instructions | Can't have long schema.description
|
Tools,Resources converted to system prompt, instructions in one place |
| Resources Support | No built-in resource handling | Full URI-based resource system |
| Response Types | No standard types | MCP standard types (text, images, blobs) |
| State Management | Per-plugin implementation | Centralized lifecycle management |
| Plugin Updates | May break tool implementations | Tools isolated from plugin changes |
MCPHub solves these problems by providing a standardized protocol (MCP) and a central hub for tools and resources:
MCPHub Native MCP Server
Option 1 (Static): add server schema table upfront in config.native_servers
-- Complete server definition with tool, resource, and template
native_servers = {
 weather = {
    name = "weather",
    capabilities = {
        tools = {
            {
                name = "get_weather",
                description = "Get current weather information for a city",
                inputSchema = {
                    type = "object",
                    properties = {
                        city = {
                            type = "string",
                            description = "City name to get weather for",
                        }
                    },
                },
                handler = function(req, res)
                    res:text("Weather in " .. req.params.city .. ": ☀️ Sunny, 22°C"):send()
                end
            }
        },
        resources = {
            {
                name = "current",
                uri = "weather://current/london",
                description = "Get current weather data for London",
                handler = function(req, res)
                    res:text("London: ☀️ Sunny, 22°C, Humidity: 65%"):send()
                end
            }
        },
        resourceTemplates = {
            {
                name = "city_weather",
                uriTemplate = "weather://forecast/{city}",
                description = "Get weather forecast for any city",
                handler = function(req, res)
                    res:text(req.params.city .. " 5-day forecast:\n" ..
                           "Mon: ☀️ 22°C\n" ..
                           "Tue: ⛅ 20°C\n" ..
                           "Wed: 🌧️ 18°C"):send()
                end
            }
        },
        prompts = {
            name = "weather_chat",
            description = "Chat about weather in any city",
            arguments = {
                {
                    name = "city",
                    description = "City to check weather for"
                }
            },
            handler = function(req, res)
                return res
                :user()
                :text(string.format("What's the weather like in %s?", req.params.city))
                :llm()
                :text(string.format("Let me check the weather in %s for you...", req.params.city)):text(string.format("The weather in %s is ☀️ 22°C. Perfect day for outdoor activities!", req.params.city))

                res:send()
            end
}
    }
  }
}
Option 2 (Dynamic) : Usemcphub.add_* api to build incrementally
local mcphub = require("mcphub")

-- Start by adding a tool. It iwll create the server if it is not already present.
mcphub.add_tool("weather", {
  --tool def
})

-- Add a static resource for London weather
mcphub.add_resource("weather", {
  --resource def
})

-- Add a template for any city
mcphub.add_resource_template("weather", {
  --resource template def
})

-- Add a prompt
mcphub.add_prompt({
    --prompt def
})
Preview:
Please read Native README.md (beta) for more information.
MCPHub acts as a central hub that:
- Collects Tools, Resources, Prompts: Gathers capabilities from both native and community servers
-
Standardizes Access: Provides a single interface via
@mcptool - Manages State: Handles server lifecycles and capability registration
- Formats Prompts: Transforms complex tool definitions into LLM-friendly formats
-
Write Once, Use Everywhere
- Implement tools once as native servers
- Works with any chat plugin that supports MCPHub
- Chat plugins focus on their unique features
-
No Limitations
All tools, resources, and templates from the server above are converted into a clean, LLM-friendly system prompt:
## weather

### Available Tools
- get_weather: Get current weather information for a city
    Input Schema:
    {
        type: "object",
        properties: {
            city: {
                type: "string",
                description: "City name to get weather for",
                examples: ["London", "Tokyo"]
            }
        }
    }

### Available Resources
- weather://current/london: Get current weather data for London

### Resource Templates
- weather://forecast/{city}: Get weather forecast for any city-
Rich Resource Capabilities
- Static resources with URIs (like weather://current/london)
- Dynamic resource templates (like weather://forecast/{city})
- Resource embedding in tool responses
- Consistent URI patterns across servers
-
Separation of Concerns
- Tool providers focus on implementations
- Chat plugins focus on LLM integration
- MCPHub handles communication and standardization
-
Easy Integration
- Chat plugins need only implement MCPHub support
- Get access to all MCP servers automatically
- Standardized tool and resource interfaces
-
Community Ecosystem
- Share implementations across plugins
- Reduce duplication of effort
- Common platform for tool development
-
Environment Requirements
- Ensure these are installed as they're required by most MCP servers:
node --version    # Should be >= 18.0.0
python --version  # Should be installed
uvx --version    # Should be installed
- Most server commands use
npxoruvx- verify these work in your terminal
- Ensure these are installed as they're required by most MCP servers:
-
LLM Model Issues
If the LLM isn't making correct tool calls:
- Schema Support
- Models with function calling support (like claude-3.5) work best with Avante's schema format
- Only top-tier models handle XML-based tool formats correctly
- Consider upgrading to a better model if seeing incorrect tool usage
- Common Tool Call Issues
- Missing
actionfield - Incorrect
server_name - Missing
tool_nameoruri - Malformed arguments
- Recommended Models
- GPT-4o
- Claude 3.5 Sonnet
- Claude 3.7
- Gemini 2.0 Flash
- Gemini 2.0 Pro
- Mistral Large
-
Port Issues
- If you get
EADDRINUSEerror, kill the existing process:lsof -i :[port] # Find process ID kill [pid] # Kill the process
- If you get
-
Configuration File
- Ensure config path is absolute
- Verify file contains valid JSON with
mcpServerskey - Check server-specific configuration requirements
- Validate server command and args are correct for your system
-
MCP Server Issues
- Validate server configurations using either:
- MCP Inspector: GUI tool for verifying server operation
- mcp-cli: Command-line tool for testing servers with config files
- Check server logs in MCPHub UI (Logs view)
- Test tools and resources individually to isolate issues
- Validate server configurations using either:
-
Need Help?
- First try testing it with minimal.lua
- Feel free to open an Issue for bugs or doubts
- Create a Discussion for questions, showcase, or feature requests
Note: You can also access the Express server directly at http://localhost:[port]/api
MCPHub.nvim uses an Express server to manage MCP servers and handle client requests:
-
When
setup()is called:- Checks for mcp-hub command installation
- Verifies version compatibility
- Starts mcp-hub with provided port and config file
- Creates Express server at localhost:[port]
-
After successful setup:
- Calls on_ready callback with hub instance
- Hub instance provides REST API interface
- UI updates in real-time via
:MCPHubcommand
-
Express Server Features:
- Manages MCP server configurations
- Handles tool execution requests
- Provides resource access
- Multi-client support
- Automatic cleanup
-
When Neovim instances close:
- Unregister as clients
- Last client triggers shutdown timer
- Timer cancels if new client connects
This architecture ensures:
- Consistent server management
- Real-time status monitoring
- Efficient resource usage
- Clean process handling
- Multiple client support
sequenceDiagram
    participant N1 as First Neovim
    participant N2 as Other Neovims
    participant S as MCP Hub Server

    Note over N1,S: First Client Connection
    N1->>S: Check if Running
    activate S
    S-->>N1: Not Running
    N1->>S: start_hub()
    Note over S: Server Start
    S-->>N1: Ready Signal
    N1->>S: Register Client
    S-->>N1: Registration OK

    Note over N2,S: Other Clients
    N2->>S: Check if Running
    S-->>N2: Running
    N2->>S: Register Client
    S-->>N2: Registration OK

    Note over N1,S: Server stays active

    Note over N2,S: Client Disconnection
    N2->>S: Unregister Client
    S-->>N2: OK
    Note over S: Keep Running

    Note over N1,S: Last Client Exit
    N1->>S: Unregister Client
    S-->>N1: OK
    Note over S: Grace Period
    Note over S: Auto Shutdown
deactivate SsequenceDiagram
participant N as Neovim
participant P as Plugin
participant S as MCP Hub Server
N->>P: start_hub()
P->>S: Health Check
alt Server Not Running
P->>S: Start Server
S-->>P: Ready Signal
end
P->>S: Register Client
S-->>P: Registration OK
N->>P: :MCPHub
P->>S: Get Status
S-->>P: Server Status
P->>N: Display UIflowchart LR
A[VimLeavePre] -->|Trigger| B[Stop Hub]
B -->|If Ready| C[Unregister Client]
C -->|Last Client| D[Server Auto-shutdown]
C -->|Other Clients| E[Server Continues]
B --> F[Clear State]
F --> G[Ready = false]
F --> H[Owner = false]sequenceDiagram
participant C as Chat Plugin
participant H as Hub Instance
participant S as MCP Server
C->>H: call_tool()
H->>H: Check Ready
alt Not Ready
H-->>C: Error: Not Ready
end
H->>S: POST /tools
S-->>H: Tool Result
H-->>C: Return Result
Note over C,S: Similar flow for resources
C->>H: access_resource()
H->>H: Check Ready
H->>S: POST /resources
S-->>H: Resource Data
H-->>C: Return Data- Neovim >= 0.8.0
- Node.js >= 18.0.0
- plenary.nvim
- mcp-hub (automatically installed via build command)
- [x] Neovim MCP Server (kind of) with better editing, diffs, terminal integration etc (Ideas are welcome)
- [x] Enhanced help view with comprehensive documentation
- [x] MCP Resources as variables in chat plugins
- [x] MCP Prompts as slash commands in chat plugins
- [ ] Support for #variables, /slash_commands in avante
- [ ] Support SSE transport
Thanks to:
- cline/mcp-marketplace for providing the marketplace api
- nui.nvim for inspiring our text highlighting utilities
For detailed documentation, visit our Wiki:
For Tasks:
Click tags to check more tools for each tasksFor Jobs:
Alternative AI tools for mcphub.nvim
Similar Open Source Tools
mcphub.nvim
MCPHub.nvim is a powerful Neovim plugin that integrates MCP (Model Context Protocol) servers into your workflow. It offers a centralized config file for managing servers and tools, with an intuitive UI for testing resources. Ideal for LLM integration, it provides programmatic API access and interactive testing through the `:MCPHub` command.

hud-python
hud-python is a Python library for creating interactive heads-up displays (HUDs) in video games. It provides a simple and flexible way to overlay information on the screen, such as player health, score, and notifications. The library is designed to be easy to use and customizable, allowing game developers to enhance the user experience by adding dynamic elements to their games. With hud-python, developers can create engaging HUDs that improve gameplay and provide important feedback to players.
client-python
The Mistral Python Client is a tool inspired by cohere-python that allows users to interact with the Mistral AI API. It provides functionalities to access and utilize the AI capabilities offered by Mistral. Users can easily install the client using pip and manage dependencies using poetry. The client includes examples demonstrating how to use the API for various tasks, such as chat interactions. To get started, users need to obtain a Mistral API Key and set it as an environment variable. Overall, the Mistral Python Client simplifies the integration of Mistral AI services into Python applications.
repomix
Repomix is a powerful tool that packs your entire repository into a single, AI-friendly file. It is designed to format your codebase for easy understanding by AI tools like Large Language Models (LLMs), Claude, ChatGPT, and Gemini. Repomix offers features such as AI optimization, token counting, simplicity in usage, customization options, Git awareness, and security-focused checks using Secretlint. It allows users to pack their entire repository or specific directories/files using glob patterns, and even supports processing remote Git repositories. The tool generates output in plain text, XML, or Markdown formats, with options for including/excluding files, removing comments, and performing security checks. Repomix also provides a global configuration option, custom instructions for AI context, and a security check feature to detect sensitive information in files.
LightRAG
LightRAG is a repository hosting the code for LightRAG, a system that supports seamless integration of custom knowledge graphs, Oracle Database 23ai, Neo4J for storage, and multiple file types. It includes features like entity deletion, batch insert, incremental insert, and graph visualization. LightRAG provides an API server implementation for RESTful API access to RAG operations, allowing users to interact with it through HTTP requests. The repository also includes evaluation scripts, code for reproducing results, and a comprehensive code structure.

acte
Acte is a framework designed to build GUI-like tools for AI Agents. It aims to address the issues of cognitive load and freedom degrees when interacting with multiple APIs in complex scenarios. By providing a graphical user interface (GUI) for Agents, Acte helps reduce cognitive load and constraints interaction, similar to how humans interact with computers through GUIs. The tool offers APIs for starting new sessions, executing actions, and displaying screens, accessible via HTTP requests or the SessionManager class.
aioshelly
Aioshelly is an asynchronous library designed to control Shelly devices. It is currently under development and requires Python version 3.11 or higher, along with dependencies like bluetooth-data-tools, aiohttp, and orjson. The library provides examples for interacting with Gen1 devices using CoAP protocol and Gen2/Gen3 devices using RPC and WebSocket protocols. Users can easily connect to Shelly devices, retrieve status information, and perform various actions through the provided APIs. The repository also includes example scripts for quick testing and usage guidelines for contributors to maintain consistency with the Shelly API.
curator
Bespoke Curator is an open-source tool for data curation and structured data extraction. It provides a Python library for generating synthetic data at scale, with features like programmability, performance optimization, caching, and integration with HuggingFace Datasets. The tool includes a Curator Viewer for dataset visualization and offers a rich set of functionalities for creating and refining data generation strategies.

ai-sdk-cpp
The AI SDK CPP is a modern C++ toolkit that provides a unified, easy-to-use API for building AI-powered applications with popular model providers like OpenAI and Anthropic. It bridges the gap for C++ developers by offering a clean, expressive codebase with minimal dependencies. The toolkit supports text generation, streaming content, multi-turn conversations, error handling, tool calling, async tool execution, and configurable retries. Future updates will include additional providers, text embeddings, and image generation models. The project also includes a patched version of nlohmann/json for improved thread safety and consistent behavior in multi-threaded environments.

MHA2MLA
This repository contains the code for the paper 'Towards Economical Inference: Enabling DeepSeek's Multi-Head Latent Attention in Any Transformer-based LLMs'. It provides tools for fine-tuning and evaluating Llama models, converting models between different frameworks, processing datasets, and performing specific model training tasks like Partial-RoPE Fine-Tuning and Multiple-Head Latent Attention Fine-Tuning. The repository also includes commands for model evaluation using Lighteval and LongBench, along with necessary environment setup instructions.

Remote-MCP
Remote-MCP is a type-safe, bidirectional, and simple solution for remote MCP communication, enabling remote access and centralized management of model contexts. It provides a bridge for immediate remote access to a remote MCP server from a local MCP client, without waiting for future official implementations. The repository contains client and server libraries for creating and connecting to remotely accessible MCP services. The core features include basic type-safe client/server communication, MCP command/tool/prompt support, custom headers, and ongoing work on crash-safe handling and event subscription system.

clarifai-python
The Clarifai Python SDK offers a comprehensive set of tools to integrate Clarifai's AI platform to leverage computer vision capabilities like classification , detection ,segementation and natural language capabilities like classification , summarisation , generation , Q&A ,etc into your applications. With just a few lines of code, you can leverage cutting-edge artificial intelligence to unlock valuable insights from visual and textual content.

CrackSQL
CrackSQL is a powerful SQL dialect translation tool that integrates rule-based strategies with large language models (LLMs) for high accuracy. It enables seamless conversion between dialects (e.g., PostgreSQL → MySQL) with flexible access through Python API, command line, and web interface. The tool supports extensive dialect compatibility, precision & advanced processing, and versatile access & integration. It offers three modes for dialect translation and demonstrates high translation accuracy over collected benchmarks. Users can deploy CrackSQL using PyPI package installation or source code installation methods. The tool can be extended to support additional syntax, new dialects, and improve translation efficiency. The project is actively maintained and welcomes contributions from the community.
pocketgroq
PocketGroq is a tool that provides advanced functionalities for text generation, web scraping, web search, and AI response evaluation. It includes features like an Autonomous Agent for answering questions, web crawling and scraping capabilities, enhanced web search functionality, and flexible integration with Ollama server. Users can customize the agent's behavior, evaluate responses using AI, and utilize various methods for text generation, conversation management, and Chain of Thought reasoning. The tool offers comprehensive methods for different tasks, such as initializing RAG, error handling, and tool management. PocketGroq is designed to enhance development processes and enable the creation of AI-powered applications with ease.

UnrealGenAISupport
The Unreal Engine Generative AI Support Plugin is a tool designed to integrate various cutting-edge LLM/GenAI models into Unreal Engine for game development. It aims to simplify the process of using AI models for game development tasks, such as controlling scene objects, generating blueprints, running Python scripts, and more. The plugin currently supports models from organizations like OpenAI, Anthropic, XAI, Google Gemini, Meta AI, Deepseek, and Baidu. It provides features like API support, model control, generative AI capabilities, UI generation, project file management, and more. The plugin is still under development but offers a promising solution for integrating AI models into game development workflows.
client-ts
Mistral Typescript Client is an SDK for Mistral AI API, providing Chat Completion and Embeddings APIs. It allows users to create chat completions, upload files, create agent completions, create embedding requests, and more. The SDK supports various JavaScript runtimes and provides detailed documentation on installation, requirements, API key setup, example usage, error handling, server selection, custom HTTP client, authentication, providers support, standalone functions, debugging, and contributions.
For similar tasks
mcphub.nvim
MCPHub.nvim is a powerful Neovim plugin that integrates MCP (Model Context Protocol) servers into your workflow. It offers a centralized config file for managing servers and tools, with an intuitive UI for testing resources. Ideal for LLM integration, it provides programmatic API access and interactive testing through the `:MCPHub` command.

mcp-hub
MCP Hub is a centralized manager for Model Context Protocol (MCP) servers, offering dynamic server management and monitoring, REST API for tool execution and resource access, MCP Server marketplace integration, real-time server status tracking, client connection management, and process lifecycle handling. It acts as a central management server connecting to and managing multiple MCP servers, providing unified API endpoints for client access, handling server lifecycle and health monitoring, and routing requests between clients and MCP servers.
LLM-Tool-Survey
This repository contains a collection of papers related to tool learning with large language models (LLMs). The papers are organized according to the survey paper 'Tool Learning with Large Language Models: A Survey'. The survey focuses on the benefits and implementation of tool learning with LLMs, covering aspects such as task planning, tool selection, tool calling, response generation, benchmarks, evaluation, challenges, and future directions in the field. It aims to provide a comprehensive understanding of tool learning with LLMs and inspire further exploration in this emerging area.
tool-ahead-of-time
Tool-Ahead-of-Time (TAoT) is a Python package that enables tool calling for any model available through Langchain's ChatOpenAI library, even before official support is provided. It reformats model output into a JSON parser for tool calling. The package supports OpenAI and non-OpenAI models, following LangChain's syntax for tool calling. Users can start using the tool without waiting for official support, providing a more robust solution for tool calling.

go-utcp
The Universal Tool Calling Protocol (UTCP) is a modern, flexible, and scalable standard for defining and interacting with tools across various communication protocols. It emphasizes scalability, interoperability, and ease of use. It provides built-in transports for HTTP, CLI, Server-Sent Events, streaming HTTP, GraphQL, MCP, and UDP. Users can use the library to construct a client and call tools using the available transports. The library also includes utilities for variable substitution, in-memory repository for storing providers and tools, and OpenAPI conversion to UTCP manuals.

utcp-specification
The Universal Tool Calling Protocol (UTCP) Specification repository contains the official documentation for a modern and scalable standard that enables AI systems and clients to discover and interact with tools across different communication protocols. It defines tool discovery mechanisms, call formats, provider configuration, authentication methods, and response handling.

ailoy
Ailoy is a lightweight library for building AI applications such as agent systems or RAG pipelines with ease. It enables AI features effortlessly, supporting AI models locally or via cloud APIs, multi-turn conversation, system message customization, reasoning-based workflows, tool calling capabilities, and built-in vector store support. It also supports running native-equivalent functionality in web browsers using WASM. The library is in early development stages and provides examples in the `examples` directory for inspiration on building applications with Agents.

LocalLLMClient
LocalLLMClient is a Swift package designed to interact with local Large Language Models (LLMs) on Apple platforms. It supports GGUF, MLX models, and the FoundationModels framework, providing streaming API, multimodal capabilities, and tool calling functionalities. Users can easily integrate this tool to work with various models for text generation and processing. The package also includes advanced features for low-level API control and multimodal image processing. LocalLLMClient is experimental and subject to API changes, offering support for iOS, macOS, and Linux platforms.
For similar jobs
weave
Weave is a toolkit for developing Generative AI applications, built by Weights & Biases. With Weave, you can log and debug language model inputs, outputs, and traces; build rigorous, apples-to-apples evaluations for language model use cases; and organize all the information generated across the LLM workflow, from experimentation to evaluations to production. Weave aims to bring rigor, best-practices, and composability to the inherently experimental process of developing Generative AI software, without introducing cognitive overhead.

agentcloud
AgentCloud is an open-source platform that enables companies to build and deploy private LLM chat apps, empowering teams to securely interact with their data. It comprises three main components: Agent Backend, Webapp, and Vector Proxy. To run this project locally, clone the repository, install Docker, and start the services. The project is licensed under the GNU Affero General Public License, version 3 only. Contributions and feedback are welcome from the community.
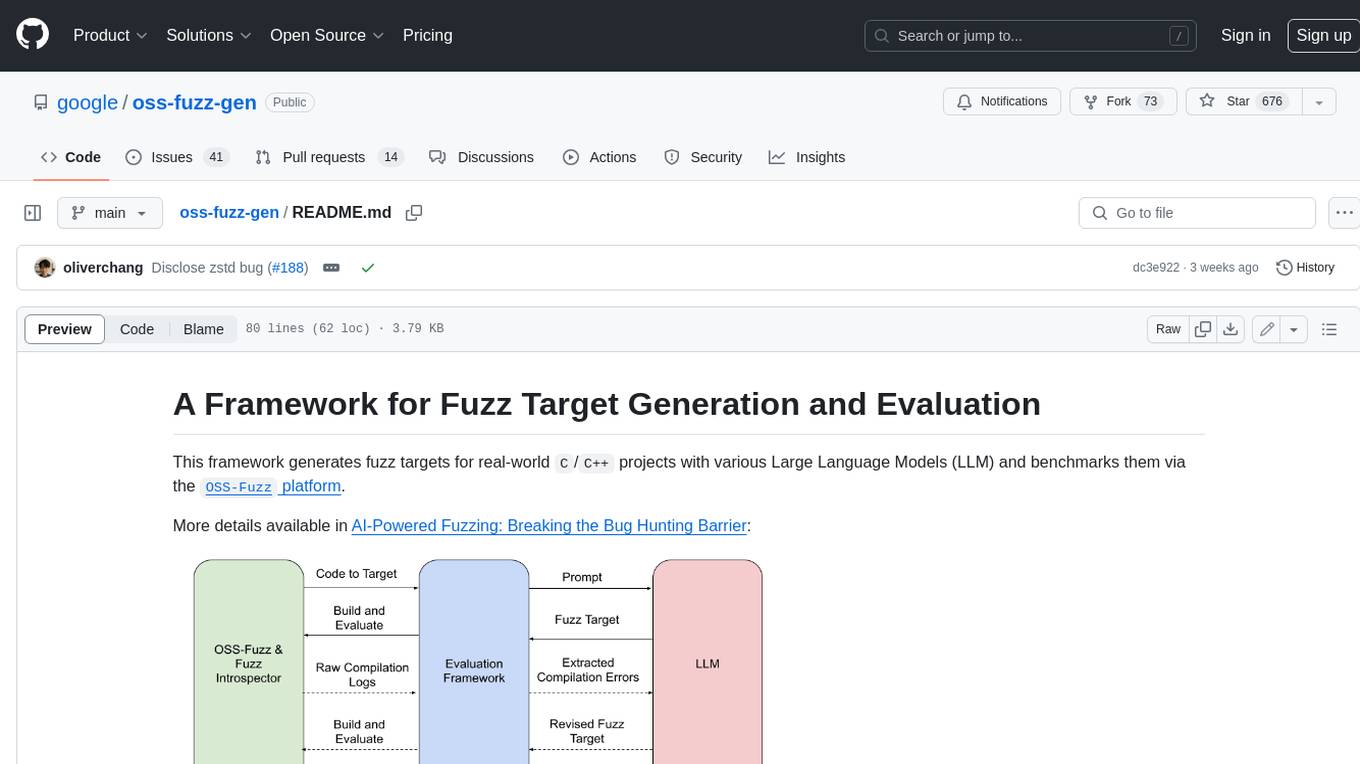
oss-fuzz-gen
This framework generates fuzz targets for real-world `C`/`C++` projects with various Large Language Models (LLM) and benchmarks them via the `OSS-Fuzz` platform. It manages to successfully leverage LLMs to generate valid fuzz targets (which generate non-zero coverage increase) for 160 C/C++ projects. The maximum line coverage increase is 29% from the existing human-written targets.
LLMStack
LLMStack is a no-code platform for building generative AI agents, workflows, and chatbots. It allows users to connect their own data, internal tools, and GPT-powered models without any coding experience. LLMStack can be deployed to the cloud or on-premise and can be accessed via HTTP API or triggered from Slack or Discord.
VisionCraft
The VisionCraft API is a free API for using over 100 different AI models. From images to sound.
kaito
Kaito is an operator that automates the AI/ML inference model deployment in a Kubernetes cluster. It manages large model files using container images, avoids tuning deployment parameters to fit GPU hardware by providing preset configurations, auto-provisions GPU nodes based on model requirements, and hosts large model images in the public Microsoft Container Registry (MCR) if the license allows. Using Kaito, the workflow of onboarding large AI inference models in Kubernetes is largely simplified.
PyRIT
PyRIT is an open access automation framework designed to empower security professionals and ML engineers to red team foundation models and their applications. It automates AI Red Teaming tasks to allow operators to focus on more complicated and time-consuming tasks and can also identify security harms such as misuse (e.g., malware generation, jailbreaking), and privacy harms (e.g., identity theft). The goal is to allow researchers to have a baseline of how well their model and entire inference pipeline is doing against different harm categories and to be able to compare that baseline to future iterations of their model. This allows them to have empirical data on how well their model is doing today, and detect any degradation of performance based on future improvements.
Azure-Analytics-and-AI-Engagement
The Azure-Analytics-and-AI-Engagement repository provides packaged Industry Scenario DREAM Demos with ARM templates (Containing a demo web application, Power BI reports, Synapse resources, AML Notebooks etc.) that can be deployed in a customer’s subscription using the CAPE tool within a matter of few hours. Partners can also deploy DREAM Demos in their own subscriptions using DPoC.